Deep dive: Timesheets: Difference between revisions
No edit summary |
|||
| Line 92: | Line 92: | ||
=== View timesheet entries in the calendar === | === View timesheet entries in the calendar === | ||
Goal: Add timesheet entries to calendar. Make sure that entries use different color depending on the status. | |||
Solution: | |||
# Edit the app project in Woodford and select the '''Timesheet Entry''' entity from the '''Project''' menu. | |||
# Click '''Show UI''' to display the list of views, forms, and charts for this entity. | |||
# Create a new public view for calendar. When editing the view, make sure that the [[View#Date_fields|date fields]] for start time and end time are correctly defined. | |||
# Then, select '''Calendar''' from the '''Project''' menu. | |||
# Create or edit a calendar. | |||
# On the '''Views''' tab, click '''Add Entity''' and select Timesheet Entry. | |||
# On the '''Rules''' tab, select the Timesheet Entry entity and click '''Edit Rule''':<br>[[File:Timesheet entry calendar rule.png|600px]] | |||
Demo: | |||
TBD_EMBED_VIDEO | |||
=== Timesheet submit confirmation === | === Timesheet submit confirmation === | ||
=== Aggregate values === | === Aggregate values === | ||
Revision as of 10:26, 14 December 2022
| Warning | Work in progress! We are in the process of updating the information on this page. Subject to change. |
Timesheets are a method for tracking the amount of a worker's time spent on each job. The default Resco projects don't include timesheets out-of-the-box. This article describes a simple way of adding timesheets to your organization. It assumes a good working knowledge of Resco and Dynamics ecosystem as well as a certain level of autonomy in designing mobile projects. The main focus is to describe several user experience improvements in more detail, beyond the rudimentary forms and views.
About this solution
- Technology used
- Resco mobile app
- Woodford
- Microsoft Dynamics 365/Dataverse
- Power App
- Power Automate
- Custom tables (entities) used
- Timesheet
- Back-office manager creates a new timesheet ("Open").
- Mobile worker submits the completed timesheet in the app ("Submitted").
- Back-office manager reviews and approves it ("Approved").
- Timesheet Entry
- Each timesheet consists of multiple timesheet entries. Entries are created by the mobile worker ("Open") and approved by the manager ("Approved").
- Project
- Each timesheet is assigned to a specific project. Projects can be active or inactive.
- Project Category
- Each project is assigned to a specific project category. Categories can be active or inactive.
- Standard (system) tables used
- User (employee)
- Account (customer)
MVP
Describing how to build the minimum viable product is out of the scope of this article.
- About the backend part built on Dynamics. TBD.
- About the mobile part built in Woodford, this requires basic knowledge of Woodford:
- Enable the custom entities in Woodford.
- Create forms and views for the new entities.
- If you want to learn how to create forms and views, check Resco Academy, for example the Woodford Basics course.
UX improvements
In this section, we describe several optional additions that improve the user experience of mobile users.
Color code timesheet entries
Goal: Visually distinguish between timesheet entries depending on their status
Solution:
- Edit the app project in Woodford and select the Timesheet Entry entity from the Project menu.
- Click Show UI to display the list of views, forms, and charts for this entity.
- Edit the view "All entries".
- Clone the default row two times to create three rows:
- One for open
- One for closed
- One for canceled
- Use the Row selector on the Properties pane to switch between rows. Use an appropriately colored image for each row.
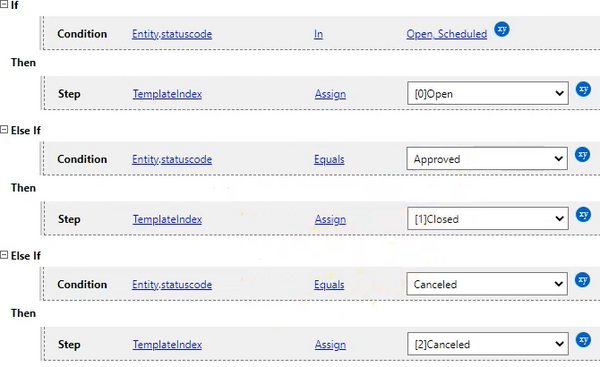
- Click Row Script and enter a simple rule that selects the right row depending on the status reason of the record.

Demo:
TBD_EMBED_VIDEO
All day button
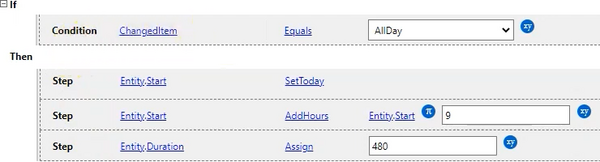
Goal: Create the "All day" button on the timesheet entry form.
Solution:
- Edit the app project in Woodford and select the Timesheet Entry entity from the Project menu.
- Click Show UI to display the list of views, forms, and charts for this entity.
- Edit the form.
- Click Add Button to the button to the form.
- On the Properties pane, as Click Text, enter "All day".
- Click Button Click and add the following rule:

Demo:
TBD_EMBED_VIDEO
Clone timesheet entries
Goal: Add Clone button to Timesheet Entries view.
Solution:
- Edit the app project in Woodford and select the Timesheet Entry entity from the Project menu.
- Click Show UI to display the list of views, forms, and charts for this entity.
- Edit the view "All entries".
- Click Buttons, then click New Command to create a new custom command.
- Enter Name (internal button name) and Label (what is displayed in the app), then save and close the Row Buttons screen.
- Click Button Click and enter the following rule:
TBD
Demo:
TBD_EMBED_VIDEO
View timesheet entries in the calendar
Goal: Add timesheet entries to calendar. Make sure that entries use different color depending on the status.
Solution:
- Edit the app project in Woodford and select the Timesheet Entry entity from the Project menu.
- Click Show UI to display the list of views, forms, and charts for this entity.
- Create a new public view for calendar. When editing the view, make sure that the date fields for start time and end time are correctly defined.
- Then, select Calendar from the Project menu.
- Create or edit a calendar.
- On the Views tab, click Add Entity and select Timesheet Entry.
- On the Rules tab, select the Timesheet Entry entity and click Edit Rule:


Demo:
TBD_EMBED_VIDEO