Connect Resco Cloud with Okta: Difference between revisions
No edit summary |
|||
| Line 1: | Line 1: | ||
{{ | {{Beta}} | ||
[[Resco Cloud]] supports Okta authorization. | [[Resco Cloud]] supports Okta authorization. | ||
Revision as of 09:45, 11 May 2022
| Warning | This page describes a function that has not yet been publicly released, or has been released in beta / preview quality. Subject to change. |
Resco Cloud supports Okta authorization.
Prerequisites
- To set up Okta authorization, you need Resco Cloud version 15.1 or higher.
- To use Okta authorization, the app also must be updated to version 15.1 or higher.
Okta configuration
Log in to the Okta admin console as an administrator and set up app integrations for the web app and native apps, as well as an authorization server for Resco Cloud.
Web apps
- In the Admin Console, go to Applications > Applications.
- Click Create App Integration.
- As Sign-in method, select OIDC - OpenID Connect.
- As Application type, select Web Application.
- Click Next.
- Set up the new app integration:
- As App integration name, enter a name for your app integration, for example "resco cloud web app".
- As Grant type, select Refresh Token.
- As Sign-in redirect URIs, enter
https://<your_server_name>/Authenticate.aspx/ADFS. - As Sign-out redirect URIs, enter
https://<your_server_name>.
- Save all changes.
Native apps
- In the Admin Console, go to Applications > Applications.
- Click Create App Integration.
- As Sign-in method, select OIDC - OpenID Connect.
- As Application type, select Native Application.
- Click Next.
- Set up the new app integration:
- As App integration name, enter a name for your app integration, for example "resco cloud native apps".
- As Grant type, select Refresh Token.
- As Sign-in redirect URIs, enter
https://www.resco.net/oauth.html.
- Save all changes.
Authorization server
- In the Admin Console, go to Security > API.
- On the Authorization Servers tab, either modify the default authorization server or click Add Authorization Server to add a new one.
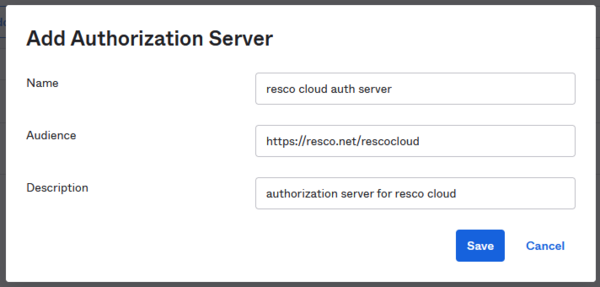
- As Name, enter a name for authorization server, for example "resco cloud auth server".
- As Audience, enter
https://resco.net/rescocloud.
- Go to the Claims tab and click Add Claim:
- As Name, enter
upn. - As Include in token type, select "ID Token" and "Always".
- As Value type, select "Expression".
- As Value, enter
user.email. - Click Create.
- As Name, enter
- Add another claim:
- As Name, enter
uid. - As Include in token type, select "ID Token" and "Always".
- As Value type, select "Expression".
- As Value, enter
user.id. - Click Create.
- As Name, enter


Connect Resco Cloud to Okta
- Sign in to the Resco Cloud management console using a System Administrator user account.
- Start the Resco Cloud Admin Console.
- Select Settings > Organization from the menu to edit the properties of your organization.
- In the Identity provider line, click Connect...
- Select OKTA.
- As Metadata URL, enter the URL of your Okta authorization server (e.g.,
https://{your domain}/oauth2/default). - The read-only Redirect URI is provided for your reference (you need it for Okta configuration).
- Enter the Client ID and Client Secret from Okta web app configuration.
- Enter the Native Client ID from Okta native apps configuration.
- Click Connect Now to validate the configuration and save it.