Business Central: Difference between revisions
No edit summary |
|||
| Line 18: | Line 18: | ||
# Click '''New''' and fill out the registration form.<br>[[File:Bc2.png|600px]] | # Click '''New''' and fill out the registration form.<br>[[File:Bc2.png|600px]] | ||
# As '''Client ID''', use <code>4abedb2f-19bc-402f-b0b5-b8d17e85aa04</code>. | # As '''Client ID''', use <code>4abedb2f-19bc-402f-b0b5-b8d17e85aa04</code>. | ||
# Add '''User Permission Sets'''. | # Add '''User Permission Sets''' (<code>SUPER</code>). | ||
# Grant the necesary consent.<br>[[File:Bc3.png|600px]] | # Grant the necesary consent.<br>[[File:Bc3.png|600px]] | ||
Revision as of 06:18, 13 October 2021
| Warning | Work in progress! We are in the process of updating the information on this page. Subject to change. |
Microsoft Dynamics 365 Business Central is an enterprise resource planning system from Microsoft. The product is part of the Microsoft Dynamics family.
Resco Cloud can connect to Business Central using one of the following methods:
- Via Power Automate + Resco Cloud connector: full-featured integration using a third-party Microsoft service
- Using Integrations (Preview): connect your Resco Cloud organization to Business Central directly from Woodford.

This article explains the second method in more detail.
Register Resco application in Business Central
Before you can start migrating data between Resco Cloud and Business Central, you must register the Resco application (clientId) in Business Central and grant Resco consent with accessing Business Central data.
- Log in to your Business Central organization and go to the Azure Active Directory Applications.
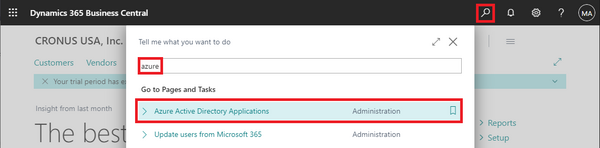
- Click New and fill out the registration form.
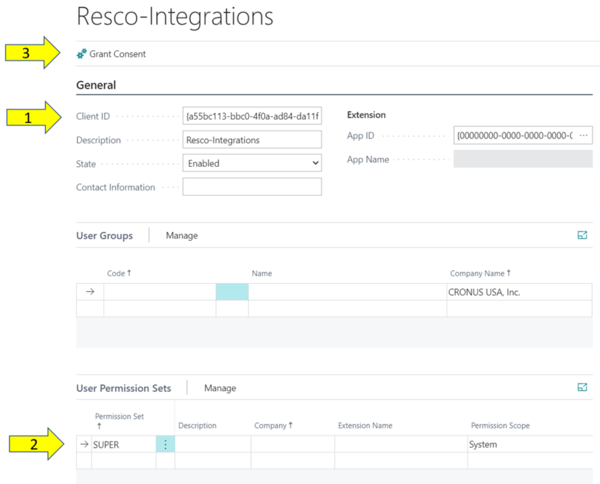
- As Client ID, use
4abedb2f-19bc-402f-b0b5-b8d17e85aa04. - Add User Permission Sets (
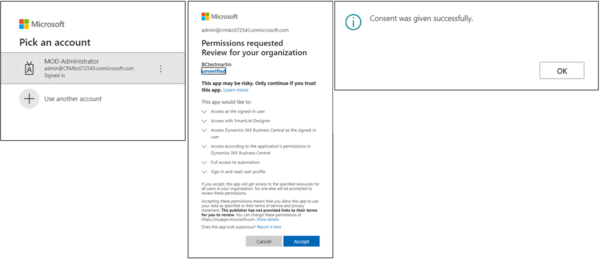
SUPER). - Grant the necesary consent.


Install Resco extension on Business Central
The extension is required for synchronizing between Resco Cloud and Business Central.
- Download the extension from Resco web.
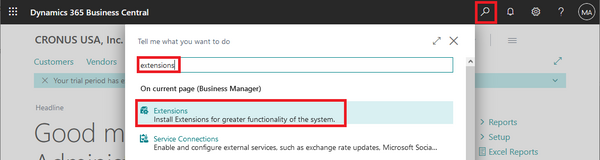
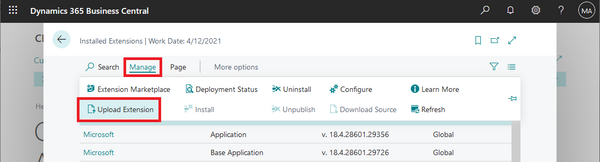
- Log in to Business Central and search for "extensions".
- On the Manage tab, click Upload Extension and upload the zip file.


Create integration
- Start Woodford and select Integrations from the Administrator menu.
- Click New and enter the following details:
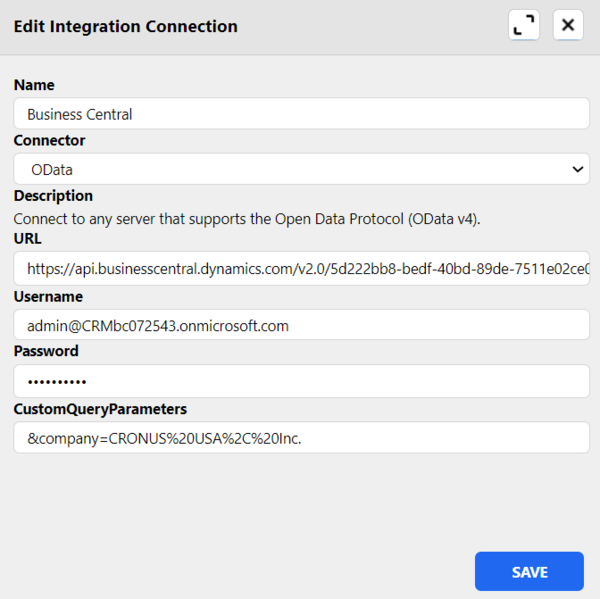
- Name - enter a name of your integration
- Connector - select OData
- URL - enter the URL of Business Central OData endpoint (e.g., https://api.businesscentral.dynamics.com/v2.0/b8cc0002-2542-46ed-8584-d4868701fbc4/Production/ODataV4/)
- Username - BC account's email address
- Password - BC account's password
- CustomQueryParamaters - custom query, which should be added to the every request (e.g.,
&company=CRONUS%20USA%2C%20Inc.). It is important to include the correct&companyparameter.
- Click Save.

Configure integration
- Double-click this integration to map external entities/fields to local entities/fields. For Business Central, some settings are configured by default:
- Default mapping will be added. In the preview, only three entities are officially supported: account, contact, and work order.
- Based on default mapping, External Primary Key fields will be added to the schema.
- Verify that the three entities supported out-of-the-box are enabled.
- Save all changes.
You can start migrating or synchronizing data: