Localization examples: Difference between revisions
| Line 39: | Line 39: | ||
* To localize the Open button, specify the entity where the field exists and what is the field that points to that entity (lookup field), i.e. <code>Buttons.Open.entityName.lookupFieldID</code>; for example, <code>Buttons.Open.contact.parentcustomerid</code>. | * To localize the Open button, specify the entity where the field exists and what is the field that points to that entity (lookup field), i.e. <code>Buttons.Open.entityName.lookupFieldID</code>; for example, <code>Buttons.Open.contact.parentcustomerid</code>. | ||
* If the button opens an Activity (to open a parent activity in case of a custom setup), the ID is | * If the button opens an Activity (to open a parent activity in case of a custom setup), the ID is <code>Buttons.Open.entityName.lookupFieldID</code>; for example, <code>Buttons.Open.activitypointer.regardingobjectid</code>. | ||
* To localize the Create button, e.g. you want to allow users to create a new Case from Account view, in addition to Buttons.Create, you need to specify the target entity name and the lookup field name on the target entity: <code>Buttons.Create.targetEntityName.lookupFieldID</code>. For example, when creating a Case record from Account view, the ID is <code>Buttons.Create.incident.customerid</code>. Again, the hint is that the targetEntityName and lookupFieldID name are displayed in the Button’s configuration. | * To localize the Create button, e.g. you want to allow users to create a new Case from Account view, in addition to Buttons.Create, you need to specify the target entity name and the lookup field name on the target entity: <code>Buttons.Create.targetEntityName.lookupFieldID</code>. For example, when creating a Case record from Account view, the ID is <code>Buttons.Create.incident.customerid</code>. Again, the hint is that the targetEntityName and lookupFieldID name are displayed in the Button’s configuration. | ||
Revision as of 13:17, 13 January 2020
Entity item on home screen
In this example, we rename the title and subtitle of an entity on home screen, add a custom icon for the item.
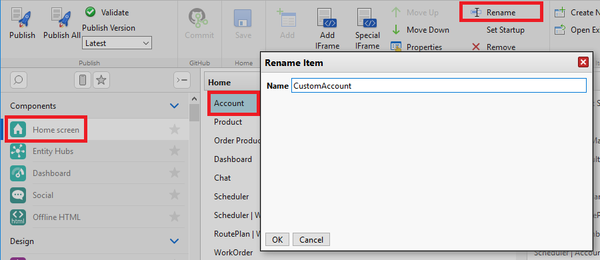
- In Woodford, edit the home screen. Select the entity and click Rename. Use a unique one-word string, for example, "CustomAccount".
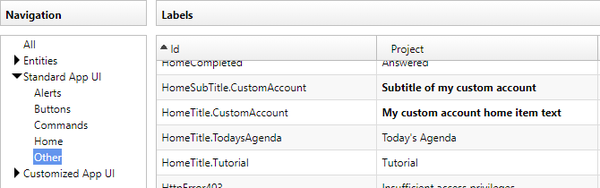
- Select Design > Localization from the Administrator menu and edit a language, Click Add to add a new localization string. As the ID, use "HomeTitle.HomeItemName"; in this particular example, "HomeTitle.CustomAccount". Add another string for HomeSubTitle.CustomAccount.
- If you want to change the icon of the home screen item, select Design > Images from the Administrator menu. Go to the Home directory and click Add to add a new image. As the image name, use the name you used in step 1, for example "CustomAccount".


Hub item on home screen
In this example, we create a new hub, add it to the home screen with a custom label and icon.
- In Woodford, go to Components > Entity Hubs and create a new hub. Give it a unique, one-worded name, for example "myHub".
- Go to Components > Home screen and add the new hub to your home.
- Go to Design > Localization and add new strings. As the ID, use "myHub" for the title and "myHub.SubTitle" for the subtitle.
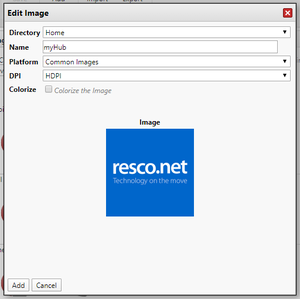
- Go to Design > Images and add the new icon to the Home directory. Use "myHub" as the name.
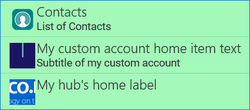
- Result:
Rename views
Views are internally identified by their names. As a result, renaming views is tricky; see the best practices. In this example, we use localization to change the label of a view in the app.
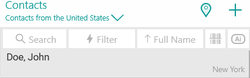
- In Woodford, go to Entities > Contact, click Show UI, and create a new view. Give it a unique, one-worded name, for example "USContacts".
- Go to Design > Localization, find the string for this new view and click Edit Project to enter a localized label.
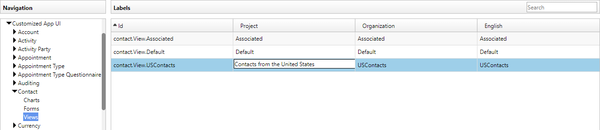
- Result:


Change names of view buttons and commands
When editing a view in Woodford, you can use Command editor to add actions to your views. Sometimes, it is appropriate to rename these actions so that users can understand them better.
| Tip | If you have only a single command on your view, the text of the command is displayed on the button; in this case, use a short text. If you have multiple commands, they are available from the hamburger menu, and there's enough room for multiple words. |
To set a localized name for the buttons, go to Localization and open the appropriate language, for which you want to specify button names. Click Add to add a new localization item.
- To localize a standard button that does not require additional setup (for example, Email, SMS, or Delete), the string ID is
Buttons.NameOfTheCommand; for exampleButtons.AssignToMe.
- To localize the change of a status code, the ID is
entityName.ChangeStatus.statusNumber; for exampleaccount.ChangeStatus.1.
- To localize the Open button, specify the entity where the field exists and what is the field that points to that entity (lookup field), i.e.
Buttons.Open.entityName.lookupFieldID; for example,Buttons.Open.contact.parentcustomerid.
- If the button opens an Activity (to open a parent activity in case of a custom setup), the ID is
Buttons.Open.entityName.lookupFieldID; for example,Buttons.Open.activitypointer.regardingobjectid.
- To localize the Create button, e.g. you want to allow users to create a new Case from Account view, in addition to Buttons.Create, you need to specify the target entity name and the lookup field name on the target entity:
Buttons.Create.targetEntityName.lookupFieldID. For example, when creating a Case record from Account view, the ID isButtons.Create.incident.customerid. Again, the hint is that the targetEntityName and lookupFieldID name are displayed in the Button’s configuration.
Constant (static text) on View Localization
TBD