Schedule Board examples: Difference between revisions
No edit summary |
|||
| Line 4: | Line 4: | ||
== Display travel time in Schedule Board == | == Display travel time in Schedule Board == | ||
If you want to optimize your field staff, it might be important to account for the travel time between visits. Schedule Board can be configured to display travel time between destinations. | If you want to optimize your field staff, it might be important to account for the travel time between visits. Schedule Board can be configured to display travel time between destinations. You enable this feature in [[Schedule_Board#Drag_&_drop_scheduling|Schedule Board setting]] '''Calculate travel when dropped''', however, additional configuration is often necessary. | ||
# Edit your [[app project]] in [[Woodford]]. | |||
# Create and enable fields "Incoming Travel Duration" and "Outgoing Travel Duration" for your activity entity. In this example, we're using the Appointments table. The fields must be of the type "Whole Number", formatted as "Duration". Save all changes. If you don't know how to manage entities and fields in Woodford, [[Data_model_in_mobile_apps#Managing_entities|learn more here]].<br>[[File:Enable-duration-fields-for-appointment.png|600px|alt=enable duration fields for appointment]] | |||
# Select '''Schedule Board''' from the Project menu and edit it. | |||
#* On the '''Activity''' tab, set up the fields '''Incoming Travel Duration''' and '''Outgoing Travel Duration'''.<br>[[File:Schedule-board-activity-tab-durations.png|600px|alt-activity tab-set up duration]] | |||
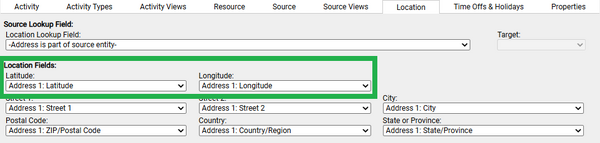
#* On the '''Location''' tab, set up the fields '''Latitude''' and '''Longitude'''. It probably goes without saying, the fields must be properly populated with valid geolocation data to calculate travel times.<br>[[File:Schedule-board-location-tab-coords.png|600px|location tab - lat long]] | |||
# Save all changes and publish the project. | |||
When you go back to the Schedule | |||
== Filter sources and resources by skill == | == Filter sources and resources by skill == | ||
Revision as of 12:03, 16 January 2026
This article describes several useful examples of using the Schedule Board.
Display travel time in Schedule Board
If you want to optimize your field staff, it might be important to account for the travel time between visits. Schedule Board can be configured to display travel time between destinations. You enable this feature in Schedule Board setting Calculate travel when dropped, however, additional configuration is often necessary.
- Edit your app project in Woodford.
- Create and enable fields "Incoming Travel Duration" and "Outgoing Travel Duration" for your activity entity. In this example, we're using the Appointments table. The fields must be of the type "Whole Number", formatted as "Duration". Save all changes. If you don't know how to manage entities and fields in Woodford, learn more here.

- Select Schedule Board from the Project menu and edit it.
- On the Activity tab, set up the fields Incoming Travel Duration and Outgoing Travel Duration.

- On the Location tab, set up the fields Latitude and Longitude. It probably goes without saying, the fields must be properly populated with valid geolocation data to calculate travel times.
- On the Activity tab, set up the fields Incoming Travel Duration and Outgoing Travel Duration.
- Save all changes and publish the project.


When you go back to the Schedule
Filter sources and resources by skill
This example demonstrates how to assign skills to sources and resources and use this in the scheduler to simplify filtering.
- Woodford setup YouTube
- Result in the app YouTube
We are using the following entities:
- Case is the source entity.
- Resource is the resource entity.
- Case Inspection is the activity (with Resource Lookup and Case Lookup fields).
- Skill is an entity that lists all skills.
- Resource Skill is an N:N relation table saying what are the skills of your resources (with skillid field and resourceid field)
- Case Skill is an N:N relation table saying what skills are required for your cases (with skillid field and caseid field)
Edit your app project. Select Scheduler from the Project menu. Create a new scheduler configuration or open an existing one that you want to modify.
On the Activity tab, set Case Inspection as your Activity Entity. Use Resource Lookup as Resource Lookup Field and Case Lookup as Source Lookup Field.

On the Resource tab, configure Skills for the Resource entity.

On the Source tab, configure Skill for the Case entity.

Save your scheduler and project changes, then publish the project and synchronize the app. You can now use Filter Skills to filter both your sources and resources simultaneously.

Filter sources and resources by skill (alternative solution)
The second example solves the problem as before, but somewhat simplified. In this case, we don't use two separate N:N relationship entities to bind skills with sources and resources. Instead, we only add a lookup field to the source and resource entity, that points to skills. The limitation of this scenario is that each source or resource can have only a single related skill.
We are using the following entities:
- Case is the source entity (with a Skill Lookup field).
- Resource is the resource entity (with a Skill Lookup field).
- Case Inspection is the activity (with Resource Lookup and Case Lookup fields).
- Skill is an entity that lists all skills.
In this case, the schedule board configuration also has to change slightly. On the Source and Resource tabs, the Skill Lookup field from Case or Resource entity is used to link directly to target Skill.
![]()