Plug-in assemblies: Difference between revisions
Marek Rodak (talk | contribs) No edit summary |
|||
| Line 16: | Line 16: | ||
# Download [https://app.resco.net/docs/RescoCRM.Plugin.SDK.zip Resco SDK].<br>Sample projects are part of the RescoCRM.Plugin.SDK.zip file. | # Download [https://app.resco.net/docs/RescoCRM.Plugin.SDK.zip Resco SDK].<br>Sample projects are part of the RescoCRM.Plugin.SDK.zip file. | ||
# Create a new project as a Class Library (.NET Framework 4.6.2). | # Create a new project as a Class Library (.NET Framework 4.6.2). | ||
# Add a reference to the downloaded XRMServer.Core.dll.<br>[[File:Add reference to dll.png|600px]]<br>[[File:Add reference to dll 2.png|600px]] | # Add a reference to the downloaded XRMServer.Core.dll.<br>[[File:Add reference to dll.png|alt=Creating a plug-in assembly: Add reference to dll|600px]]<br>[[File:Add reference to dll 2.png|alt=Creating a plug-in assembly: Add reference to dll 2|600px]] | ||
# Implement the PluginBase interface.<br>[[File:PluginBase interface.png|600px]] | # Implement the PluginBase interface.<br>[[File:PluginBase interface.png|alt=Creating a plug-in assembly: PluginBase interface|600px]] | ||
=== Return value of plugin === | === Return value of plugin === | ||
| Line 25: | Line 25: | ||
Implement the IPluginReturnValue interface to the code (e.g. string): | Implement the IPluginReturnValue interface to the code (e.g. string): | ||
[[File:IPluginReturnValue.png|600px]] | [[File:IPluginReturnValue.png|alt=Plug-in assemblies: Return value of plugin: IPluginReturnValue|600px]] | ||
These are the allowed return types: It should be possible to create a variable of this type in Processes editor. | These are the allowed return types: It should be possible to create a variable of this type in Processes editor. | ||
[[File:Allowed return type.png]] | [[File:Allowed return type.png|alt=Plug-in assemblies: Return value of plugin: Allowed return type]] | ||
=== Input values of plugin === | === Input values of plugin === | ||
| Line 35: | Line 35: | ||
You can define the input values of your plugin. | You can define the input values of your plugin. | ||
[[File:Input values.png|600px]] | [[File:Input values.png|alt=Plug-in assemblies: Input values of plugin: Input values|600px]] | ||
The name of the PluginInputParameter (MyPluginInput in the example), will be visible in the Processes editor. | The name of the PluginInputParameter (MyPluginInput in the example), will be visible in the Processes editor. | ||
[[File:MyPluginInput.png]] | [[File:MyPluginInput.png|alt=Plug-in assemblies: Input values of plugin: MyPluginInput]] | ||
=== Logs === | === Logs === | ||
| Line 60: | Line 60: | ||
Fetch | Fetch | ||
[[File:Example-fetch.png|600px]] | [[File:Example-fetch.png|alt=Plug-in assemblies: Cancel the workflow execution: Example fetch|600px]] | ||
Create | Create | ||
[[File:Example-create.png|600px]] | [[File:Example-create.png|alt=Plug-in assemblies: Cancel the workflow execution: Example create|600px]] | ||
Update | Update | ||
[[File:Example-update.png|600px]] | [[File:Example-update.png|alt=Plug-in assemblies: Cancel the workflow execution: Example update|600px]] | ||
Delete | Delete | ||
[[File:Example-delete.png|600px]] | [[File:Example-delete.png|alt=Plug-in assemblies: Cancel the workflow execution: Example delete|600px]] | ||
== Adding plug-in assembly to the Resco Cloud == | == Adding plug-in assembly to the Resco Cloud == | ||
In the development tool: | In the development tool: | ||
# Build the solution.<br>[[File:Build solution.png|600px]] | # Build the solution.<br>[[File:Build solution.png|alt=Adding plug-in assembly to the Resco Cloud: Build solution|600px]] | ||
# Create the zip file with the dll file.<br>[[File:Create zip.png|600px]] | # Create the zip file with the dll file.<br>[[File:Create zip.png|alt=Adding plug-in assembly to the Resco Cloud: Create zip|600px]] | ||
In the Admin Console: | In the Admin Console: | ||
| Line 86: | Line 86: | ||
The plugin is loaded and the return type and input parameters listed below (if implemented). | The plugin is loaded and the return type and input parameters listed below (if implemented). | ||
[[File:Plugin successfully loaded.png|600px]] | [[File:Plugin successfully loaded.png|alt=Adding plug-in assembly to the Resco Cloud: Plugin successfully loaded|600px]] | ||
{{Note|If you don't see the plugin in the list, log out and then log back in.}} | {{Note|If you don't see the plugin in the list, log out and then log back in.}} | ||
| Line 97: | Line 97: | ||
# If your plugin has a return value, it is necessary to add the variable of this type to the editor, then you are able to select the plugin. | # If your plugin has a return value, it is necessary to add the variable of this type to the editor, then you are able to select the plugin. | ||
[[File:Process using the demo plugin.png|600px]] | [[File:Process using the demo plugin.png|alt=Plug-in assemblies: Executing plugins: Process using the demo plugin|600px]] | ||
=== Process logs === | === Process logs === | ||
| Line 103: | Line 103: | ||
Whenever a process is executed, the run generates a log file entry. To access the logs, go to '''Processes Center > Logs'''. | Whenever a process is executed, the run generates a log file entry. To access the logs, go to '''Processes Center > Logs'''. | ||
[[File:Process log.png|600px]] | [[File:Process log.png|alt=Plug-in assemblies: Process log|600px]] | ||
== Exporting plugins == | == Exporting plugins == | ||
Revision as of 09:47, 21 November 2023
| Business logic |
|---|
|
This document is a brief summary of plug-in assemblies in Resco Cloud and their implementation to the processes (workflows).
Getting started
Plug-in assemblies allow you to run custom C# code on the Resco Cloud as part of the Processes. Plugins can run periodically as jobs or be triggered as workflows. It should solve the limitations of the no-coding editor of processes. There are the typical use cases:
- complex logic of process
- communication with some third party system
- etc.
In Resco Cloud, you can manage plugins using the Admin Console.
Creating a plug-in assembly
- Download Resco SDK.
Sample projects are part of the RescoCRM.Plugin.SDK.zip file. - Create a new project as a Class Library (.NET Framework 4.6.2).
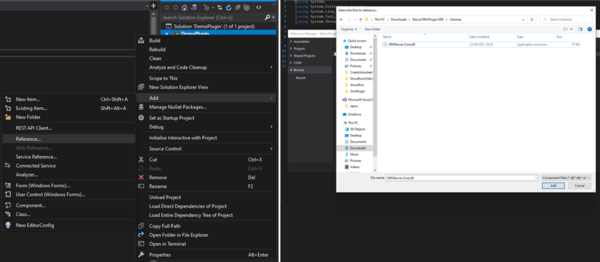
- Add a reference to the downloaded XRMServer.Core.dll.
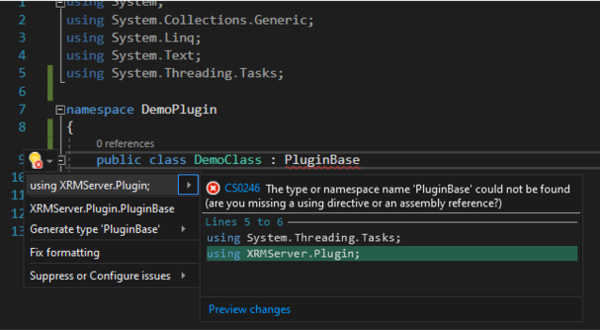
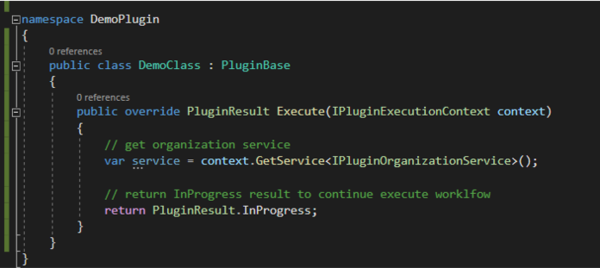
- Implement the PluginBase interface.


Return value of plugin
You can define the return value of your plugin.
Implement the IPluginReturnValue interface to the code (e.g. string):

These are the allowed return types: It should be possible to create a variable of this type in Processes editor.

Input values of plugin
You can define the input values of your plugin.

The name of the PluginInputParameter (MyPluginInput in the example), will be visible in the Processes editor.

Logs
context.AppendLogLine("Contacts with specified account id '{0}' cannot be found!", accountId);
Logs are saved and visible in the Admin Console under Processes Center > Logs.
Cancel the workflow execution
context.AppendLogLine("Contacts with specified account id '{0}' cannot be found!", accountId);
return PluginResult.Failed;
Examples
Fetch

Create

Update

Delete

Adding plug-in assembly to the Resco Cloud
In the development tool:
- Build the solution.

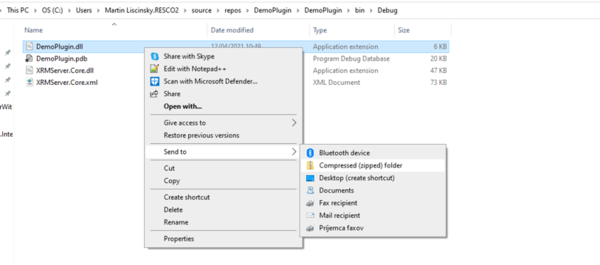
- Create the zip file with the dll file.


In the Admin Console:
- Go to Processes Center > Plug-in Assemblies.
- Click New, then click Browse and upload the zip file.
The plugin is loaded and the return type and input parameters listed below (if implemented).

| Note | If you don't see the plugin in the list, log out and then log back in. |
Executing plugins
- In the Admin Console, go to Processes Center > Processes.
- Click New to create a new process.
- As Category, select Workflow or Job.
- If your plugin has a return value, it is necessary to add the variable of this type to the editor, then you are able to select the plugin.

Process logs
Whenever a process is executed, the run generates a log file entry. To access the logs, go to Processes Center > Logs.

Exporting plugins
If you need to transfer a plugin from one organization to another:
- In the Admin Console, go to Settings > Organization
- Click Export Organization and select Custom.
- Select Plug-ins and click Export.
You can then import the files to the other organization using the Import Organization button.
Alternatively, you can export/import plugins between connected environments.
Exception: There is already an open DataReader
When you fetch data but don't use the result, you can encounter the exception System.InvalidOperationException: There is already an open DataReader associated with this Command which must be closed first. To avoid this problem, make sure that all fetch results are used.
{{#CI form: title = Was this information helpful? How can we improve? | type = inputs | [textarea] }}