Report Designer examples: Difference between revisions
No edit summary |
|||
| Line 1: | Line 1: | ||
This article describes several | This article describes several useful examples of using the [[Report Designer]]. | ||
== Static image == | == Static image == | ||
Revision as of 08:32, 21 February 2020
This article describes several useful examples of using the Report Designer.
Static image
Use static images for images that should not depend on the record(s) selected for the report. For example, you can add your company logo to the header block.
- Edit your app project in Woodford, select Offline HTML from the Project menu, and upload your static image. In this example, we create a Reports folder and add the file image01.png. Publish your project.

- In Report Designer, select a cell in the header block and click Add Image. Set Binding Type to Constant. As Binding, enter the path to your image. In our example Reports\image01.png.
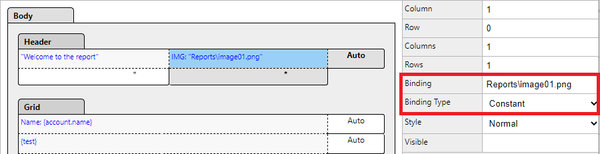
- Synchronize the project and verify the result in the app.


Dynamic image
Use dynamic images that depend on the record selected for the report. For example, consider a report for a single contact where you want to include that person photo (available in the Annotation entity).

Multiply values
There are situations where you don't want to display two fields directly, but you want to perform an arithmetic operation and display the result. In the following unlikely example, we multiply the latitude and the longitude fields of your accounts and display the product in the report.
- Select the Body element of your report and click Edit Sources.
- Click Add to add a custom variable that stores the result of the multiplication. Enter a name and type, then click OK.

- Click On Create and add a rule that performs the multiplication, then close the rules editor and variable editor.

- Add the field to your report.

- Verify the result in the app.


Cell visibility
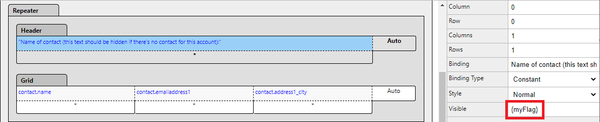
You can control the visibility of a text block or image block by setting the Visible property.
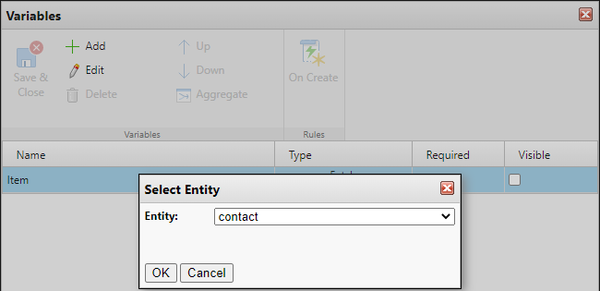
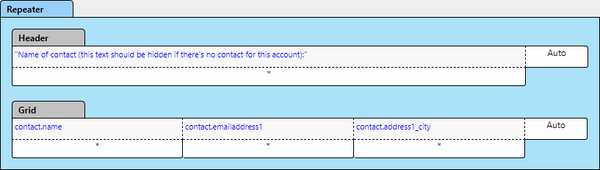
In the following example, we list all contacts related to an account in a repeater block. We're using the Visible property to hide the text block in the header section of the repeater if an account has no associated contacts.
Create the repeater
- Edit the report for your account.
- Select the body of your report and click Add Repeater.
- Select the repeater, move it to the appropriate location of your report and click Edit Sources.
- Select the Item and click Edit. Change the Entity to contact and click OK.
- Add the following filter, then click Save & Close.

- Add the following text blocks to your repeater.


Manage visibility
- Select the body of your report and click Edit Sources.
- Add a new variable (myContact) of the Type Fetch Result for the Entity contact. Select it, click Edit, and add the same filter as above.
- Add a new variable (myFlag) of the Type Boolean. Select it, click On Create and add the following rule:

- Set the visibility of the text block in the header to depend on the boolean variable.
- Verify the result in the app. For accounts that have no associated contacts, the header cell should not be displayed in the report.


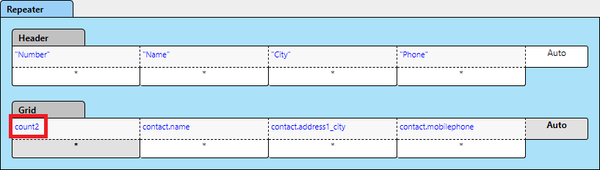
Automatic numbering of repeating blocks
In this example, we want to number the repeater blocks displayed in a report.
- Select the body of your report and click Edit Sources.
- Click Add and create a new decimal variable (count).
- Click On Create and initialize this variable to 1.

- Close the rule editor and variables on body level.
- Select the repeater and click Edit Sources.
- Click Add and create a new decimal variable (count2).
- Click On Create and add the following steps.

- Close the rule editor and variables on body level.
- Add the the second variable to your report.
- Verify the result in the app.

