Connect Resco Cloud to custom ADFS: Difference between revisions
Marek Rodak (talk | contribs) No edit summary |
|||
| (4 intermediate revisions by one other user not shown) | |||
| Line 1: | Line 1: | ||
{{Admin TOC}} | |||
These steps will guide you through the process of connecting [[Resco Cloud]] to a custom Active Directory Federation Services (ADFS). | These steps will guide you through the process of connecting [[Resco Cloud]] to a custom Active Directory Federation Services (ADFS). | ||
| Line 20: | Line 21: | ||
# Select '''Issuance Transform Rules''' and click '''Add Rule...''' | # Select '''Issuance Transform Rules''' and click '''Add Rule...''' | ||
# Select '''Send LDAP Attributes as Claims''', then click '''Next'''. | # Select '''Send LDAP Attributes as Claims''', then click '''Next'''. | ||
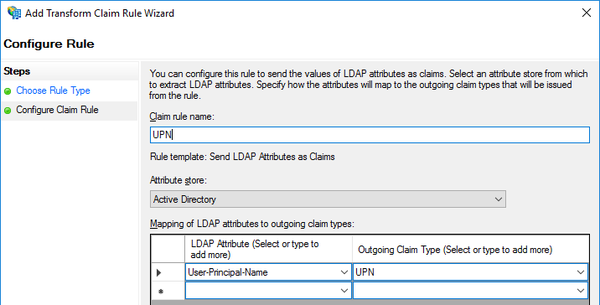
# Enter UPN rule settings to match the screen shot below, then click '''Finish'''.<br>[[File:Transform claim rule.png|600px]] | # Enter UPN rule settings to match the screen shot below, then click '''Finish'''.<br>[[File:Transform claim rule.png|alt=Connect Resco Cloud to custom ADFS: Configuration: Transform claim rule|600px]] | ||
# Click '''Add Rule...''' again, select '''Send LDAP Attributes as Claims''', then click '''Next''' | # Click '''Add Rule...''' again, select '''Send LDAP Attributes as Claims''', then click '''Next''' | ||
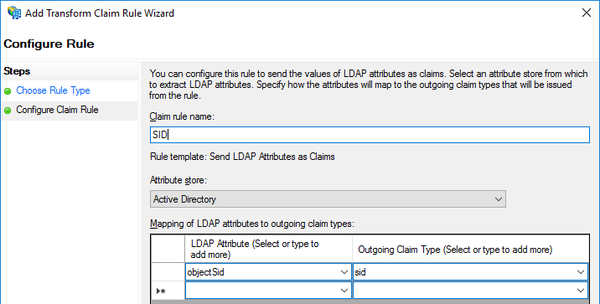
# Enter SID rule settings to match the screen shot below, then click '''Finish'''.<br>[[File:Transform claim rule 2 sid.png|600px]] | # Enter SID rule settings to match the screen shot below, then click '''Finish'''.<br>[[File:Transform claim rule 2 sid.png|alt=Connect Resco Cloud to custom ADFS: Configuration: Transform claim rule 2|600px]] | ||
# Click '''Apply''', then close Resco Cloud Properties. | # Click '''Apply''', then close Resco Cloud Properties. | ||
| Line 30: | Line 31: | ||
# Start the [[Admin Console]]. | # Start the [[Admin Console]]. | ||
# Select '''Settings > Organization''' from the menu to edit the properties of your organization. | # Select '''Settings > Organization''' from the menu to edit the properties of your organization. | ||
# In the ''' | # In the '''Identity provider''' line, click '''Connect...'''. | ||
# Select '''ADFS'''. | |||
# As '''ADFS Metadata URL''', enter the URL to your ADFS server (e.g. <code><nowiki>https://adfs.server.com/adfs</nowiki></code>). | # As '''ADFS Metadata URL''', enter the URL to your ADFS server (e.g. <code><nowiki>https://adfs.server.com/adfs</nowiki></code>). | ||
# The read-only Redirect URI is provided for your reference (you need it for ADFS configuration). | # The read-only Redirect URI is provided for your reference (you need it for ADFS configuration). | ||
| Line 46: | Line 48: | ||
A red text saying '''Inactive''' is displayed next to the '''Domain Name''' until the user logs in for the first time. At that point, the text changes into a green '''Active'''. | A red text saying '''Inactive''' is displayed next to the '''Domain Name''' until the user logs in for the first time. At that point, the text changes into a green '''Active'''. | ||
== Connect Resco mobile app to Resco Cloud that uses | == Connect Resco mobile app to Resco Cloud that uses ADFS == | ||
# Tap Synchronize. | # Tap Synchronize. | ||
# As '''User Mode''' select '''OAuth'''. | # As '''User Mode''' select '''OAuth'''. | ||
Latest revision as of 09:37, 27 November 2023
| Resco Cloud administration |
|---|
|
|
These steps will guide you through the process of connecting Resco Cloud to a custom Active Directory Federation Services (ADFS).
Configure ADFS
- Start Server Manager > Tools > AD FS Management.
- On the Actions pane, click Add Application Group... to start the Add Application Group Wizard.
- In the Welcome step, enter a Name (for example "Resco Cloud"), select the Server application accessing a web API template, then click Next.
- In the Server application step, enter
https://<your_server_name>/Authenticate.aspx/ADFSas the Redirect URI for your Resco Cloud organization instance and click Next. - In the Configure Application Credentials step, check Generate a shared secret, then copy and save the secret. Click Next.
- In the Configure Web API step,
https://resco.net/rescocloudas the Identifier for web API and click Next. - In the Apply Access Control Policy step, select a policy. As default, use Permit everyone. Click Next.
- In the Configure Application Permissions step, keep openid as a permitted scope, then click Next.
- To finish the wizard, click Next and Close.
- Select the Resco Cloud application group and click Properties on the Actions pane.
- Click Add Application to start the Add a new application to Resco Cloud wizard.
- In the Welcome step, select Native application template and click Next.
- In the Native application step, enter
3cf04e1c-f7ff-4d09-8581-503d794ef5baas the Client Identifier for the Resco Mobile CRM application, addhttps://www.resco.net/oauth.htmlas the Redirect URI, then click Next. - To finish the wizard, click Next and Close.
- Select Resco Cloud – Web API, click Edit, and go to the Client Permissions tab.
- Click Add..., select Resco Cloud - Native application and check openid as a permitted scope.
- Select Issuance Transform Rules and click Add Rule...
- Select Send LDAP Attributes as Claims, then click Next.
- Enter UPN rule settings to match the screen shot below, then click Finish.
- Click Add Rule... again, select Send LDAP Attributes as Claims, then click Next
- Enter SID rule settings to match the screen shot below, then click Finish.
- Click Apply, then close Resco Cloud Properties.


Connect your Resco Cloud to ADFS
- Sign in to the Resco Cloud management console using a System Administrator user account.
- Start the Admin Console.
- Select Settings > Organization from the menu to edit the properties of your organization.
- In the Identity provider line, click Connect....
- Select ADFS.
- As ADFS Metadata URL, enter the URL to your ADFS server (e.g.
https://adfs.server.com/adfs). - The read-only Redirect URI is provided for your reference (you need it for ADFS configuration).
- Enter the Client ID and Client Secret from ADFS configuration.
- Click Connect Now.
- You are redirected to the ADFS login page. Sign in and you return to the Admin Console with the ADFS state set to Connected.
Assign ADFS users
You have to assign ADFS users to new or existing users of Resco Cloud.
- In the Admin Console, go to Resources > Users.
- Select an existing user or create a new one.
- As the Domain Name, select the ADFS login name (by default, this is the email address) of the user who you want to associate with the selected Resco Cloud user.
- Click Save & Close.
A red text saying Inactive is displayed next to the Domain Name until the user logs in for the first time. At that point, the text changes into a green Active.
Connect Resco mobile app to Resco Cloud that uses ADFS
- Tap Synchronize.
- As User Mode select OAuth.
- Enter the URL of your organization, usually
https://{organizationname}.rescocrm.com. - Enter a new password that protects your offline data (twice). This password cannot be recovered so remember it well.
- Tap Synchronize.
- Enter your AD FS credentials.