Custom map pins: Difference between revisions
Marek Rodak (talk | contribs) No edit summary |
|||
| (7 intermediate revisions by 2 users not shown) | |||
| Line 1: | Line 1: | ||
[[Resco mobile apps]] can include [[global map|maps]]. Records with location information can be displayed on the map as pins. By default, they look like this: | |||
[[Resco mobile apps]] can include maps. Records with location information can be displayed on the map as pins. By default, they look like this: | |||
[[File:Default mappins.PNG|alt=default map pins in the app]] | [[File:Default mappins.PNG|alt=default map pins in the app]] | ||
You | You can customize map pins for various records based on field differences, which can significantly enhance the visualization of data on maps. Custom map pins are easily set up through the View Designer feature. | ||
# Edit an [[app project]] in Woodford. | |||
# Select the entity where you want to use custom map pins. | |||
# Click '''Show UI''' and edit the [[view]]. | |||
# Select the row design and click '''Add Map Pin'''. | |||
# A new icon appears next to the row design name. Click it to configure map pins. | |||
[[File:CustomMapPin on View.png|400px|alt=custom map pin on the view]] | |||
There are three main types of bindings available for custom map pins, allowing for a range of customization options: | There are three main types of bindings available for custom map pins, allowing for a range of customization options: | ||
* Constant Binding: This option utilizes a single map pin image for all the selected records. To apply this, choose an image from the image folder to represent all records uniformly on the map. | |||
* Value Binding: This option allows the creation of custom map pins based on the name of options within an option set field. | |||
* Raw Value Binding: Similar to Value Binding, this method defines the map pin based on the logical value of options within an option set field. | |||
[[File:Configure-map-pin.png|300px|alt=configure map pins]] | |||
For both Value and Raw Value bindings, it's necessary to select an option set field as the basis for differentiating the records. After selecting the appropriate field, choose a style that specifies how the map pins should be formatted. The chosen style must be either ImageCellStyle or its child. | For both Value and Raw Value bindings, it's necessary to select an option set field as the basis for differentiating the records. After selecting the appropriate field, choose a style that specifies how the map pins should be formatted. The chosen style must be either ImageCellStyle or its child. | ||
When you finish configuring and add a custom map pin to the row, it's displayed above it. | When you finish configuring and add a custom map pin to the row, it's displayed above it. | ||
===Example: Custom map pins for active and inactive accounts=== | ===Example: Custom map pins for active and inactive accounts=== | ||
| Line 27: | Line 28: | ||
In this example, we add custom map pins for the account entity and differentiate between the active and inactive accounts. | In this example, we add custom map pins for the account entity and differentiate between the active and inactive accounts. | ||
First, we have to define the style for the map pin. Go to the Account entity and open a view used in the map. In the style editor, click '''Add''' while ImageCellStyle is selected. This creates a new child style. We name it MapPin. The format string is defined as follows: ''Map_pins.{0}.png''. Map_pins | First, we have to define the style for the map pin. | ||
# Go to the Account entity and open a view used in the map. | |||
# In the style editor, click '''Add''' while ImageCellStyle is selected. This creates a new child style. We name it "MapPin". | |||
# The format string is defined as follows: ''Map_pins.{0}.png''. | |||
#: "Map_pins" refers to the folder where the map pin images are stored. | |||
#: The following part ".{0}" represents the value. This is a placeholder for the map pin types mentioned above. It's either for Value or Raw Value. | |||
{{Note|Styles are global; you can use this style also for other pins on different views.}} | |||
[[File:Mappin style.PNG|alt=Style we define for the custom map pins|600px]] | [[File:Mappin style.PNG|alt=Style we define for the custom map pins|600px]] | ||
The next step is to add the map pin to the view. Click '''Add Map Pin'''. | The next step is to add the map pin to the view. | ||
# Click '''Add Map Pin''' and click the pin. | |||
# Set '''Type''' to "Raw Value". | |||
# We want to differentiate the records by their status code. Therefore, set '''Field''' to "statuscode". | |||
# Set '''Style''' to "MapPin". | |||
[[File:Configure mappin.PNG|alt=configure map pin window Raw value]] | [[File:Configure mappin.PNG|alt=configure map pin window Raw value]] | ||
The last thing we have to set up is the images. Go to Images and create a new folder Map_pins. Upload two images representing the map pins. The name of the Images should be the logical value for the respective status code. In our use-case, 0 is for active and 1 is for inactive. | The last thing we have to set up is the images. | ||
# Go to Images and create a new folder "Map_pins". | |||
# Upload two images representing the map pins. The name of the Images should be the logical value for the respective status code. In our use-case, "0" is for active and "1" is for inactive. | |||
[[File:Map pins in the images.PNG|alt=upladed map pins in the images folder]] | [[File:Map pins in the images.PNG|alt=upladed map pins in the images folder]] | ||
| Line 47: | Line 61: | ||
In the configuration of your app project, in the [[Configuration#Map,_GPS|Map, GPS tab]], you can set additional options related to map pins and their behavior: | In the configuration of your app project, in the [[Configuration#Map,_GPS|Map, GPS tab]], you can set additional options related to map pins and their behavior: | ||
;Map Pin Aggregation | |||
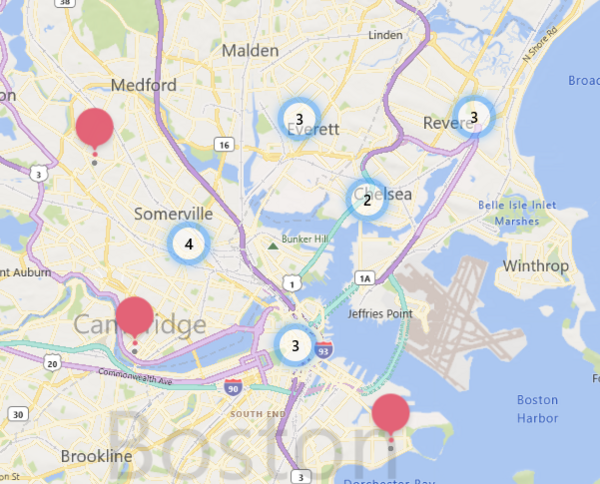
: Enabling map pin aggregation is useful when multiple records are located in the same area. Cluster pins group records based on the zoomed area and prevent the map from looking cluttered. | |||
Enabling map pin aggregation is useful when multiple records are located in the same area. Cluster pins group records based on the zoomed area and prevent the map from looking cluttered. | : Map pin aggregation can be configured in Woodford configuration menu as a project-wide behavior or for the specific map in map setup. | ||
: [[File:Cluster Pin.PNG|600px|alt=Map pin aggregation]] | |||
;Map Pin Expansion | |||
: (iOS) Allow the pin expansion on the map (show contact details for related record) | |||
== Customize map pin information == | |||
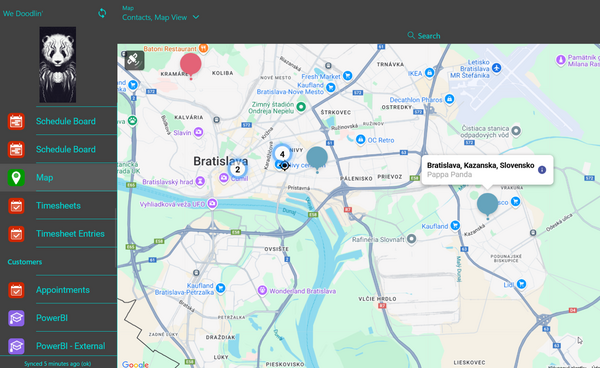
When you tap a pin on the map, Resco Mobile CRM displays additional details about the record. You can customize the text displayed on the map. | |||
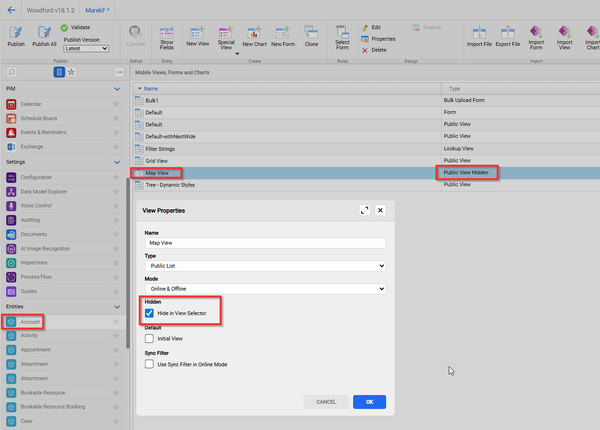
* Create a specific hidden [[view]] used by the map. | |||
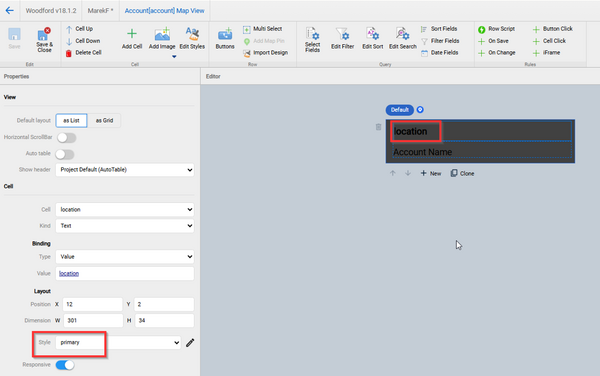
* On the view, specify which fields will be shown as cells. | |||
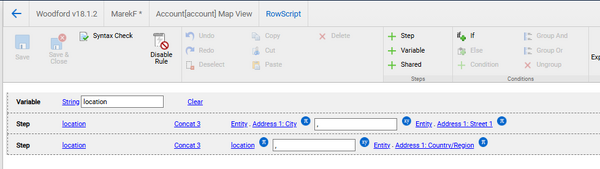
* If you need to fetch some data into the cell's field (e.g., multiple strings from multiple fields), you can configure this via [[Row Script]] by creating a variable. | |||
--> | ;Setting up this feature | ||
# Create a new view.<br>[[File:Create-a-hidden-view.png|600px|alt=create a new hidden view]] | |||
# Add fields as needed and select the appropriate style.<br>[[File:Customize-the-view.png|600px|alt=customize the view]] | |||
# Optionally, use Row Script to combine values from multiple fields.<br>[[File:Add-simple-rowscript.png|600px|alt=add a simple row script]] | |||
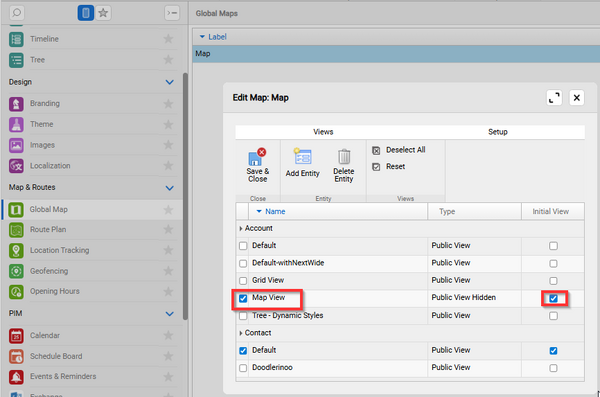
# Set the new view as the initial view in map properties.<br>[[File:Set-the-view-as-initial-in-map-properties.png|600px|alt=set the view as initial for map]] | |||
# Publish the app project and verify the behavior in the app.<br>[[File:Verify-pin-info-in-app.png|600px|alt=verify in the app]] | |||
Latest revision as of 07:54, 21 July 2025
Resco mobile apps can include maps. Records with location information can be displayed on the map as pins. By default, they look like this:

You can customize map pins for various records based on field differences, which can significantly enhance the visualization of data on maps. Custom map pins are easily set up through the View Designer feature.
- Edit an app project in Woodford.
- Select the entity where you want to use custom map pins.
- Click Show UI and edit the view.
- Select the row design and click Add Map Pin.
- A new icon appears next to the row design name. Click it to configure map pins.

There are three main types of bindings available for custom map pins, allowing for a range of customization options:
- Constant Binding: This option utilizes a single map pin image for all the selected records. To apply this, choose an image from the image folder to represent all records uniformly on the map.
- Value Binding: This option allows the creation of custom map pins based on the name of options within an option set field.
- Raw Value Binding: Similar to Value Binding, this method defines the map pin based on the logical value of options within an option set field.

For both Value and Raw Value bindings, it's necessary to select an option set field as the basis for differentiating the records. After selecting the appropriate field, choose a style that specifies how the map pins should be formatted. The chosen style must be either ImageCellStyle or its child.
When you finish configuring and add a custom map pin to the row, it's displayed above it.
Example: Custom map pins for active and inactive accounts
In this example, we add custom map pins for the account entity and differentiate between the active and inactive accounts.
First, we have to define the style for the map pin.
- Go to the Account entity and open a view used in the map.
- In the style editor, click Add while ImageCellStyle is selected. This creates a new child style. We name it "MapPin".
- The format string is defined as follows: Map_pins.{0}.png.
- "Map_pins" refers to the folder where the map pin images are stored.
- The following part ".{0}" represents the value. This is a placeholder for the map pin types mentioned above. It's either for Value or Raw Value.
| Note | Styles are global; you can use this style also for other pins on different views. |

The next step is to add the map pin to the view.
- Click Add Map Pin and click the pin.
- Set Type to "Raw Value".
- We want to differentiate the records by their status code. Therefore, set Field to "statuscode".
- Set Style to "MapPin".

The last thing we have to set up is the images.
- Go to Images and create a new folder "Map_pins".
- Upload two images representing the map pins. The name of the Images should be the logical value for the respective status code. In our use-case, "0" is for active and "1" is for inactive.

This is what the result looks like in the app:

More options
In the configuration of your app project, in the Map, GPS tab, you can set additional options related to map pins and their behavior:
- Map Pin Aggregation
- Enabling map pin aggregation is useful when multiple records are located in the same area. Cluster pins group records based on the zoomed area and prevent the map from looking cluttered.
- Map pin aggregation can be configured in Woodford configuration menu as a project-wide behavior or for the specific map in map setup.

- Map Pin Expansion
- (iOS) Allow the pin expansion on the map (show contact details for related record)
Customize map pin information
When you tap a pin on the map, Resco Mobile CRM displays additional details about the record. You can customize the text displayed on the map.
- Create a specific hidden view used by the map.
- On the view, specify which fields will be shown as cells.
- If you need to fetch some data into the cell's field (e.g., multiple strings from multiple fields), you can configure this via Row Script by creating a variable.
- Setting up this feature
- Create a new view.
- Add fields as needed and select the appropriate style.
- Optionally, use Row Script to combine values from multiple fields.
- Set the new view as the initial view in map properties.
- Publish the app project and verify the behavior in the app.