Mobile reports for Resco Inspections: Difference between revisions
| (50 intermediate revisions by 2 users not shown) | |||
| Line 1: | Line 1: | ||
Traditionally, inspections often involved a lot of paperwork - part of it in the field, and then again in the office, producing a report. [[Resco Inspections]] is designed to perform the entire inspection process without any paper documents, however, in many scenarios, it is desirable to finish the inspection with a report, a document that can be sent to your manager or end customer. Fortunately, Resco Inspections allows you to generate such reports directly on your device, immediately after concluding an inspection. | {{Inspections TOC}} | ||
Traditionally, inspections often involved a lot of paperwork - part of it in the field, and then again in the office, producing a report. [[Resco Inspections]] is designed to perform the entire inspection process without any paper documents, however, in many scenarios, it is desirable to finish the inspection with a report, a document that can be sent to your manager or end customer. Fortunately, Resco Inspections allows you to [[Mobile report|generate such reports directly on your device]], immediately after concluding an inspection. | |||
Resco Inspections comes with a generic report available automatically for all questionnaires, | Resco Inspections comes with a generic report available automatically for all questionnaires. If the default rendering is not sufficient, use the automatic report, configurable directly in the [[Questionnaire Designer]]. For the most advanced use cases, you can use the [[Report Designer]]. | ||
= | [[File:Report selection in the app.png|alt=Mobile reports for Resco Inspections: Report selection in the app|300px]] | ||
== Generic report (legacy) == | |||
The | The demo data includes a generic report that can be used for any questionnaire, formerly known as "AutomaticReport". It simply lists all the questions and answers one after another. This generic report is included in [[app projects]] that have [[Inspections]] enabled by default. For app projects that don't include inspections out-of-the-box, you can add it via Woodford using the '''Install Report''' button (on the [[Inspections#Configuring_in_Woodford|Inspections]] screen). | ||
This generic report covers the scenario "one answered questionnaire = one report". If you want to cover multiple answered questionnaires in a single report, contact Resco support. For some platforms, we have created an experimental automatic report for a list of questionnaires. | |||
The generic report displays a maximum of three images for image/media questions. | |||
== | == Automatic report: edit in the Questionnaire Designer == | ||
The following configuration options are available for | You can configure the report along with the questionnaire template directly in the Questionnaire Designer. The following configuration options are available: | ||
=== Enable automatic reports === | |||
The support of automatic reports can be enabled per questionnaire. Edit a questionnaire template and [[Questionnaire_Designer#Questionnaire_options|click '''Options''' on the toolbar]]. On the '''Auto Report''' tab, enable '''Generate automatic report'''. This unlocks additional functions in your Questionnaire Designer: | |||
* Additional options in the '''Auto Report''' tab for hiding unanswered questions from the report and selecting header and footer styles | |||
* Toolbar functions for previewing reports, setting up the preview, and selecting report themes | |||
* Option to configure report styles under '''Styles''' button | |||
* Extra question/group properties related to reports | |||
On the data level, the definition of the automatic report is saved in the questionnaire record, in the field "autoreport"; report styles are saved in the field "reportingproperties". | |||
{{Note|The content of each field is a potentially large XML file. If you're not using automatic reports, disable them to save database space and sync time.|Tip}} | |||
=== What to include === | === What to include === | ||
For each question, set whether it should be included in the report or not (in the '''Show on report''' parameter on the '''Properties''' pane). | For each question, set whether it should be included in the report or not (in the '''Show on report''' parameter on the '''Properties''' pane). | ||
* All | * All [[Questionnaire_Designer#Questions|non-static questions]] are included in the report by default. | ||
* Most static components are excluded by default; the only exception is the Logo. | * Most [[Questionnaire_Designer#Static_components|static components]] are excluded by default; the only exception is the Logo. | ||
=== Style and themes === | === Style and themes === | ||
| Line 30: | Line 41: | ||
* To assign styles to questions, select a question, and on the '''Properties''' pane, set the reporting style. | * To assign styles to questions, select a question, and on the '''Properties''' pane, set the reporting style. | ||
* To assign styles to header and footer, | * To assign styles to header and footer, go to '''Options > Auto report''' tab. | ||
* To modify styles manually, click '''Styles''' in the toolbar, switch to the '''Report Styles''' pane, and set the font, colors, and arrangement of question and answer. See [[Style editor]] for general information about styles. | * To modify styles manually, click '''Styles''' in the toolbar, switch to the '''Report Styles''' pane, and set the font, colors, and arrangement of question and answer. See [[Style editor]] for general information about styles. | ||
* To switch between pre-defined report themes, click '''Report Themes''' in the toolbar and select one of the themes. Selecting a new theme discards all changes in custom styles. | * To switch between pre-defined report themes, click '''Report Themes''' in the toolbar and select one of the themes. Selecting a new theme discards all changes in custom styles. | ||
| Line 38: | Line 49: | ||
One of the big shortcomings of the generic report is how question groups are displayed. Therefore, the report customization in the Questionnaire Designer offers multiple options for displaying groups. To configure these, select a question group and modify parameters in the '''Reporting''' section on the '''Properties''' pane. | One of the big shortcomings of the generic report is how question groups are displayed. Therefore, the report customization in the Questionnaire Designer offers multiple options for displaying groups. To configure these, select a question group and modify parameters in the '''Reporting''' section on the '''Properties''' pane. | ||
[[File:Reporting properties in the questionnaire designer.png]] | [[File:Reporting properties in the questionnaire designer.png|alt=Mobile reports for Resco Inspections: Reporting properties in the questionnaire designer]] | ||
The first two parameters, '''Show Header''' and '''Header Style''', allow you to select if and how should the group header be displayed in the report. | The first two parameters, '''Show Header''' and '''Header Style''', allow you to select if and how should the group header be displayed in the report. | ||
| Line 45: | Line 56: | ||
* Horizontal: questions are arranged next to each other in a row | * Horizontal: questions are arranged next to each other in a row | ||
* Vertical: questions are arranged one below the other in a column | * Vertical: questions are arranged one below the other in a column | ||
* Custom: design your own layout (not available with Salesforce backend) | |||
{| class="wikitable" style="width: 500px; display:inline-table;" | {| class="wikitable" style="width: 500px; display:inline-table;" | ||
| Line 52: | Line 64: | ||
|} | |} | ||
{| class="wikitable" style="display:inline-table;" | {| class="wikitable" style="width: 500px; display:inline-table;" | ||
|+ Vertical layout | |+ Vertical layout | ||
|- | |- | ||
| Line 60: | Line 72: | ||
|- | |- | ||
| Question 3 Answer 3 | | Question 3 Answer 3 | ||
|} | |||
{| class="wikitable" style="width: 500px;" | |||
|+ Custom layout | |||
|- | |||
| [[File:Questionnaire_reports_editing_custom_layout.png|alt=Mobile reports for Resco Inspections: Questionnaire reports editing custom layout|490px]] | |||
|} | |} | ||
| Line 157: | Line 175: | ||
If you're working with Resco Cloud or Resco Inspections cloud backends, you can preview reports directly in the Questionnaire Designer. | If you're working with Resco Cloud or Resco Inspections cloud backends, you can preview reports directly in the Questionnaire Designer. | ||
* Click '''Report''' on the toolbar to display the report preview. | * Click '''Report''' on the toolbar to display the report preview. | ||
* Click '''Settings''' on the toolbar to set the '''Language''' of the previewed report, and the data (answers) of the '''Questionnaire''' that should be displayed. Use "Virtual" if you want to use empty/default values, or select one of the existing completed questionnaires as a data source. | * Click '''Settings''' on the toolbar to set the '''Language''' of the previewed report, and the data (answers) of the '''Questionnaire''' that should be displayed. Use "Virtual" if you want to use empty/default values, or select one of the existing completed questionnaires as a data source.<br>Note: [[Questionnaire_Designer#Smart_default_values|Smart default values]] are ignored when previewing reports. | ||
* Optionally, for selected questions, you can specify a '''Preview Answer''' on the properties pane. | * Optionally, for selected questions, you can specify a '''Preview Answer''' on the properties pane. | ||
== | === Autoreport cannot be saved because its size exceeds the maximum field length === | ||
The most exhaustive configurator for mobile reports is the Report Designer. If neither the generic | There's a limit on how many characters can be stored in a single field (different on various backends). For exceptionally large questionnaires, you may encounter a problem where the autoreport (or another field; see below) cannot be saved because it exceeds the maximum size. To solve the problem, enable compression in the Questionnaire Designer: select the top-level element of a questionnaire template and check '''Compress properties'''. | ||
[[File:Compress properties.png]] | |||
{| class="wikitable" | |||
! Entity || Compressed fields | |||
|- | |||
| resco_questionnaire || resco_rules, resco_styles, resco_reusefetch, resco_autoreport, resco_localization, resco_reportingproperties, resco_layout | |||
|- | |||
| resco_questionnairegroup || resco_rules, resco_repeatconfig, resco_localization, resco_reportingproperties, resco_layout | |||
|- | |||
| resco_question || resco_rules, resco_localization, resco_reportingproperties, resco_layout | |||
|} | |||
== Custom report: edit in the Report Designer == | |||
The most exhaustive configurator for mobile reports is the Report Designer. If neither the generic report nor the automatic report customized in the Questionnaire Designer is sufficient for your use case, you can set up questionnaire reports in the Report Designer. | |||
=== Create a report === | === Create a report === | ||
To | To take the mobile report definition from a questionnaire template and convert it into a report template that can be configured in the Report Designer, proceed as follows: | ||
# Start the Report Designer. | # Start the Report Designer. | ||
# Click '''New'''. | # Click '''New'''. | ||
# As '''Entity''', select "resco_questionnaire". | # As '''Entity''', select "resco_questionnaire". | ||
# As '''Create''', select "From Template", then choose the questionnaire to serve as a source for your report.<br>[[File:Create mobile report for questionnaire entity.png|600px]] | # As '''Create''', select "From Template", then choose the questionnaire to serve as a source for your report.<br>[[File:Create mobile report for questionnaire entity.png|alt= Mobile reports for Resco Inspections: Create mobile report for questionnaire entity|600px]] | ||
# Set other options on the '''Create Mobile Report''' window as needed, then click '''OK'''. | # Set other options on the '''Create Mobile Report''' window as needed, then click '''OK'''. | ||
# Once you're done editing the report, save all changes, and activate the report. | # Once you're done editing the report, save all changes, and activate the report. | ||
The procedure doesn't work on [[Salesforce]].<!-- Instead, in the [[Questionnaire Designer]], make sure that Autoreport is enabled in the [[Questionnaire_Designer#Questionnaire_options|questionnaire options]], then export the questionnaire. Unzip the package and import the report file to the Report Designer.--> | |||
=== Make new report visible === | === Make new report visible === | ||
| Line 178: | Line 214: | ||
To make the report available for users in the app: | To make the report available for users in the app: | ||
* In the Report Designer, make sure that the report is linked to the correct questionnaire. Also, make sure the report is active. | * In the Report Designer, make sure that the report is linked to the correct questionnaire. Also, make sure the report is active. | ||
* In the Questionnaire Designer, | * In the Questionnaire Designer, open the questionnaire template, click '''Edit''', and choose the right report. | ||
:: [[File:Add report to command.png|600px]] | :: [[File:Add report to command.png|600px]] | ||
=== Images in questionnaire reports === | === Images in questionnaire reports === | ||
If you are using the | If you are using the generic report, or if you configure your report in the [[Questionnaire Designer]], image-type questions and answers will be included, no extra effort is needed. However, if you are creating a custom report for a questionnaire from scratch, you need to perform a few extra steps to access the right images related to your questions. | ||
When a questionnaire is saved, the image present on the questionnaire is saved as a record in the note/annotation entity. This entity has two important fields that contain the relationship between the questionnaire and the question where the image is set: | When a questionnaire is saved, the image present on the questionnaire is saved as a record in the note/annotation entity. This entity has two important fields that contain the relationship between the questionnaire and the question where the image is set: | ||
| Line 189: | Line 225: | ||
* Title/subject - contains the reference to the question on which the image is saved | * Title/subject - contains the reference to the question on which the image is saved | ||
::[[File:Title and regarding fields.png|600px]] | ::[[File:Title and regarding fields.png|alt=Mobile reports for Resco Inspections: Title and regarding fields|600px]] | ||
Both of these fields are needed to be used in the filter to get the note on the report. | Both of these fields are needed to be used in the filter to get the note on the report. | ||
| Line 196: | Line 232: | ||
# Select the report body and click '''Edit Sources'''. | # Select the report body and click '''Edit Sources'''. | ||
# Add a new variable of the type Fetch Result for the annotation entity.<br>[[File:New annotation variable.png]] | # Add a new variable of the type Fetch Result for the annotation entity.<br>[[File:New annotation variable.png|alt=Mobile reports for Resco Inspections: New annotation variable]] | ||
# Define the appropriate filter.<br>[[File:Filter for the annotation variable.png|600px]] | # Define the appropriate filter.<br>[[File:Filter for the annotation variable.png|alt=Mobile reports for Resco Inspections: Filter for the annotation variable|600px]] | ||
=== Logo in questionnaire reports === | === Logo in questionnaire reports === | ||
| Line 204: | Line 240: | ||
# Select the report body and click '''Edit Sources'''. | # Select the report body and click '''Edit Sources'''. | ||
# Add a variable of the type Fetch Result for the annotation entity. | # Add a variable of the type Fetch Result for the annotation entity. | ||
# Define the appropriate filter.<br>[[File:Questionnaire logo in report.png|600px]] | # Define the appropriate filter.<br>[[File:Questionnaire logo in report.png|alt=Mobile reports for Resco Inspections: Questionnaire logo in report|600px]] | ||
=== Images from repeatable groups === | === Images from repeatable groups === | ||
| Line 212: | Line 248: | ||
First, you need to create a child repeater for question group and add "resco_name" condition to the filer. Use the "Contains" operator and the name string from Questionnaire Designer. This way you make that each repetition will be fetched and used in the report's repeater. A good practice is also to define the sort order so that you get the question groups in the same order as on the questionnaire. | First, you need to create a child repeater for question group and add "resco_name" condition to the filer. Use the "Contains" operator and the name string from Questionnaire Designer. This way you make that each repetition will be fetched and used in the report's repeater. A good practice is also to define the sort order so that you get the question groups in the same order as on the questionnaire. | ||
# Create a child repeater.<br>[[File:Repeatable1.png|600px]] | # Create a child repeater.<br>[[File:Repeatable1.png|alt=Mobile reports for Resco Inspections: Repeatable1|600px]] | ||
# Select the repeater and click '''Edit Sources''', then double-click the filter. | # Select the repeater and click '''Edit Sources''', then double-click the filter. | ||
# Click '''Add Condition''' and enter the condition for "resco_name".<br>[[File:Repeatable2.png|600px]] | # Click '''Add Condition''' and enter the condition for "resco_name".<br>[[File:Repeatable2.png|alt=Mobile reports for Resco Inspections: Repeatable2|600px]] | ||
# Save all changes. | # Save all changes. | ||
| Line 220: | Line 256: | ||
# Return to the list of variables of the child repeater. | # Return to the list of variables of the child repeater. | ||
# Click '''Add''' to add a variable for the entity "resco_question".<br>[[File:Repeatable3.png|600px]] | # Click '''Add''' to add a variable for the entity "resco_question".<br>[[File:Repeatable3.png|alt=Mobile reports for Resco Inspections: Repeatable3|600px]] | ||
The final step is to place an image cell into the repeater and define the "annotation" entity filter. The "annotation.objected" must equal the id of the questionnaire and the "annotation.subject" must equal the name of the image question from step 2. | The final step is to place an image cell into the repeater and define the "annotation" entity filter. The "annotation.objected" must equal the id of the questionnaire and the "annotation.subject" must equal the name of the image question from step 2. | ||
| Line 226: | Line 262: | ||
# Close the variables list and return to the questionnaire design. | # Close the variables list and return to the questionnaire design. | ||
# Select a cell in the child repeater grid and click '''Add Image'''. | # Select a cell in the child repeater grid and click '''Add Image'''. | ||
# On the '''Properties''' pane, click '''Binding > Select''' and define a filter for the annotation.<br>[[File:Repeatable4.png|600px]] | # On the '''Properties''' pane, click '''Binding > Select''' and define a filter for the annotation.<br>[[File:Repeatable4.png|alt=Mobile reports for Resco Inspections: Repeatable4|600px]] | ||
=== Images from repeatable groups (variant syntax) === | |||
As an alternative, you can use the following binding in a repeater for a group: <code><nowiki>image#{{resco_questiongroupIndex:000}}</nowiki></code>. | |||
* <code>image</code> - name of the question | |||
* <code>resco_questiongroupIndex</code> - name of the repeater with the suffix 'Index' (for example, use "myrepeaterIndex" for a repeater called "myrepeater") - this inserts the index of the repetition | |||
* <code>:000</code> ensures the correct format, e.g., "1" is converted to "001", "2" to "002", etc. | |||
<syntaxhighlight lang="xml"> | |||
<fetch version="1.0"><entity name="annotation"><filter type="and"><condition attribute="subject" operator="eq" value="image#{{resco_questiongroupIndex:000}}"/> | |||
</syntaxhighlight> | |||
This syntax is not limited to image-type questions, but it can be used in general for any type of question in a repeater group. Keep in mind that resco_questiongroupIndex corresponds to the "line" of a repeater and not to the index of the repeat group. | |||
=== Using JSON storage in custom reports === | === Using JSON storage in custom reports === | ||
| Line 232: | Line 281: | ||
If you want to use a questionnaire component saved in JSON/compressed JSON format on your report, the fetch for this component must include an extra condition. | If you want to use a questionnaire component saved in JSON/compressed JSON format on your report, the fetch for this component must include an extra condition. | ||
[[File:Filter for json questions.png|600px]] | [[File:Filter for json questions.png|alt=Mobile reports for Resco Inspections: Filter for json questions|600px]] | ||
=== Custom reports and versioned templates === | |||
When you create a new version of a questionnaire template using the '''Revise''' button in the Questionnaire Designer, check '''Reuse''' to create also a new version of the report and associate it to the new version. | |||
[[File:Revise an older version of the questionnaire.png|alt=Mobile reports for Resco Inspections: Revise an older version of the questionnaire]] | |||
The '''Reuse''' checkbox applies to custom reports (configured in the Report Designer). | |||
{{Note|If the original version of the questionnaire template did not have an associated report, the new one won't either, even if you select to reuse the report.}} | |||
=== Omit unanswered questions === | |||
Since [[Releases/Winter_2022#Omit_unanswered_questions_from_reports|release 15.3]], you can decide to omit unanswered questions from the report en bloc. | |||
The '''Include Unanswered''' checkbox applies to automatic reports and newly created custom reports. If you want to update an existing custom report to use the same functionality, you must set up the '''[[Report_Designer#Visibility|Visibility]]''' property of each question. Use the virtual property IsAnswered in curly brackets. | |||
[[File:Question visibility in reports.png|alt=Mobile reports for Resco Inspections: Question visibility in reports]] | |||
== See also == | |||
* Report over multiple questionnaires: [[Report_Designer_examples#All_questionnaires_associated_with_a_record|All questionnaires associated with a record]] | |||
{{Feedback}} | |||
[[Category:Resco Inspections]] | [[Category:Resco Inspections]] | ||
Latest revision as of 10:38, 23 January 2026
Traditionally, inspections often involved a lot of paperwork - part of it in the field, and then again in the office, producing a report. Resco Inspections is designed to perform the entire inspection process without any paper documents, however, in many scenarios, it is desirable to finish the inspection with a report, a document that can be sent to your manager or end customer. Fortunately, Resco Inspections allows you to generate such reports directly on your device, immediately after concluding an inspection.
Resco Inspections comes with a generic report available automatically for all questionnaires. If the default rendering is not sufficient, use the automatic report, configurable directly in the Questionnaire Designer. For the most advanced use cases, you can use the Report Designer.

Generic report (legacy)
The demo data includes a generic report that can be used for any questionnaire, formerly known as "AutomaticReport". It simply lists all the questions and answers one after another. This generic report is included in app projects that have Inspections enabled by default. For app projects that don't include inspections out-of-the-box, you can add it via Woodford using the Install Report button (on the Inspections screen).
This generic report covers the scenario "one answered questionnaire = one report". If you want to cover multiple answered questionnaires in a single report, contact Resco support. For some platforms, we have created an experimental automatic report for a list of questionnaires.
The generic report displays a maximum of three images for image/media questions.
Automatic report: edit in the Questionnaire Designer
You can configure the report along with the questionnaire template directly in the Questionnaire Designer. The following configuration options are available:
Enable automatic reports
The support of automatic reports can be enabled per questionnaire. Edit a questionnaire template and click Options on the toolbar. On the Auto Report tab, enable Generate automatic report. This unlocks additional functions in your Questionnaire Designer:
- Additional options in the Auto Report tab for hiding unanswered questions from the report and selecting header and footer styles
- Toolbar functions for previewing reports, setting up the preview, and selecting report themes
- Option to configure report styles under Styles button
- Extra question/group properties related to reports
On the data level, the definition of the automatic report is saved in the questionnaire record, in the field "autoreport"; report styles are saved in the field "reportingproperties".
| Tip | The content of each field is a potentially large XML file. If you're not using automatic reports, disable them to save database space and sync time. |
What to include
For each question, set whether it should be included in the report or not (in the Show on report parameter on the Properties pane).
- All non-static questions are included in the report by default.
- Most static components are excluded by default; the only exception is the Logo.
Style and themes
Questionnaire reports come with pre-configured styles and themes.
- To assign styles to questions, select a question, and on the Properties pane, set the reporting style.
- To assign styles to header and footer, go to Options > Auto report tab.
- To modify styles manually, click Styles in the toolbar, switch to the Report Styles pane, and set the font, colors, and arrangement of question and answer. See Style editor for general information about styles.
- To switch between pre-defined report themes, click Report Themes in the toolbar and select one of the themes. Selecting a new theme discards all changes in custom styles.
Group properties
One of the big shortcomings of the generic report is how question groups are displayed. Therefore, the report customization in the Questionnaire Designer offers multiple options for displaying groups. To configure these, select a question group and modify parameters in the Reporting section on the Properties pane.

The first two parameters, Show Header and Header Style, allow you to select if and how should the group header be displayed in the report.
The Questions Layout determines how the questions should be arranged:
- Horizontal: questions are arranged next to each other in a row
- Vertical: questions are arranged one below the other in a column
- Custom: design your own layout (not available with Salesforce backend)
| Question 1 Answer 1 | Question 2 Answer 2 | Question 3 Answer 3 |
| Question 1 Answer 1 |
| Question 2 Answer 2 |
| Question 3 Answer 3 |

|
In the Break After, specify how many questions should be listed in a single column or row before continuing to the next column or row. Note the different numbering order.
| Question 1 Answer 1 | Question 2 Answer 2 | Question 3 Answer 3 |
| Question 4 Answer 4 | Question 5 Answer 5 |
| Question 1 Answer 1 | Question 4 Answer 4 |
| Question 2 Answer 2 | Question 5 Answer 5 |
| Question 3 Answer 3 |
Border Kind and Line Color determine if and how table cell borders should be drawn. The following options are supported:
- Grid
- Rows
- Columns
- Outside Border
- No Border
For repeatable groups, you can additionally configure the Repeat Layout.
- Default – each instance of a repeating group is rendered as a separate group with its own header
- Compact – all instances of a repeatable group share a single header
| Default horizontal | ||
|---|---|---|
| Question 1 Answer 1 | Question 2 Answer 2 | Question 3 Answer 3 |
| Default horizontal | ||
| Question 1 Answer 1 | Question 2 Answer 2 | Question 3 Answer 3 |
| Default horizontal | ||
| Question 1 Answer 1 | Question 2 Answer 2 | Question 3 Answer 3 |
| Default vertical | |
|---|---|
| Question 1 | Answer 1 |
| Question 2 | Answer 2 |
| Question 3 | Answer 3 |
| Default vertical | |
| Question 1 | Answer 1 |
| Question 2 | Answer 2 |
| Question 3 | Answer 3 |
| Compact horizontal | Question 1 | Question 2 | Question 3 |
|---|---|---|---|
| #1 | Answer 1 | Answer 2 | Answer 3 |
| #2 | Answer 1 | Answer 2 | Answer 3 |
| Compact vertical | Question 1 Question 2 Question 3 |
|---|---|
| #1 | Answer 1 Answer 2 Answer 3 |
| #2 | Answer 1 Answer 2 Answer 3 |
Preview the result
If you're working with Resco Cloud or Resco Inspections cloud backends, you can preview reports directly in the Questionnaire Designer.
- Click Report on the toolbar to display the report preview.
- Click Settings on the toolbar to set the Language of the previewed report, and the data (answers) of the Questionnaire that should be displayed. Use "Virtual" if you want to use empty/default values, or select one of the existing completed questionnaires as a data source.
Note: Smart default values are ignored when previewing reports. - Optionally, for selected questions, you can specify a Preview Answer on the properties pane.
Autoreport cannot be saved because its size exceeds the maximum field length
There's a limit on how many characters can be stored in a single field (different on various backends). For exceptionally large questionnaires, you may encounter a problem where the autoreport (or another field; see below) cannot be saved because it exceeds the maximum size. To solve the problem, enable compression in the Questionnaire Designer: select the top-level element of a questionnaire template and check Compress properties.

| Entity | Compressed fields |
|---|---|
| resco_questionnaire | resco_rules, resco_styles, resco_reusefetch, resco_autoreport, resco_localization, resco_reportingproperties, resco_layout |
| resco_questionnairegroup | resco_rules, resco_repeatconfig, resco_localization, resco_reportingproperties, resco_layout |
| resco_question | resco_rules, resco_localization, resco_reportingproperties, resco_layout |
Custom report: edit in the Report Designer
The most exhaustive configurator for mobile reports is the Report Designer. If neither the generic report nor the automatic report customized in the Questionnaire Designer is sufficient for your use case, you can set up questionnaire reports in the Report Designer.
Create a report
To take the mobile report definition from a questionnaire template and convert it into a report template that can be configured in the Report Designer, proceed as follows:
- Start the Report Designer.
- Click New.
- As Entity, select "resco_questionnaire".
- As Create, select "From Template", then choose the questionnaire to serve as a source for your report.
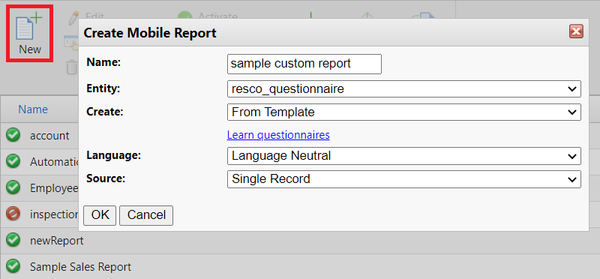
- Set other options on the Create Mobile Report window as needed, then click OK.
- Once you're done editing the report, save all changes, and activate the report.

The procedure doesn't work on Salesforce.
Make new report visible
To make the report available for users in the app:
- In the Report Designer, make sure that the report is linked to the correct questionnaire. Also, make sure the report is active.
- In the Questionnaire Designer, open the questionnaire template, click Edit, and choose the right report.

Images in questionnaire reports
If you are using the generic report, or if you configure your report in the Questionnaire Designer, image-type questions and answers will be included, no extra effort is needed. However, if you are creating a custom report for a questionnaire from scratch, you need to perform a few extra steps to access the right images related to your questions.
When a questionnaire is saved, the image present on the questionnaire is saved as a record in the note/annotation entity. This entity has two important fields that contain the relationship between the questionnaire and the question where the image is set:
- Regarding/objectid - contains the reference to the questionnaire
- Title/subject - contains the reference to the question on which the image is saved

Both of these fields are needed to be used in the filter to get the note on the report.
The note entity is used for images if your backend is Resco Cloud or Dynamics. For Salesforce, use the contentversion entity instead. The fields have a different name but the general principle remains the same.
- Select the report body and click Edit Sources.
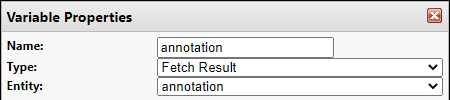
- Add a new variable of the type Fetch Result for the annotation entity.
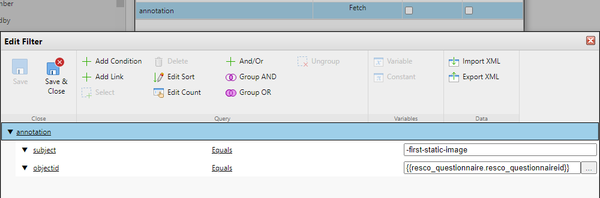
- Define the appropriate filter.


Logo in questionnaire reports
Adding the logo of the questionnaire template to a report is even easier than adding an image related to a question. The logo is linked directly from the questionnaire and its title equals "-resco_logo".
- Select the report body and click Edit Sources.
- Add a variable of the type Fetch Result for the annotation entity.
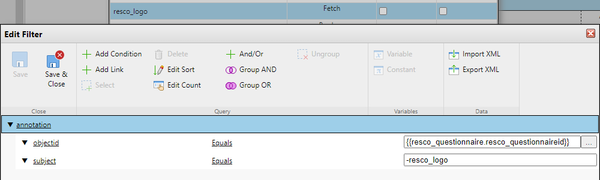
- Define the appropriate filter.
Images from repeatable groups
In the case of images that are placed within repeatable groups, you need to adjust the annotation fetch according to the name, index, and repetition of the respective question group. When the question group is repeated on the questionnaire form, the name (field "resco_questiongroup.resco_name") is composed of the name of the question group defined in the questionnaire designer and the index of repetition, e.g. "my-question-group#001". The same works for each question placed within.
First, you need to create a child repeater for question group and add "resco_name" condition to the filer. Use the "Contains" operator and the name string from Questionnaire Designer. This way you make that each repetition will be fetched and used in the report's repeater. A good practice is also to define the sort order so that you get the question groups in the same order as on the questionnaire.
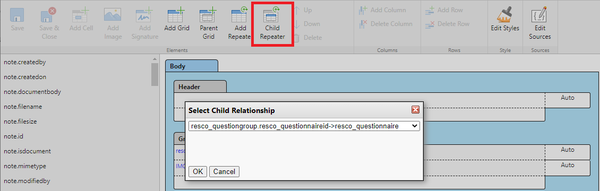
- Create a child repeater.
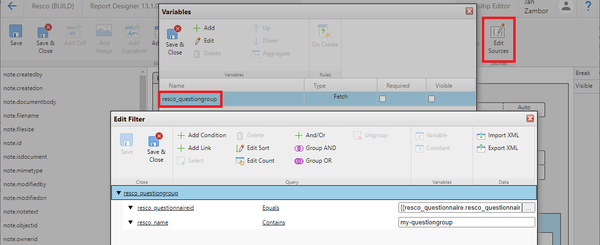
- Select the repeater and click Edit Sources, then double-click the filter.
- Click Add Condition and enter the condition for "resco_name".
- Save all changes.


Next, define the fetch for “resco_question” entity which will get the correct question record. You need this record to fetch the correct annotation record in the following step. The question filter should use “resco_questiongroup” condition for the question group from step 1 and condition based on the question name and index similarly as in the “resco_questiongroup” filter.
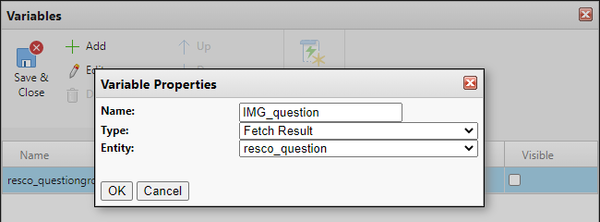
- Return to the list of variables of the child repeater.
- Click Add to add a variable for the entity "resco_question".

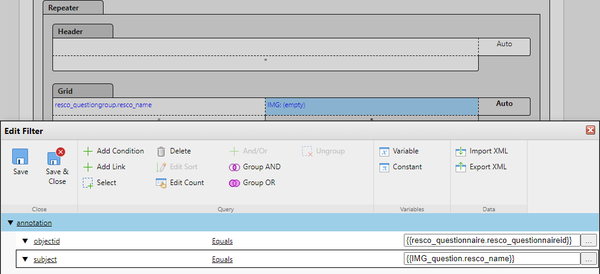
The final step is to place an image cell into the repeater and define the "annotation" entity filter. The "annotation.objected" must equal the id of the questionnaire and the "annotation.subject" must equal the name of the image question from step 2.
- Close the variables list and return to the questionnaire design.
- Select a cell in the child repeater grid and click Add Image.
- On the Properties pane, click Binding > Select and define a filter for the annotation.

Images from repeatable groups (variant syntax)
As an alternative, you can use the following binding in a repeater for a group: image#{{resco_questiongroupIndex:000}}.
image- name of the questionresco_questiongroupIndex- name of the repeater with the suffix 'Index' (for example, use "myrepeaterIndex" for a repeater called "myrepeater") - this inserts the index of the repetition:000ensures the correct format, e.g., "1" is converted to "001", "2" to "002", etc.
<fetch version="1.0"><entity name="annotation"><filter type="and"><condition attribute="subject" operator="eq" value="image#{{resco_questiongroupIndex:000}}"/>
This syntax is not limited to image-type questions, but it can be used in general for any type of question in a repeater group. Keep in mind that resco_questiongroupIndex corresponds to the "line" of a repeater and not to the index of the repeat group.
Using JSON storage in custom reports
If you want to use a questionnaire component saved in JSON/compressed JSON format on your report, the fetch for this component must include an extra condition.

Custom reports and versioned templates
When you create a new version of a questionnaire template using the Revise button in the Questionnaire Designer, check Reuse to create also a new version of the report and associate it to the new version.

The Reuse checkbox applies to custom reports (configured in the Report Designer).
| Note | If the original version of the questionnaire template did not have an associated report, the new one won't either, even if you select to reuse the report. |
Omit unanswered questions
Since release 15.3, you can decide to omit unanswered questions from the report en bloc.
The Include Unanswered checkbox applies to automatic reports and newly created custom reports. If you want to update an existing custom report to use the same functionality, you must set up the Visibility property of each question. Use the virtual property IsAnswered in curly brackets.

See also
- Report over multiple questionnaires: All questionnaires associated with a record
{{#CI form: title = Was this information helpful? How can we improve?
| type = inputs
| [textarea]
}}