Guides: Difference between revisions
| (51 intermediate revisions by 2 users not shown) | |||
| Line 1: | Line 1: | ||
Guides | {{Discontinued}}{{Guides TOC}} | ||
'''Resco Guides''' is a workforce knowledge management software by Resco. | |||
It is an optional component of [[Mobile App Development Toolkit]] that allows you to create step-by-step instructions that your technicians in the field can follow to solve a problem. If you have an existing solution that uses Woodford and Resco mobile apps, it can be added to your solution in a few clicks. | |||
It is available for Microsoft Dataverse/Dynamics 365, Salesforce, and Resco Cloud backends. | |||
{{YT|zjG4RY36VMk}} | {{YT|zjG4RY36VMk}} | ||
| Line 5: | Line 10: | ||
== Features == | == Features == | ||
* '''Guides''': Step-by-step instructions that combine text content, images, videos, and PDF attachments that are related to a particular record (for example, a piece of machinery) | * '''Guides''': Step-by-step instructions that combine text content, images, videos, and PDF attachments that are related to a particular record (for example, a piece of machinery). Guides can be displayed in [[Resco mobile apps]] or Power Apps. | ||
* '''Guides | * '''[[Guides library]]''': A web application that allows you to create, modify, and publish guides. | ||
* '''Feedback''': App users can rate the guides and provide feedback to the guide editors in the back office. | * '''[[Guides feedback and statistics|Feedback]]''': App users can rate the guides and provide feedback to the guide editors in the back office. | ||
* '''Guides harvesting''': App users can quickly collect simple guides from the field (take/upload photos and add comments) if they identify missing processes. Guide editors in the back office can then standardize the guides, add proper language and associations, and then publish them to make the information available to all users in the field (knowledge decentralization from experts to the entire organization). | * '''Guides harvesting''': App users can quickly collect simple guides from the field (take/upload photos and add comments) if they identify missing processes. Guide editors in the back office can then standardize the guides, add proper language and associations, and then publish them to make the information available to all users in the field (knowledge decentralization from experts to the entire organization). | ||
* '''[[Guides_library#Localizing_guides|Localization]]''': [[Guides_library#Localizing_guides|Guides can be localized]]. The translation can be either manual, or you can leverage cloud services for machine translation. | |||
* '''AI generation''': [[Guides_library#AI_tools|You can generate new guides using AI.]] | |||
== Prerequisites == | == Prerequisites == | ||
* [[Resco Cloud]] – [[Releases/Spring 2022|Release 15.0 (spring 2022)]] or later | * [[Resco Cloud]] – [[Releases/Spring 2022|Release 15.0 (spring 2022)]] or later | ||
* [[Dynamics| | * [[Dynamics|Dataverse/Dynamics]] – [[Releases/Summer 2022|Release 15.1 (summer 2022)]] or later | ||
* [[Guides on Power Platform|Power Apps]] – [[Releases/Summer 2023|Release 16.1 (summer 2023)]] or later | |||
* [[Guides on Power Platform|Power Pages]] – [[Releases/Summer 2023|Release 16.1 (summer 2023)]] or later | |||
* [[Salesforce]] – [[Releases/Spring 2024|Release 17.1 (spring 2024)]] or later | |||
== License == | |||
* Resco Guides requires Resco's ultimate license. | |||
* If you need more information, contact us at [mailto:sales@resco.net sales@resco.net]. | |||
== Configuring in Woodford == | == Configuring in Woodford == | ||
| Line 28: | Line 43: | ||
# Click '''Save'''. | # Click '''Save'''. | ||
# Optionally, click '''Add To Home''' if you want to add the Guides view as the last item on your [[home screen]]. | # Optionally, click '''Add To Home''' if you want to add the Guides view as the last item on your [[home screen]]. | ||
# For manager/admin projects that should have access to the Guides Editor, click '''Add Editor To Home'''.<br>[[File:Enable Guide.png|600px]] | # For manager/admin projects that should have access to the Guides Editor, click '''Add Editor To Home'''.<br>[[File:Enable Guide.png|alt=Guides: Add Editor To Home|600px]] | ||
;Adding guides to entity forms | ;Adding guides to entity forms | ||
| Line 37: | Line 52: | ||
# Save all changes. | # Save all changes. | ||
== Setting up | == Setting up Power Platform == | ||
Before you can use | Before you can use guides on Microsoft Power Platform (Dynamics/Dataverse) , you have to: | ||
* Install the Guides solution to your | * Install the Guides solution to your organization. | ||
* Create N:N entities between the Guide entity and entities that | * Create N:N entities between the Guide entity and entities that need access to guides. | ||
=== Installing the | === Installing the guides solution === | ||
# Download [https://woodford-download.resco.net/online/rescoguides the Guides solution file] from Resco web. | # Download [https://woodford-download.resco.net/online/rescoguides the Guides managed solution file] from Resco web. | ||
# Log in to | # Log in to https://make.powerapps.com/ as a '''system administrator'''. | ||
# | # Select the correct environment where you want to install guides. | ||
# Click '''Import''' and select the downloaded solution file. | # Select '''Solutions''' from the menu. | ||
# Click '''Import solution''' and select the downloaded solution file.<br>[[File:Import-solution-into-powerapps.png|alt=Import Guides solution into powerapps|600px]] | |||
# Finish the import wizard. | # Finish the import wizard. | ||
# Publish all customizations | # Wait until the import is complete. Then, click '''Publish all customizations'''. | ||
The Resco Guides managed solution includes custom tables and a model-driven app "Resco Guides", designed to run on a PC. Select "Resco Guides" in the list of apps on your environment and click '''Play''' to start it. It offers the following features: | |||
* Guides: Starts the [[Guides library]] tool for creating, editing, and managing guides. | |||
* Categories: Allows you to view, create, and update guide categories. | |||
* Guides: Displays the standard view for guides in model-driven apps. | |||
* Guide Feedbacks: Displays the rating and feedback left by users. | |||
:[[File:Resco | ::[[File:Resco-guides-model-driven-app.png|alt=Resco Guides model driven app showcase|600px]] | ||
=== Defining N:N relationships === | === Defining N:N relationships === | ||
On | On Dataverse, before you can associate a guide with another table in Woodford, you must create an N:N relationship. | ||
#Go to the ''' | |||
# | # Go to https://make.powerapps.com/ and select the right environment with guides installed. | ||
# | # Select '''Tables''' from the menu and switch to '''All''' tab. | ||
# | # Find the "Guide" table and click it. | ||
#Click ''' | # Click '''New > Relationship > Many-to-Many'''.<br>[[File:Creating-new-many-to-many-in-powerapps.png|alt=Guides: Creating new many to many relationship in powerapps]] | ||
# Select the other table from the list, for example, "Account", if you want to link guides to the Account records. | |||
# Click '''Done''' and wait until the relationship is created. | |||
== Adding guide categories == | == Adding guide categories == | ||
Guides that you create can belong to a category. To keep your guides organized, create guide categories that are suitable for your organization, such as "maintenance" or "safety". | |||
== | === Power Platform === | ||
Guides | # Start the Resco Guides app. | ||
# Select '''Categories''' from the menu. | |||
# Click '''New''' and enter the name of the new category, such as "Maintenance". <br> [[File:Categories.png|alt=Adding guide categories in Dataverse|600px]] | |||
# Click '''Save & Close'''. | |||
=== Resco Cloud=== | |||
# Start the [[Admin Console]]. | |||
# Select '''Data > Manage Data''' and enable '''Show System Entities'''. | |||
# Scroll down to the Guide Category entity and open it. | |||
# Click '''New''' and enter a category, for example, "Maintenance" or "Repair", and save it. <br> [[File:Guide category.png|alt=Adding guide categories in Admin Console|400px]] | |||
=== Salesforce === | |||
On Salesforce, because of the [[Getting_started_with_Salesforce#Specifics_and_limitations|specifics and limitations]], the recommended way for managing Guide Categories is using the Resco Mobile CRM app. This method can be used with any backend. | |||
# Edit an [[app project]] in [[Woodford]]. | |||
# Select the "Guide Category" entity (rh_guidecategory) from the project menu. | |||
# Create a simple [[view]] and a simple [[form]] so that you can view and edit categories in the mobile app. | |||
# Add the entity to your [[home screen]], then save everything and publish the project. | |||
== | == Guides library == | ||
Guides library or editor is a web tool for guide authors. It serves for creating and managing guides. See [[Guides library]] for details. | |||
== Using guides in the app == | == Using guides in the app == | ||
| Line 136: | Line 123: | ||
On the '''home screen''' - all guides (if you used the '''Add To Home''' button in Guides configuration) | On the '''home screen''' - all guides (if you used the '''Add To Home''' button in Guides configuration) | ||
:[[File:Guides on the home screen.png|600px]] | :[[File:Guides on the home screen.png|alt= Guides on the home screen showcase|600px]] | ||
On the '''entity form''' - related guides (if you added the related guides list to the form) | On the '''entity form''' - related guides (if you added the related guides list to the form) | ||
:[[File:Guides on a form.png|600px]] | :[[File:Guides on a form.png|alt=Guides on a form showcase|600px]] | ||
In a '''questionnaire''' (if you [[Questionnaire_Designer#Static_components|added the guide as a static component]] of the questionnaire) | In a '''questionnaire''' (if you [[Questionnaire_Designer#Static_components|added the guide as a static component]] of the questionnaire) | ||
:[[File:Guides from inspections.png|600px]] | :[[File:Guides from inspections.png|alt=Guides from inspections showcase|600px]] | ||
Tap the guide that interests you to display it. | Tap the guide that interests you to display it. | ||
:[[File:Houston9.png|200px]] [[File:Houston10.png|200px]] | :[[File:Houston9.png|alt=Guide showcase|200px]] [[File:Houston10.png|alt=Guide showcase|200px]] | ||
== Harvesting guides from the app == | == Harvesting guides from the app == | ||
{{Note|The ability to create new guides in Resco Mobile CRM was removed in [[Releases/Winter_2026|release 19.0]].}} | |||
You can also create new draft guides: | You can also create new draft guides: | ||
| Line 157: | Line 146: | ||
# Add a title, description, steps, and photos. | # Add a title, description, steps, and photos. | ||
# Save the guide. | # Save the guide. | ||
# Synchronize the app to make the guide available in the Guides Editor (status = "collected").<br>[[File:Creating a new guide.png|250px]] | # Synchronize the app to make the guide available in the Guides Editor (status = "collected").<br>[[File:Creating a new guide.png|ALT=Creating a new guide showcase|250px]] | ||
Harvesting is not supported with Salesforce. | |||
[[Category:Woodford]] | |||
[[ | |||
Latest revision as of 10:55, 29 September 2025
| Warning | This feature has been discontinued and is no longer available. If you have questions, contact your business development manager at Resco. |

|
Resco Guides is a workforce knowledge management software by Resco.
It is an optional component of Mobile App Development Toolkit that allows you to create step-by-step instructions that your technicians in the field can follow to solve a problem. If you have an existing solution that uses Woodford and Resco mobile apps, it can be added to your solution in a few clicks.
It is available for Microsoft Dataverse/Dynamics 365, Salesforce, and Resco Cloud backends.
Features
- Guides: Step-by-step instructions that combine text content, images, videos, and PDF attachments that are related to a particular record (for example, a piece of machinery). Guides can be displayed in Resco mobile apps or Power Apps.
- Guides library: A web application that allows you to create, modify, and publish guides.
- Feedback: App users can rate the guides and provide feedback to the guide editors in the back office.
- Guides harvesting: App users can quickly collect simple guides from the field (take/upload photos and add comments) if they identify missing processes. Guide editors in the back office can then standardize the guides, add proper language and associations, and then publish them to make the information available to all users in the field (knowledge decentralization from experts to the entire organization).
- Localization: Guides can be localized. The translation can be either manual, or you can leverage cloud services for machine translation.
- AI generation: You can generate new guides using AI.
Prerequisites
- Resco Cloud – Release 15.0 (spring 2022) or later
- Dataverse/Dynamics – Release 15.1 (summer 2022) or later
- Power Apps – Release 16.1 (summer 2023) or later
- Power Pages – Release 16.1 (summer 2023) or later
- Salesforce – Release 17.1 (spring 2024) or later
License
- Resco Guides requires Resco's ultimate license.
- If you need more information, contact us at sales@resco.net.
Configuring in Woodford
- Enabling guides
- Edit an app project in Woodford.
- Select Settings > Guides from the Project menu.
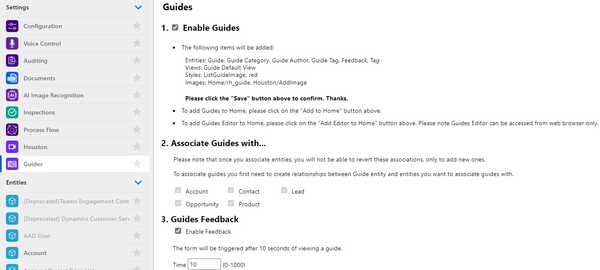
- Select Enable Guides.
- Select the entities for which you want to define guides. For example, if you want guides for your products, select the Product entity. You can add multiple.
Notes:- Once guides are enabled for an entity, they cannot be disabled.
- On Dynamics, you need to create an N:N entity before you can enable guides for an entity.
- Select Enable Feedback and set the delay after viewing a guide when a feedback form appears.
- Click Save.
- Optionally, click Add To Home if you want to add the Guides view as the last item on your home screen.
- For manager/admin projects that should have access to the Guides Editor, click Add Editor To Home.

- Adding guides to entity forms
- The home screen item lists all guides. Alternatively (or in addition) to the home screen button, you can add a list of related guides to an entity form. Users that display a record can then see the list of relevant guides.
- Edit an entity form.
- Click Add List and select "Guides List".
- Optionally, set up a filter, for example,
Status Reason Equals Published. - Save all changes.
Setting up Power Platform
Before you can use guides on Microsoft Power Platform (Dynamics/Dataverse) , you have to:
- Install the Guides solution to your organization.
- Create N:N entities between the Guide entity and entities that need access to guides.
Installing the guides solution
- Download the Guides managed solution file from Resco web.
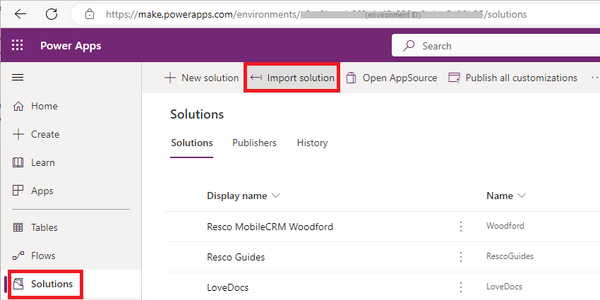
- Log in to https://make.powerapps.com/ as a system administrator.
- Select the correct environment where you want to install guides.
- Select Solutions from the menu.
- Click Import solution and select the downloaded solution file.
- Finish the import wizard.
- Wait until the import is complete. Then, click Publish all customizations.

The Resco Guides managed solution includes custom tables and a model-driven app "Resco Guides", designed to run on a PC. Select "Resco Guides" in the list of apps on your environment and click Play to start it. It offers the following features:
- Guides: Starts the Guides library tool for creating, editing, and managing guides.
- Categories: Allows you to view, create, and update guide categories.
- Guides: Displays the standard view for guides in model-driven apps.
- Guide Feedbacks: Displays the rating and feedback left by users.

Defining N:N relationships
On Dataverse, before you can associate a guide with another table in Woodford, you must create an N:N relationship.
- Go to https://make.powerapps.com/ and select the right environment with guides installed.
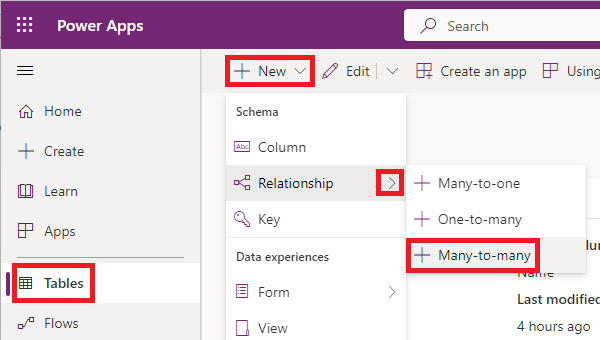
- Select Tables from the menu and switch to All tab.
- Find the "Guide" table and click it.
- Click New > Relationship > Many-to-Many.
- Select the other table from the list, for example, "Account", if you want to link guides to the Account records.
- Click Done and wait until the relationship is created.

Adding guide categories
Guides that you create can belong to a category. To keep your guides organized, create guide categories that are suitable for your organization, such as "maintenance" or "safety".
Power Platform
- Start the Resco Guides app.
- Select Categories from the menu.
- Click New and enter the name of the new category, such as "Maintenance".
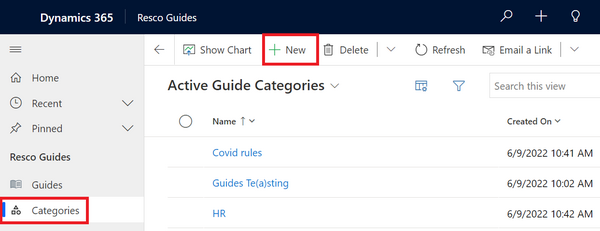
- Click Save & Close.

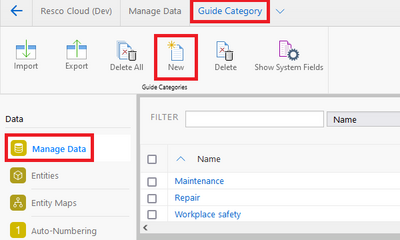
Resco Cloud
- Start the Admin Console.
- Select Data > Manage Data and enable Show System Entities.
- Scroll down to the Guide Category entity and open it.
- Click New and enter a category, for example, "Maintenance" or "Repair", and save it.

Salesforce
On Salesforce, because of the specifics and limitations, the recommended way for managing Guide Categories is using the Resco Mobile CRM app. This method can be used with any backend.
- Edit an app project in Woodford.
- Select the "Guide Category" entity (rh_guidecategory) from the project menu.
- Create a simple view and a simple form so that you can view and edit categories in the mobile app.
- Add the entity to your home screen, then save everything and publish the project.
Guides library
Guides library or editor is a web tool for guide authors. It serves for creating and managing guides. See Guides library for details.
Using guides in the app
In the app, you can find guides in three places:
On the home screen - all guides (if you used the Add To Home button in Guides configuration)

On the entity form - related guides (if you added the related guides list to the form)

In a questionnaire (if you added the guide as a static component of the questionnaire)

Tap the guide that interests you to display it.


Harvesting guides from the app
| Note | The ability to create new guides in Resco Mobile CRM was removed in release 19.0. |
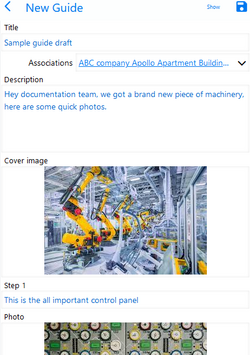
You can also create new draft guides:
- On the home screen, tap Guides.
- Tap the plus button in the top right corner.
- Add a title, description, steps, and photos.
- Save the guide.
- Synchronize the app to make the guide available in the Guides Editor (status = "collected").

Harvesting is not supported with Salesforce.