Resco Inspections on Dynamics 365: Difference between revisions
→Questionnaire Player on entity form: preparing some stuff for later |
|||
| (14 intermediate revisions by 2 users not shown) | |||
| Line 1: | Line 1: | ||
{{Inspections TOC}} | {{Inspections TOC}} | ||
[[Resco Inspections]] can be combined with your [[Dynamics]] 365/CRM organization and grant you access to powerful checklists and questionnaires. | [[Resco Inspections]] can be combined with your Dataverse/[[Dynamics]] 365/[[Dynamics]] CRM organization and grant you access to powerful checklists and questionnaires. | ||
== Enabling Resco Inspections == | == Enabling Resco Inspections == | ||
| Line 6: | Line 6: | ||
=== Woodford solution === | === Woodford solution === | ||
To enable and use the Resco Inspections functionalities within Dynamics 365/CRM, first it is necessary to download and import the Woodford solution into your Dynamics 365/CRM instance. Woodford solution is a custom Dynamics 365/CRM managed solution developed and maintained by Resco that contains all the Resco components, including the Resco Inspections tools. | To enable and use the Resco Inspections functionalities within Dynamics 365/CRM, first it is necessary to download and import the Woodford solution ([[Resco Suite]]) into your Dynamics 365/CRM instance. Woodford solution is a custom Dynamics 365/CRM managed solution developed and maintained by Resco that contains all the Resco components, including the Resco Inspections tools. | ||
More information on how to install the latest version of Woodford into Dynamics 365/CRM can be found [[ | More information on how to install the latest version of Woodford into Dynamics 365/CRM can be found [[Resco_Suite#Installing_Resco_Suite|here]]. | ||
=== New app project === | === New app project === | ||
| Line 18: | Line 18: | ||
Detailed steps for Dynamics 365 Online: | Detailed steps for Dynamics 365 Online: | ||
# In the web browser (we suggest using Chrome) log into your Dynamics 365 organization and switch to the '''Resco Suite''' app.<br>[[File:01 Resco Suite app.png|600px]] | # In the web browser (we suggest using Chrome) log into your Dynamics 365 organization and switch to the '''Resco Suite''' app.<br>[[File:01 Resco Suite app.png|alt=Resco Inspections on Dynamics 365: New app project: Resco Suite app|600px]] | ||
# Click '''Woodford''' to open the [[Woodford]] tool.<br>[[File:02 Woodford.png |600px]] | # Click '''Woodford''' to open the [[Woodford]] tool.<br>[[File:02 Woodford.png |alt=Resco Inspections on Dynamics 365: New app project: Woodford|600px]] | ||
# Select '''[[app projects|App Projects]]''' from the '''Administration''' menu, then click '''New''' to start the '''New Project Wizard'''. | # Select '''[[app projects|App Projects]]''' from the '''Administration''' menu, then click '''New''' to start the '''New Project Wizard'''. | ||
# In the wizard, set '''Type''' to "Standard User" and choose the Inspector template from the gallery, then click '''Next'''.<br>[[File:03 New Project 1.png |600px]] | # In the wizard, set '''Type''' to "Standard User" and choose the Inspector template from the gallery, then click '''Next'''.<br>[[File:03 New Project 1.png |alt=Resco Inspections on Dynamics 365: New app project: New Project 1|600px]] | ||
# Enter '''New App Name''' (e.g., "Inspector App") and click '''Next'''.<br>[[File:04 New Project 2.png |600px]] | # Enter '''New App Name''' (e.g., "Inspector App") and click '''Next'''.<br>[[File:04 New Project 2.png |alt=Resco Inspections on Dynamics 365: New app project: New Project 2|600px]] | ||
# In the last step, enter the name of your project (e.g., "Inspector Project"), select the security role(s) this project will be associated with and click '''Create'''.<br>[[File:05 New Project 3.png |600px]] | # In the last step, enter the name of your project (e.g., "Inspector Project"), select the security role(s) this project will be associated with and click '''Create'''.<br>[[File:05 New Project 3.png |alt=Resco Inspections on Dynamics 365: New app project: New Project 3|600px]] | ||
# Finally, open the new app project and [[Publishing app projects|publish it]].<br>[[File:06 Publish project.png|600px]] | # Finally, open the new app project and [[Publishing app projects|publish it]].<br>[[File:06 Publish project.png|alt=Resco Inspections on Dynamics 365: New app project: Publish project|600px]] | ||
Now you can go to the Questionnaire Designer and [[Resco_Inspections_on_Dynamics_365#Questionnaire_Designer|create a questionnaire template]]. | Now you can go to the Questionnaire Designer and [[Resco_Inspections_on_Dynamics_365#Questionnaire_Designer|create a questionnaire template]]. | ||
| Line 32: | Line 32: | ||
In case you already use the Resco technology, have an existing/customized app project in Woodford, and want to enable the Resco Inspections functionality, follow these steps: | In case you already use the Resco technology, have an existing/customized app project in Woodford, and want to enable the Resco Inspections functionality, follow these steps: | ||
# In Woodford, edit your [[app project]] and select '''[[Inspections]]''' from the '''Project''' menu.<br>[[File:07 Inspections disabled.png|600px]] | # In Woodford, edit your [[app project]] and select '''[[Inspections]]''' from the '''Project''' menu.<br>[[File:07 Inspections disabled.png|alt=Resco Inspections on Dynamics 365: Existing app project: Inspections disabled|600px]] | ||
# Check '''Enable Inspections''' and confirm that you have the appropriate license, then click '''Save'''.<br>[[File:08 Inspections enabled.png|600px]] | # Check '''Enable Inspections''' and confirm that you have the appropriate license, then click '''Save'''.<br>[[File:08 Inspections enabled.png|alt=Resco Inspections on Dynamics 365: Existing app project: Inspections enabled|600px]] | ||
# If you want to add the Inspections section to the [[Home screen]], click '''Add To Home'''. | # If you want to add the Inspections section to the [[Home screen]], click '''Add To Home'''. | ||
# If you want to add the Inspections section to any entity form (e.g. Appointment), click '''Add To Form'''. | # If you want to add the Inspections section to any entity form (e.g. Appointment), click '''Add To Form'''. | ||
# If you want to install a generic Automatic Report, click '''Install Report'''. | # If you want to install a generic Automatic Report, click '''Install Report'''. | ||
# Optionally, install some sample questionnaire templates via the Questionnaire Designer tool.<br>[[File:09 Inspections configuration.png|600px]] | # Optionally, install some sample questionnaire templates via the Questionnaire Designer tool.<br>[[File:09 Inspections configuration.png|alt=Resco Inspections on Dynamics 365: Existing app project: Inspections configuration|600px]] | ||
# Save all the changes and publish the app project. | # Save all the changes and publish the app project. | ||
| Line 46: | Line 46: | ||
Detailed steps for Dynamics 365 Online: | Detailed steps for Dynamics 365 Online: | ||
# In the web browser, log into your Dynamics 365 organization and switch to the Resco Suite app.<br>[[File:01 Resco Suite app.png|600px]] | # In the web browser, log into your Dynamics 365 organization and switch to the Resco Suite app.<br>[[File:01 Resco Suite app.png|alt=Resco Inspections on Dynamics 365: Questionnaire Designer: Resco Suite app|600px]] | ||
# Select Inspections and start the Questionnaire Designer tool.<br>[[File:10 Questionnaire Designer.png|600px]] | # Select Inspections and start the Questionnaire Designer tool.<br>[[File:10 Questionnaire Designer.png|alt=Resco Inspections on Dynamics 365: Questionnaire Designer: |600px]] | ||
# New window with the Questionnaire Designer opens. Click either the '''New''' button or the '''New Questionnaire''' link to start the [[Questionnaire_Designer#Creating_a_new_questionnaire|New Questionnaire Wizard]].<br>[[File:11 New questionnaire.png|600px]]<br>A quick overview of the Questionnaire Designer’s capabilities can be found [[Resco_Inspections_on_Dynamics_365#Designing_the_questionnaire|later in this article]]; more comprehensive information are [[Questionnaire Designer|here]]. | # New window with the Questionnaire Designer opens. Click either the '''New''' button or the '''New Questionnaire''' link to start the [[Questionnaire_Designer#Creating_a_new_questionnaire|New Questionnaire Wizard]].<br>[[File:11 New questionnaire.png|alt=Resco Inspections on Dynamics 365: Questionnaire Designer: New questionnaire|600px]]<br>A quick overview of the Questionnaire Designer’s capabilities can be found [[Resco_Inspections_on_Dynamics_365#Designing_the_questionnaire|later in this article]]; more comprehensive information are [[Questionnaire Designer|here]]. | ||
# When your finish your new template, click '''Save & Close'''. | # When your finish your new template, click '''Save & Close'''. | ||
# In the Questionnaires List select the draft of your template and click '''Activate'''.<br>[[File:12 Template activation.png|600px]] | # In the Questionnaires List select the draft of your template and click '''Activate'''.<br>[[File:12 Template activation.png|alt=Resco Inspections on Dynamics 365: Questionnaire Designer: Template activation|600px]] | ||
Your template is now active and ready to be used [[Resco_Inspections_on_Dynamics_365#Mobile_app|in the mobile app]]. | Your template is now active and ready to be used [[Resco_Inspections_on_Dynamics_365#Mobile_app|in the mobile app]]. | ||
| Line 56: | Line 56: | ||
=== Mobile app === | === Mobile app === | ||
Finally, it is necessary to download the [[ | Finally, it is necessary to download the [[Resco Mobile CRM]] on your device via the corresponding application store and [[Connecting to CRM|synchronize it with your Dynamics 365/CRM organization]]. | ||
== Designing the questionnaire == | == Designing the questionnaire == | ||
| Line 76: | Line 74: | ||
{{Note|When adding a new group or question into your template, carefully define not only its label (i.e., what the mobile user sees in the app) but also the technical name – this must be unique within the template and will appear in the Rules Editor when building a custom business logic.}} | {{Note|When adding a new group or question into your template, carefully define not only its label (i.e., what the mobile user sees in the app) but also the technical name – this must be unique within the template and will appear in the Rules Editor when building a custom business logic.}} | ||
[[File:16 Question name.png|600px]] | [[File:16 Question name.png|alt=Resco Inspections on Dynamics 365: Create structure: Question name|600px]] | ||
=== Enable scoring === | === Enable scoring === | ||
| Line 82: | Line 80: | ||
You can use the native '''[[Questionnaire_Designer#Scoring|Scoring]]''' feature to evaluate each answered questionnaire based on the value of the answers. | You can use the native '''[[Questionnaire_Designer#Scoring|Scoring]]''' feature to evaluate each answered questionnaire based on the value of the answers. | ||
[[File:Summer 2020 scoring.png|600px]] | [[File:Summer 2020 scoring.png|alt=Resco Inspections on Dynamics 365: Enable scoring|600px]] | ||
=== Define styles === | === Define styles === | ||
| Line 90: | Line 88: | ||
* assign the custom style to the corresponding question | * assign the custom style to the corresponding question | ||
[[File:18 Style.png|600px]] | [[File:18 Style.png|alt=Resco Inspections on Dynamics 365: Define styles|600px]] | ||
=== Add custom business logic === | === Add custom business logic === | ||
To make the questionnaire more interactive and dynamic for the mobile user, you can add a custom business logic with different levels of complexity. | To make the questionnaire more interactive and dynamic for the mobile user, you can add a custom business logic with different levels of complexity. | ||
; [[Questionnaire_Designer#Smart_question_properties|Smart question properties]]: Simple rules that allow you to easily control some properties of the groups or questions<br>[[File:Smart question rule.png]] | ; [[Questionnaire_Designer#Smart_question_properties|Smart question properties]]: Simple rules that allow you to easily control some properties of the groups or questions<br>[[File:Smart question rule.png|alt=Resco Inspections on Dynamics 365: Add custom business logic: Smart question rule]] | ||
; [[Questionnaire_Designer#Smart_default_values|Smart default values]]: Configure a default value to save time for the inspector in the field<br>[[File:Smart default value.png|600px]] | ; [[Questionnaire_Designer#Smart_default_values|Smart default values]]: Configure a default value to save time for the inspector in the field<br>[[File:Smart default value.png|alt=Resco Inspections on Dynamics 365: Add custom business logic: Smart default value|600px]] | ||
; [[Questionnaire_Designer#Editing_rules|Rules]]: More complex root-level or group-level rules managed within the Rules Designer <br>[[File:19 Rules.png|600px]] | ; [[Questionnaire_Designer#Editing_rules|Rules]]: More complex root-level or group-level rules managed within the Rules Designer <br>[[File:19 Rules.png|alt=Resco Inspections on Dynamics 365: Add custom business logic: Rules|600px]] | ||
; [[Resco_JavaScript_Bridge#Questionnaire|JavaScript]]: The most advanced logic that cannot be covered by smart properties or rules can be written in JavaScript | ; [[Resco_JavaScript_Bridge#Questionnaire|JavaScript]]: The most advanced logic that cannot be covered by smart properties or rules can be written in JavaScript | ||
=== Add custom commands === | === Add custom commands === | ||
You can manage the existing or create new custom commands together with the custom business logic via the Commands section (more information | You can manage the existing or create new custom commands together with the custom business logic via the Commands section ([[Questionnaire_Designer#Configuring_commands|more information]]). | ||
=== Configure localization === | === Configure localization === | ||
Each questionnaire template can be translated into multiple languages (more information | Each questionnaire template can be translated into multiple languages ([[Questionnaire_Designer#Localization|more information]]). | ||
=== Add branding === | === Add branding === | ||
You can brand your new questionnaire template by adding a company logo and specifying the questionnaire’s icon | You can brand your new questionnaire template by adding a [[Questionnaire_Designer#Static_components|company logo]] (a static component of the questionnaire) and specifying the [[Questionnaire_Designer#icon|questionnaire’s icon]] (in questionnaire properties). | ||
=== Enable versioning === | === Enable versioning === | ||
To manage different versions of the same questionnaire template and have | To manage different versions of the same questionnaire template and have access to its older versions, you can enable the Versioning feature ([[Questionnaire_Designer#Life_cycle_of_a_questionnaire_template|more information]]). | ||
== Opening the questionnaire in the mobile app == | == Opening the questionnaire in the mobile app == | ||
| Line 134: | Line 132: | ||
Generating a mobile report is easy: simply select the option '''Complete with a Report''' when finishing a questionnaire. | Generating a mobile report is easy: simply select the option '''Complete with a Report''' when finishing a questionnaire. | ||
[[File:44 Complete wit a report.png| 200px]] [[File:45 Mobile report.png|400px]] | [[File:44 Complete wit a report.png|alt=Resco Inspections on Dynamics 365: Generating reports from completed questionnaires: Complete wit a report|200px]] [[File:45 Mobile report.png|alt=Resco Inspections on Dynamics 365: Generating reports from completed questionnaires: Mobile report|400px]] | ||
== Reviewing questionnaires in Dynamics == | == Reviewing questionnaires in Dynamics == | ||
| Line 146: | Line 144: | ||
To access the Result Viewer in Dynamics 365, in the web browser (we suggest using Chrome) log into your Dynamics 365 organization and switch to the Resco Suite app. | To access the Result Viewer in Dynamics 365, in the web browser (we suggest using Chrome) log into your Dynamics 365 organization and switch to the Resco Suite app. | ||
[[File:01 Resco Suite app.png|600px]] | [[File:01 Resco Suite app.png|alt=Resco Inspections on Dynamics 365: Result Viewer: Resco Suite|600px]] | ||
Go to the Inspections section and open the Result Viewer tool. | Go to the Inspections section and open the Result Viewer tool. | ||
[[File:40 Result Viewer 1.png|600px]] | [[File:40 Result Viewer 1.png|alt=Resco Inspections on Dynamics 365: Result Viewer: Result Viewer 1|600px]] | ||
* Left panel = filter criteria | * Left panel = filter criteria | ||
| Line 156: | Line 154: | ||
* Right panel = selected questionnaire (read-only) | * Right panel = selected questionnaire (read-only) | ||
[[File:41 Result Viewer 2.png|600px]] | [[File:41 Result Viewer 2.png|alt=Resco Inspections on Dynamics 365: Result Viewer: Result Viewer 2|600px]] | ||
See [[Results Viewer]] for more information. | See [[Results Viewer]] for more information. | ||
| Line 166: | Line 164: | ||
See '''[[Results_Viewer#Adding_completed_questionnaires_to_Dynamics_entity_forms|Adding completed questionnaires to Dynamics entity forms]]''' for instructions. | See '''[[Results_Viewer#Adding_completed_questionnaires_to_Dynamics_entity_forms|Adding completed questionnaires to Dynamics entity forms]]''' for instructions. | ||
=== Questionnaire list, form, and player === | |||
The questionnaire is a custom entity that holds questionnaire data. By installing Woodford, you also install a customized list and form for the questionnaire entity and the Questionnaire Player. | The questionnaire is a custom entity that holds questionnaire data. By installing Woodford, you also install a customized list and form for the questionnaire entity and the Questionnaire Player. | ||
| Line 172: | Line 170: | ||
Go to the Inspections section and open the list of questionnaires. | Go to the Inspections section and open the list of questionnaires. | ||
[[File:List of questionnaires on dynamics.png|600px]] | [[File:List of questionnaires on dynamics.png|alt=Resco Inspections on Dynamics 365: Questionnaire list, form, and player: List of questionnaires on dynamics|600px]] | ||
The '''questionnaire list''' allows you to browse questionnaire templates, snippets, and answered questionnaires. | The '''questionnaire list''' allows you to browse questionnaire templates, snippets, and answered questionnaires. | ||
[[File:Dynamics list of questionnaires.png|600px]] | [[File:Dynamics list of questionnaires.png|alt=Resco Inspections on Dynamics 365: Questionnaire list, form, and player: Dynamics list of questionnaires|600px]] | ||
The '''questionnaire form''' displays the details about a template, snippet, or answered questionnaire. The form does NOT include all the questions or answers. | The '''questionnaire form''' displays the details about a template, snippet, or answered questionnaire. The form does NOT include all the questions or answers. | ||
[[File:Dynamics questionnaire form.png|600px]] | [[File:Dynamics questionnaire form.png|alt=Resco Inspections on Dynamics 365: Questionnaire list, form, and player: Dynamics questionnaire form|600px]] | ||
The '''Questionnaire Player''' is a Resco-built web resource that displays the answered questionnaire the same way as the Resco mobile app. It is accessible from the questionnaire list or form: simply click '''Run Player'''. | The '''Questionnaire Player''' is a Resco-built web resource that displays the answered questionnaire the same way as the Resco mobile app. It is accessible from the questionnaire list or form: simply click '''Run Player'''. | ||
| Line 187: | Line 185: | ||
* When you start the player for a completed answered questionnaire, you display a read-only version of the questionnaire. | * When you start the player for a completed answered questionnaire, you display a read-only version of the questionnaire. | ||
{{Note|Questionnaire Player does not support [[mobile report]]s. [[Inspections_on_Power_Platform#Limitations|Other limitations]] apply as well.}} | |||
=== Questionnaire Player (alternative access) === | |||
=== Questionnaire Player | |||
Questionnaire Player is | Questionnaire Player is integrated out-of-the-box when you install Woodford. It is available from the Questionnaire entity form as described in the previous chapter. | ||
If you are using an older version of Woodford (or for custom integrations) here's the original procedure for adding Questionnaire Player to the Questionnaire entity form as a new tab: | |||
# In Dynamics 365/CRM go to Settings > Customizations > Customize the System > Entities > Questionnaire > Forms > open the entity form where you want to insert the Questionnaire Player. | # In Dynamics 365/CRM go to Settings > Customizations > Customize the System > Entities > Questionnaire > Forms > open the entity form where you want to insert the Questionnaire Player. | ||
| Line 201: | Line 199: | ||
# Optionally, switch to the '''Formatting''' tab and change the '''Number of Rows''' to 20. Save and publish the changes. | # Optionally, switch to the '''Formatting''' tab and change the '''Number of Rows''' to 20. Save and publish the changes. | ||
[[File:46 Questionnaire Player 1.png|600px]] | [[File:46 Questionnaire Player 1.png|alt=Resco Inspections on Dynamics 365: Questionnaire Player (alternative access) 1|600px]] | ||
In Dynamics 365/CRM open any in-progress questionnaire -> switch to the Questionnaire Player tab to review and update the answered incomplete questionnaire: | In Dynamics 365/CRM open any in-progress questionnaire -> switch to the Questionnaire Player tab to review and update the answered incomplete questionnaire: | ||
[[File:47 Questionnaire Player 2.png| | [[File:47 Questionnaire Player 2.png|alt=Resco Inspections on Dynamics 365: Questionnaire Player (alternative access) 2|600px]] | ||
== Resco Inspections data structure == | == Resco Inspections data structure == | ||
To understand the data structure used to store questionnaire data, see the '''[[Resco Inspections data model]]'''. | To understand the data structure used to store questionnaire data, see the '''[[Resco Inspections data model]]'''. | ||
<!-- | |||
Currently, the standard Woodford managed solution is not customized in order to provide a user-friendly view of the Resco Inspections data structure. So there are two options available: | Currently, the standard Woodford managed solution is not customized in order to provide a user-friendly view of the Resco Inspections data structure. So there are two options available: | ||
* Customize the Resco Inspections entities – define the entity forms and views based on your requirements using the standard Dynamics 365/CRM customization tools. | * Customize the Resco Inspections entities – define the entity forms and views based on your requirements using the standard Dynamics 365/CRM customization tools. | ||
* For Dynamics 365 (online) organizations you can download a [https://www.resco.net/downloads/rescoInspectionsentities_1_0_0_0_managed.zip separate managed solution] created by Resco and import it into your organization. It contains a separate model-driven app called Resco Inspections Entities that provides a nice and comprehensive view of the Resco Inspections data structure. | * For Dynamics 365 (online) organizations you can download a [https://www.resco.net/downloads/rescoInspectionsentities_1_0_0_0_managed.zip separate managed solution] created by Resco and import it into your organization. It contains a separate model-driven app called Resco Inspections Entities that provides a nice and comprehensive view of the Resco Inspections data structure. | ||
| Line 228: | Line 224: | ||
[[File:15 Questionnaire detail.png|600px]] | [[File:15 Questionnaire detail.png|600px]] | ||
--> | |||
== Performance considerations == | == Performance considerations == | ||
Latest revision as of 20:02, 1 July 2025
Resco Inspections can be combined with your Dataverse/Dynamics 365/Dynamics CRM organization and grant you access to powerful checklists and questionnaires.
Enabling Resco Inspections
Woodford solution
To enable and use the Resco Inspections functionalities within Dynamics 365/CRM, first it is necessary to download and import the Woodford solution (Resco Suite) into your Dynamics 365/CRM instance. Woodford solution is a custom Dynamics 365/CRM managed solution developed and maintained by Resco that contains all the Resco components, including the Resco Inspections tools.
More information on how to install the latest version of Woodford into Dynamics 365/CRM can be found here.
New app project
The next step is to open the Woodford configuration tool in Dynamics 365/CRM settings and create a new app project using the “Inspector” project template – this is a project specifically designed for the inspection use case; Resco Inspections feature is already enabled here.
| Note | If you already use the Resco technology and have an existing/customized app project in Woodford, go to the next chapter to see how to enable Resco Inspections in an existing app project. |
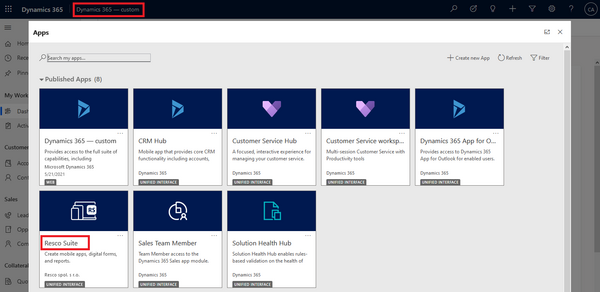
Detailed steps for Dynamics 365 Online:
- In the web browser (we suggest using Chrome) log into your Dynamics 365 organization and switch to the Resco Suite app.
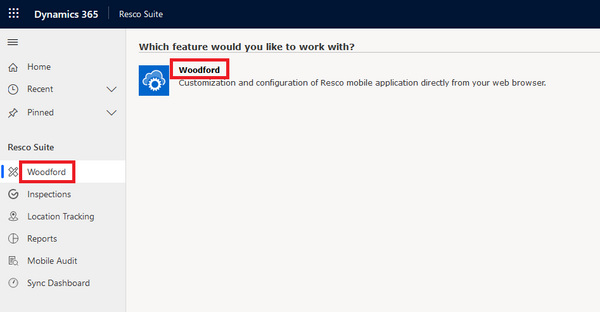
- Click Woodford to open the Woodford tool.
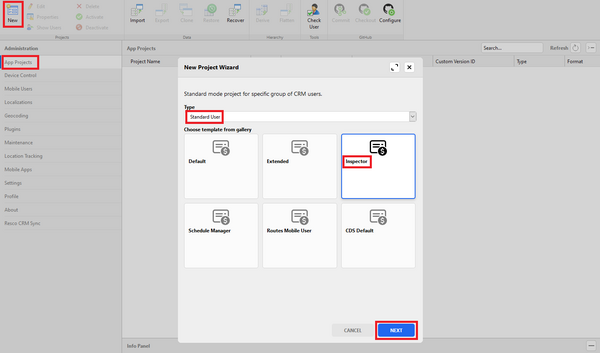
- Select App Projects from the Administration menu, then click New to start the New Project Wizard.
- In the wizard, set Type to "Standard User" and choose the Inspector template from the gallery, then click Next.
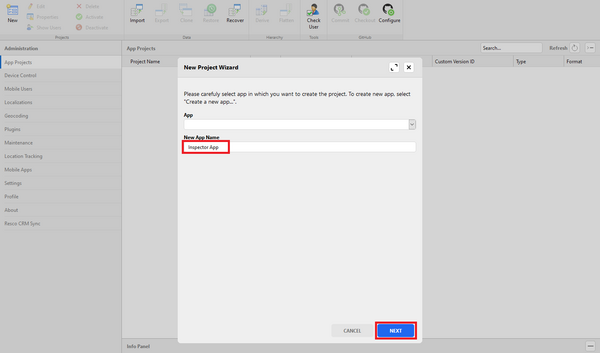
- Enter New App Name (e.g., "Inspector App") and click Next.
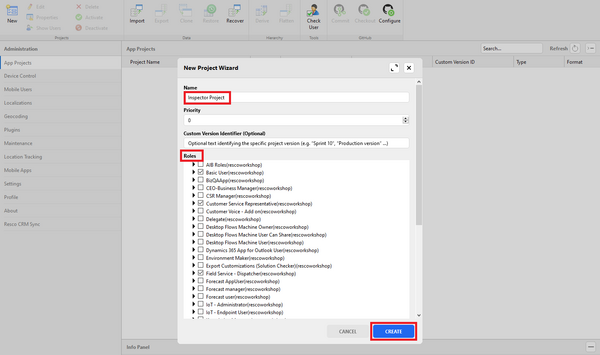
- In the last step, enter the name of your project (e.g., "Inspector Project"), select the security role(s) this project will be associated with and click Create.
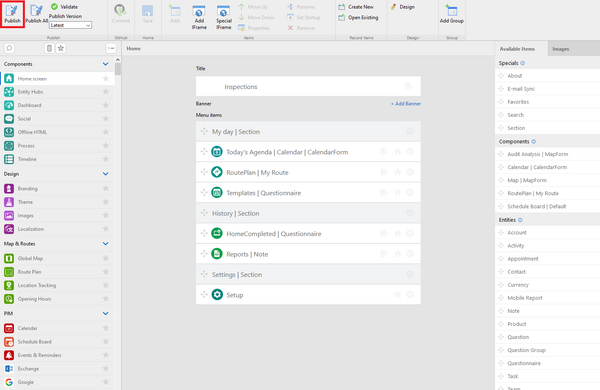
- Finally, open the new app project and publish it.


Now you can go to the Questionnaire Designer and create a questionnaire template.
Existing app project
In case you already use the Resco technology, have an existing/customized app project in Woodford, and want to enable the Resco Inspections functionality, follow these steps:
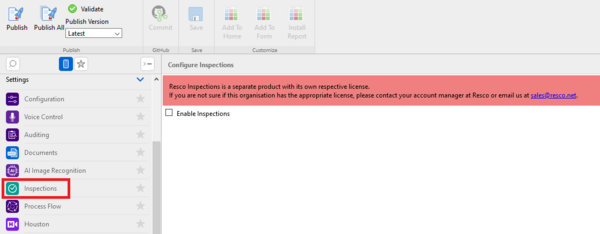
- In Woodford, edit your app project and select Inspections from the Project menu.
- Check Enable Inspections and confirm that you have the appropriate license, then click Save.
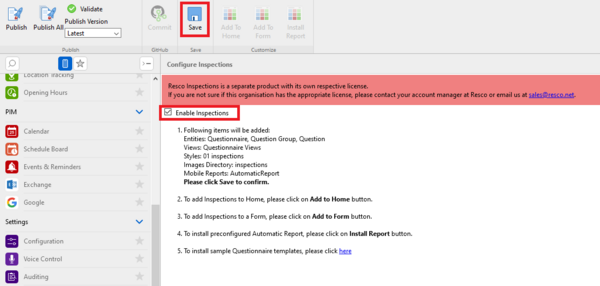
- If you want to add the Inspections section to the Home screen, click Add To Home.
- If you want to add the Inspections section to any entity form (e.g. Appointment), click Add To Form.
- If you want to install a generic Automatic Report, click Install Report.
- Optionally, install some sample questionnaire templates via the Questionnaire Designer tool.
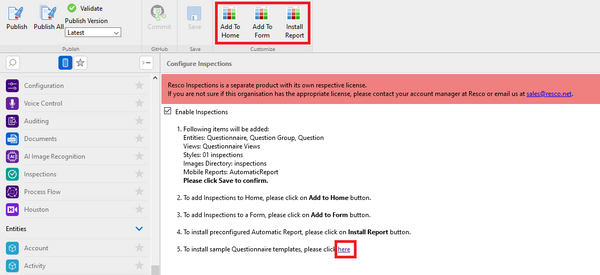
- Save all the changes and publish the app project.


Questionnaire Designer
To create your own custom inspection templates, checklists, or questionnaires, you need to open the tool called Questionnaire Designer. Just like Woodford, it is a web-based configurator tool included in the Woodford solution, so you only need a web browser (we suggest using Chrome); there is no need to install anything else.
Detailed steps for Dynamics 365 Online:
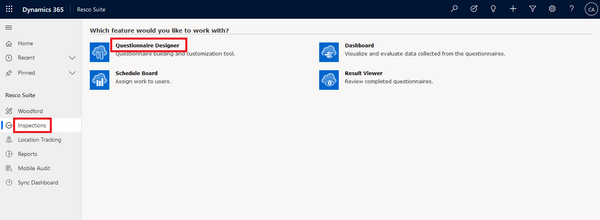
- In the web browser, log into your Dynamics 365 organization and switch to the Resco Suite app.
- Select Inspections and start the Questionnaire Designer tool.
- New window with the Questionnaire Designer opens. Click either the New button or the New Questionnaire link to start the New Questionnaire Wizard.
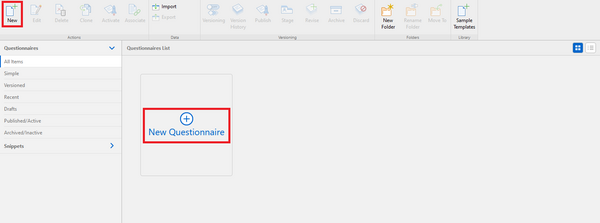
A quick overview of the Questionnaire Designer’s capabilities can be found later in this article; more comprehensive information are here. - When your finish your new template, click Save & Close.
- In the Questionnaires List select the draft of your template and click Activate.
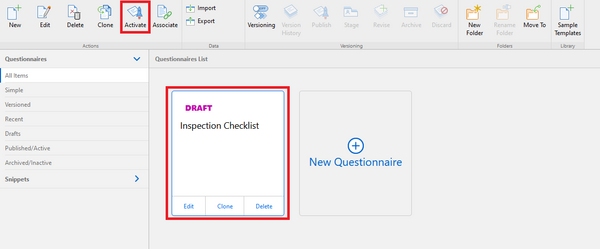


Your template is now active and ready to be used in the mobile app.
Mobile app
Finally, it is necessary to download the Resco Mobile CRM on your device via the corresponding application store and synchronize it with your Dynamics 365/CRM organization.
Designing the questionnaire
Building a new custom questionnaire template from scratch based on the specific requirements might be a complex task that requires multiple steps – we recommend you perform them in the following order:
Create structure
In general, the questionnaire template can consist of multiple root-level questions, question groups, and group-level questions. There is no limit on the number of groups or questions within the template.
The following types of components can be added to the questionnaire template (more information can be found here):
- Main: simple and repeatable groups of questions
- Static Components: their content cannot be modified by the mobile user performing the inspection
- Questions: simple and complex types of input
- Special: Regarding Lookup question is used to store the reference of the entity record from which the corresponding questionnaire has been opened by the mobile user
| Note | When adding a new group or question into your template, carefully define not only its label (i.e., what the mobile user sees in the app) but also the technical name – this must be unique within the template and will appear in the Rules Editor when building a custom business logic. |

Enable scoring
You can use the native Scoring feature to evaluate each answered questionnaire based on the value of the answers.

Define styles
To make the questionnaire more appealing to the mobile user, you can change the appearance of each question by using the Form Styles.
- create and define your custom style within the styles library
- assign the custom style to the corresponding question

Add custom business logic
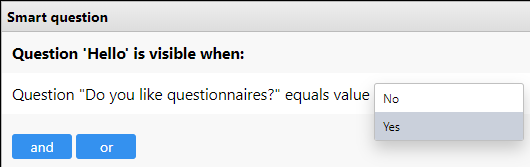
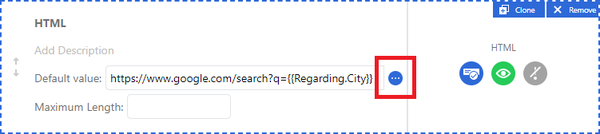
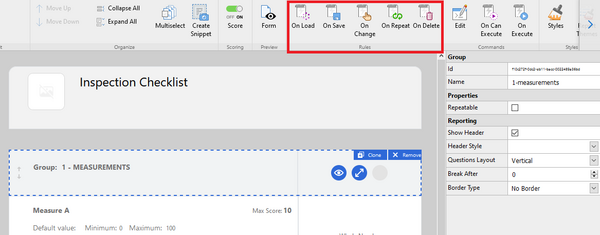
To make the questionnaire more interactive and dynamic for the mobile user, you can add a custom business logic with different levels of complexity.
- Smart question properties
- Simple rules that allow you to easily control some properties of the groups or questions
- Smart default values
- Configure a default value to save time for the inspector in the field
- Rules
- More complex root-level or group-level rules managed within the Rules Designer
- JavaScript
- The most advanced logic that cannot be covered by smart properties or rules can be written in JavaScript


Add custom commands
You can manage the existing or create new custom commands together with the custom business logic via the Commands section (more information).
Configure localization
Each questionnaire template can be translated into multiple languages (more information).
Add branding
You can brand your new questionnaire template by adding a company logo (a static component of the questionnaire) and specifying the questionnaire’s icon (in questionnaire properties).
Enable versioning
To manage different versions of the same questionnaire template and have access to its older versions, you can enable the Versioning feature (more information).
Opening the questionnaire in the mobile app
There are multiple ways how the mobile user can open the questionnaire template within the Resco mobile app; some of them require advanced customization and configuration in the Woodford project.
See Adding questionnaires to app projects for various integration options.
Mobile reports on questionnaires
Usually, as a final step of the inspection, maintenance, repair, or survey, the mobile user needs to generate an output that is shared with the customer or the back-office workers.
You can either set up your reports directly in the Questionnaire Designer together with the questionnaire template; or, for more complex use cases, use a standalone tool, Report Designer.
See Mobile reports for Resco Inspections to learn more about these approaches.
Generating reports from completed questionnaires
Generating a mobile report is easy: simply select the option Complete with a Report when finishing a questionnaire.


Reviewing questionnaires in Dynamics
Resco Inspections provide several tools that allow the back-office user to review the answered and completed questionnaires directly within the Dynamics 365/CRM user interface.
Result Viewer
Result Viewer is a web-based tool integrated into Dynamics 365/CRM that can be used by the back-office users to review the in-progress or completed questionnaires in a read-only way, filter them by different criteria, and even export the answers into CSV file.
To access the Result Viewer in Dynamics 365, in the web browser (we suggest using Chrome) log into your Dynamics 365 organization and switch to the Resco Suite app.

Go to the Inspections section and open the Result Viewer tool.

- Left panel = filter criteria
- Middle panel = list of in-progress / completed questionnaires
- Right panel = selected questionnaire (read-only)

See Results Viewer for more information.
Result Viewer on entity form
Since the Result Viewer component is a Dynamics web resource developed by Resco and included in the Woodford managed solution, it can be easily placed on any entity form in Dynamics 365/CRM and configured to display the completed questionnaires associated with the specific record.
See Adding completed questionnaires to Dynamics entity forms for instructions.
Questionnaire list, form, and player
The questionnaire is a custom entity that holds questionnaire data. By installing Woodford, you also install a customized list and form for the questionnaire entity and the Questionnaire Player.
Go to the Inspections section and open the list of questionnaires.

The questionnaire list allows you to browse questionnaire templates, snippets, and answered questionnaires.

The questionnaire form displays the details about a template, snippet, or answered questionnaire. The form does NOT include all the questions or answers.

The Questionnaire Player is a Resco-built web resource that displays the answered questionnaire the same way as the Resco mobile app. It is accessible from the questionnaire list or form: simply click Run Player.
- When you start the player from a questionnaire template, you open a brand new questionnaire instance that you can answer.
- When you start the player for an in-progress questionnaire, you can continue answering and complete the questionnaire.
- When you start the player for a completed answered questionnaire, you display a read-only version of the questionnaire.
| Note | Questionnaire Player does not support mobile reports. Other limitations apply as well. |
Questionnaire Player (alternative access)
Questionnaire Player is integrated out-of-the-box when you install Woodford. It is available from the Questionnaire entity form as described in the previous chapter.
If you are using an older version of Woodford (or for custom integrations) here's the original procedure for adding Questionnaire Player to the Questionnaire entity form as a new tab:
- In Dynamics 365/CRM go to Settings > Customizations > Customize the System > Entities > Questionnaire > Forms > open the entity form where you want to insert the Questionnaire Player.
- Go to the INSERT tab and add new one-column tab to the form. Change its label to Questionnaire Player.
- Select the newly created Questionnaire Player tab and add a web resource
resco_MobileCRM/WebClient/index.html. Enter the name and the label. - Add a custom parameter
qplayer=1check Pass record object-type code and unique identifier as parameters. - Optionally, switch to the Formatting tab and change the Number of Rows to 20. Save and publish the changes.

In Dynamics 365/CRM open any in-progress questionnaire -> switch to the Questionnaire Player tab to review and update the answered incomplete questionnaire:

Resco Inspections data structure
To understand the data structure used to store questionnaire data, see the Resco Inspections data model.
Performance considerations
If you're looking at a large-scale deployment of Resco Inspections, read about the tips and settings that can improve performance.
Custom questionnaire logic via JavaScript
You can employ Resco JavaScript Bridge to add advanced business logic to your questionnaires. See JSBridge for questionnaires to get started.