Woodford: Difference between revisions
No edit summary |
|||
| (61 intermediate revisions by the same user not shown) | |||
| Line 1: | Line 1: | ||
Woodford is a browser-based configuration tool for building and managing | {{Academy|3|Woodford Basics}} | ||
Woodford is a browser-based configuration tool for building and managing [[app projects]] using the [[Resco platform]]. It also allows you to manage connected mobile devices and licenses. | |||
== How does it work == | |||
Connect to your backend server and start Woodford. Create an app project (= a customization, i.e., the way you want the mobile app to look and work). Once you save the changes you make, these are saved on the backend server in custom Resco entities, which are created at the first start of Woodford. | |||
When you publish the project, the customization becomes active and available to be downloaded to [[Resco mobile apps]]. When the app synchronizes with your backend system (be it Microsoft Dynamics, Salesforce, Resco Cloud), it downloads the project, available for the user’s security role and downloads/uploads data. | |||
[[File:Resco Cloud.png|thumb|left|600px|A possible setup using Resco Cloud as your backend server. See [[Resco platform]] for other alternatives.|alt=Schema of Woodford, Resco Cloud, and the mobile app]] | |||
<br clear=all> | |||
== Key concepts == | == Key concepts == | ||
; Develop once | ; Develop once – deploy everywhere | ||
: The development of mobile apps | : The development of mobile apps is platform-agnostic. The apps are configured once and the same configuration is used for all platforms and devices. | ||
; Adaptable UI | ; Adaptable UI | ||
: The user interface adapts automatically to different screen sizes, formats, and aspect ratios. It looks great on a phone, on a tablet, or even in your browser. Everything is managed by Resco app and no manual customization is needed. | : The user interface adapts automatically to different screen sizes, formats, and aspect ratios. It looks great on a phone, on a tablet, or even in your browser. Everything is managed by Resco app and no manual customization is needed. | ||
== App projects == | |||
An app project is a customized version of the mobile application dedicated to a particular set of users. Woodford comes with a few predefined app project templates dedicated to particular use cases, for example. mobile sales or inspections, which you can customize. Or you can create a project from scratch: | |||
* Select the entities and fields that you want to have available in the mobile app (subset of your organization's data model). | |||
* Design the user interface using configurable building blocks. | |||
* Add business logic, essentially a set of rules and workflows that direct the interaction between user interface and data. | |||
See [[App projects]] for more information. | |||
== Availability and installation == | == Availability and installation == | ||
| Line 14: | Line 32: | ||
Using Woodford requires a SuperUser (Administrator) license. | Using Woodford requires a SuperUser (Administrator) license. | ||
=== Microsoft Dataverse / Power Apps === | |||
If you are using [[Dynamics|Microsoft Dynamics]] or Microsoft Dataverse: | |||
# Go to the [https://www.resco.net/downloads-logins/ Downloads and Logins page]. | |||
# Download the appropriate solution file, depending on your Dynamics version. | |||
# Go to https://make.powerapps.com/ and log in as a '''system administrator'''. | |||
# Select the environment where you want to install Resco Suite. | |||
# Select '''Solutions''' from the left navigation. | |||
# On the command bar, click '''Import solution''' and select the downloaded Woodford zip file.<br>[[File:Power-apps-import-solution.png|600px|alt=Import Resco Suite into Power Platform]] | |||
# When updating from an older version of Resco Suite, go to '''Advanced settings''' and select '''Upgrade'''. | |||
# Finish the import wizard. | |||
# Publish all customizations. | |||
See your Dataverse or Dynamics documentation for more information about uploading solution packages or publishing customizations. | |||
==== Microsoft Dynamics (legacy UI) ==== | |||
If you are using older [[Dynamics|Microsoft Dynamics]] user interface: | |||
# Go to the [https://www.resco.net/downloads-logins/ Downloads and Logins page]. | |||
# Go to | # Download the appropriate solution file, depending on your Dynamics version. | ||
# | # Log in to Dynamics as a '''system administrator'''. | ||
# Go to '''Settings > Customization > Solutions'''.<br>[[File:Install-solutions-on-legacy-dynamics-ui.png|600px|alt=Install Resco Suite to Dynamics]] | |||
# | # Click '''Import''' and select the downloaded Woodford zip file. | ||
# Finish the import wizard. | |||
# Go to | # Publish all customizations. | ||
# Click '''Import''' and select the downloaded Woodford zip file. | # Reload the Dynamics webpage (often, this can be accomplished by pressing F5). | ||
# Finish the import wizard | |||
Woodford is now available in the CRM Settings, under MobileCRM section. | Woodford is now available in the CRM Settings, under MobileCRM section. | ||
See your Dynamics documentation for more information about uploading solution packages or publishing customizations. | |||
==== Updating Woodford ==== | ==== Updating Woodford ==== | ||
| Line 36: | Line 68: | ||
If you need to update your Woodford solution to a new version, we recommend the following: | If you need to update your Woodford solution to a new version, we recommend the following: | ||
* First, back up your Woodford projects. | * First, back up your Woodford projects. | ||
* Use the procedure for new installation; however, you need to perform an additional step during the solution import wizard. Dynamics detects that the solution package contains an update for a solution that is already installed. Select '''Maintain customizations (recommended)'''. | * Use the [[Woodford#Availability_and_installation|procedure for new installation]]; however, you need to perform an additional step during the solution import wizard. Dynamics detects that the solution package contains an update for a solution that is already installed. Select '''Maintain customizations (recommended)'''. | ||
==== Uninstalling Woodford ==== | ==== Uninstalling Woodford ==== | ||
To uninstall Woodford from Dynamics, | To uninstall Woodford from Dynamics: | ||
# Optionally, back up your projects using the '''Export''' function in Woodford. | |||
# Optionally, back up data in your custom Resco entities. | |||
# If you are using [[Plugins]] (N:N Relationship, Delete, Owner), deactivate them for each entity. | |||
# Remove the Woodford solution file. | |||
{{Note|All projects and records in <code>resco_</code> entities are removed. | If you encounter a problem while removing the solution, the log file can often explain what went wrong. Check also [https://learn.microsoft.com/en-us/power-platform/alm/removing-dependencies Microsoft documentation about removing dependencies]. | ||
{{Note|All projects and records in <code>resco_</code> entities are removed. You lose app projects, mobile reports, questionnaires, mobile audit data.}} | |||
==== Roles and permissions ==== | |||
Here's an overview of the different Dynamics roles that can access Woodford. | |||
* A '''system administrator''' role is necessary to install Woodford. | |||
* Users with the '''system customizer''' role have almost the same privileges as admins. One notable exception is that they cannot create new app projects. | |||
* Users with the '''Resco MobileCRM Administrator (resco system admin)''' role can also work with Woodford, however, the role comes with no entity permissions. Usually, these users should have also different role(s) with access to project entities (resco_mobileproject, resco_mobileprojectitem, ...) and business entities (account, contact, ...). | |||
=== Resco Cloud === | === Resco Cloud === | ||
If you are using | If you are using [[Resco Cloud]], Woodford does not require any installation. | ||
* Log in to your [[ | * Log in to your organization on Resco Cloud. | ||
* From the [[Resco_Cloud#Resco_Cloud_landing_page|landing page]], Select '''Tools & Settings > Woodford''' from the menu. | |||
=== Salesforce === | === Salesforce === | ||
If you are using Salesforce, Woodford does not require any installation. | If you are using [[Salesforce]], Woodford does not require any installation. Use the production or sandbox links below to access the latest version. | ||
# Go to Woodford download page: [https://www.resco.net/woodford-overview/ www.resco.net/woodford-overview]. | # Go to Woodford download page: [https://www.resco.net/woodford-overview/ www.resco.net/woodford-overview]. | ||
# Select the appropriate Salesforce version: | # Select the appropriate Salesforce version: | ||
#* For production use, click '''Woodford for Salesforce - Production'''. | #* For production use, click '''Woodford for Salesforce - Production''' ([https://salesforce.resco.net/ direct link]). | ||
#* For sandbox environment, click '''Woodford for Salesforce - Sandbox'''. | #* For sandbox environment, click '''Woodford for Salesforce - Sandbox''' ([https://salesforce-test.resco.net/ direct link]). | ||
# Log in to Salesforce. | # Log in to Salesforce to open the [[Resco for Salesforce]] landing page. | ||
# Select '''Woodford'''. | # Select '''Woodford'''. | ||
By default, Woodford works only with standard Salesforce objects and fields after its first connection with Resco. All you need to do is to sync the solution with all the custom objects and settings you have in your existing organization. Click '''Update''' and wait while your custom settings are downloaded to Woodford. | By default, Woodford works only with standard Salesforce objects and fields after its first connection with Resco. All you need to do is to sync the solution with all the custom objects and settings you have in your existing organization. Click '''Update''' and wait while your custom settings are downloaded to Woodford. | ||
Some Salesforce objects are not available in Woodford by default. See [[Salesforce object blacklist]] for more information. Requires [[Resco managed package]]. | |||
=== Upgrading from Silverlight version of Woodford === | |||
The former standalone version of Woodford based on Microsoft Silverlight technology is no longer supported or updated. Instead, use Woodford HTML, a web-based tool. From the user's perspective, the main benefits of the new version are: | |||
* Speed: You no longer need to load the entire project to work with its parts (views, forms). | |||
* Collaboration: HTML Woodford supports collaboration directly. More users can work on different parts of the same project. | |||
* Access: Woodford is now accessible from any modern [[browser]]. We recommend Google Chrome, but you can now even try from Apple computers (or even on mobile devices, despite the user experience is not great yet). | |||
* Projects are no longer stored as note attachments, so bulk delete of attachments, or using Azure Blob Store plugins are no longer an issue. | |||
The transition between Woodford Silverlight and HTML should be smooth, there are no known issues with HTML Woodford. | |||
# Upgrade the Woodford solution as described above. | |||
# Just like for any regular upgrades, we recommend exporting all projects for backup. | |||
# When you open a project in Woodford HTML for the first time, the project is upgraded to use [[App_projects#Format|a new format]]. Remember to save all changes and publish the project. | |||
== User interface == | == User interface == | ||
[[File:Woodford.png|thumb|right|400px|Woodford main screen]] | [[File:Woodford.png|thumb|right|400px|Woodford main screen|alt=Woodford main screen]] | ||
The main screen of the application has the following three sections: | The main screen of the application has the following three sections: | ||
* Administration menu in on the left side of the screen. Use Administration menu to access different functions of the application. | * '''Administration''' menu in on the left side of the screen. Use Administration menu to access different functions of the application. | ||
* Main menu or toolbar is in top section of the application. The buttons and settings in the toolbar depend on the function selected in the Administration menu. | * Main menu or '''toolbar''' is in top section of the application. The buttons and settings in the toolbar depend on the function selected in the Administration menu. | ||
* The main pane of Woodford displays content depending on what's selected in the Administration menu. | * The main, central pane of Woodford displays content depending on what's selected in the Administration menu. | ||
=== Administration menu === | === Administration menu === | ||
This menu allows you to access the following functions. Depending on your CRM server and configuration, some functions might be unavailable. | This menu allows you to access the following functions. Depending on your CRM server and configuration, some functions might be unavailable. | ||
* [[App projects]] | * [[App projects]] – manage and design app projects | ||
* [[Device control]] | * [[Device control]] – manage devices using your projects | ||
* [[Mobile users]] | * [[Mobile users]] – manage users and licenses | ||
* [[Localizations]] | * [[Localizations]] – manage languages available in the mobile app, create a new translation or tweak existing | ||
* [[Plugins]] (Dynamics only) | * [[Plugins]] (Dynamics only) – manage entities controlled by Delete plugin | ||
* [[Maintenance]] (Dynamics only) | * [[Maintenance]] (Dynamics only) – manage mobile audit and tracking data | ||
* [[Geocoding]] | * [[Geocoding]] – add latitude and longitude to records | ||
* [[Location tracking]] - configure when and how to track the location of mobile users | * [[Location tracking]] / [[Location-based services]] – configure when and how to track the location of mobile users | ||
* [[Custom mobile apps|Mobile apps]] | * [[Custom mobile apps|Mobile apps]] – set up your own branded applications and ask Resco to build them | ||
* [[Settings]] | * [[Settings]] – configure licensing options and user options | ||
* [[Profile]] | * [[Profile]] – update your user profile | ||
* [[About]] – display information about Woodford | |||
* [[About]] | * [[Resco CRM sync]] – create a copy of your Microsoft Dynamics data in [[Resco Cloud]] | ||
* [[Resco CRM sync]] | |||
{{Note|While the Woodford is in the evaluation period, Mobile Users menu is not available, as the number of mobile users during the trial period is not limited.}} | {{Note|While the Woodford is in the evaluation period, Mobile Users menu is not available, as the number of mobile users during the trial period is not limited.}} | ||
| Line 94: | Line 154: | ||
When you use Woodford, the Administration menu can be replaced by submenus or other panes. To return to the Administration menu, use the left arrow (back) button in the top left corner of the app. | When you use Woodford, the Administration menu can be replaced by submenus or other panes. To return to the Administration menu, use the left arrow (back) button in the top left corner of the app. | ||
=== | === AI assistant === | ||
Click the help button in the top-right corner to access a help chatbot that can answer your questions about Resco technology using information from the Resco wiki and Resco Academy. | |||
[[File:AI-assistant-in-Woodford.png|400px|alt=AI assistant in woodford]] | |||
=== Command-line interface === | |||
In addition to the graphical user interface, Woodford offers a command-line interface. See [[Woodford CLI]] for more information. | |||
== Quick start == | |||
# Click '''New''' to create a new [[app project]]. You are designing what should be included in your new mobile app customization. | |||
# Set up the [[App_projects#Project_properties|properties]] of your new project. Most notably, select one of the predefined project templates, enter a name, and select one or more roles. | |||
# Set up various options in the [[App_projects#Project_menu|Project menu]]: | |||
#* [[Data model in mobile apps|Manage your mobile data model]]: decide which entities and fields should be available in the app. | |||
* [[ | #* Design [[view]]s for your entities. Views are used to display the list of records, for example, your contacts. | ||
* [[ | #* Design [[form]]s for your entities. Forms are used to display the details of a particular record, for example, a single contact. | ||
* [[ | #* Design [[Home screen]] to customize the start menu of your app. | ||
* [[ | # Click '''Save''' to save all changes. | ||
# Click '''Publish''' to upload your project to a custom entity on the backend server. | |||
# Users of [[Resco mobile apps]] can now [[Connecting to CRM|connect to the server]] to download the new app project along with organization data. | |||
{{Feedback}} | |||
[[Category:Woodford]] | [[Category:Woodford]] | ||
Latest revision as of 09:05, 22 May 2025

Woodford is a browser-based configuration tool for building and managing app projects using the Resco platform. It also allows you to manage connected mobile devices and licenses.
How does it work
Connect to your backend server and start Woodford. Create an app project (= a customization, i.e., the way you want the mobile app to look and work). Once you save the changes you make, these are saved on the backend server in custom Resco entities, which are created at the first start of Woodford.
When you publish the project, the customization becomes active and available to be downloaded to Resco mobile apps. When the app synchronizes with your backend system (be it Microsoft Dynamics, Salesforce, Resco Cloud), it downloads the project, available for the user’s security role and downloads/uploads data.

Key concepts
- Develop once – deploy everywhere
- The development of mobile apps is platform-agnostic. The apps are configured once and the same configuration is used for all platforms and devices.
- Adaptable UI
- The user interface adapts automatically to different screen sizes, formats, and aspect ratios. It looks great on a phone, on a tablet, or even in your browser. Everything is managed by Resco app and no manual customization is needed.
App projects
An app project is a customized version of the mobile application dedicated to a particular set of users. Woodford comes with a few predefined app project templates dedicated to particular use cases, for example. mobile sales or inspections, which you can customize. Or you can create a project from scratch:
- Select the entities and fields that you want to have available in the mobile app (subset of your organization's data model).
- Design the user interface using configurable building blocks.
- Add business logic, essentially a set of rules and workflows that direct the interaction between user interface and data.
See App projects for more information.
Availability and installation
An HTML version of Woodford is available on all major platforms and browsers, including Mac OS and the Safari web browser. Former stand-alone application is no longer updated.
Using Woodford requires a SuperUser (Administrator) license.
Microsoft Dataverse / Power Apps
If you are using Microsoft Dynamics or Microsoft Dataverse:
- Go to the Downloads and Logins page.
- Download the appropriate solution file, depending on your Dynamics version.
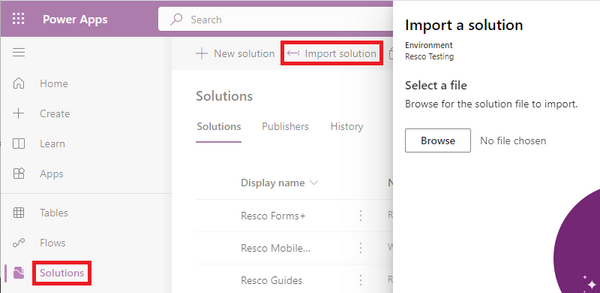
- Go to https://make.powerapps.com/ and log in as a system administrator.
- Select the environment where you want to install Resco Suite.
- Select Solutions from the left navigation.
- On the command bar, click Import solution and select the downloaded Woodford zip file.
- When updating from an older version of Resco Suite, go to Advanced settings and select Upgrade.
- Finish the import wizard.
- Publish all customizations.

See your Dataverse or Dynamics documentation for more information about uploading solution packages or publishing customizations.
Microsoft Dynamics (legacy UI)
If you are using older Microsoft Dynamics user interface:
- Go to the Downloads and Logins page.
- Download the appropriate solution file, depending on your Dynamics version.
- Log in to Dynamics as a system administrator.
- Go to Settings > Customization > Solutions.
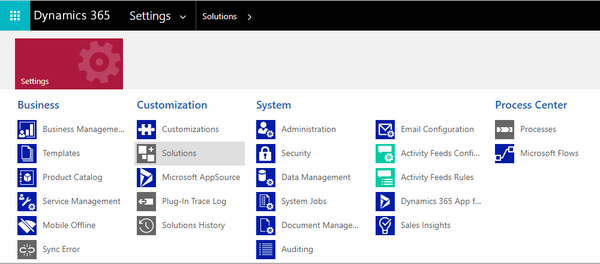
- Click Import and select the downloaded Woodford zip file.
- Finish the import wizard.
- Publish all customizations.
- Reload the Dynamics webpage (often, this can be accomplished by pressing F5).

Woodford is now available in the CRM Settings, under MobileCRM section.
See your Dynamics documentation for more information about uploading solution packages or publishing customizations.
Updating Woodford
If you need to update your Woodford solution to a new version, we recommend the following:
- First, back up your Woodford projects.
- Use the procedure for new installation; however, you need to perform an additional step during the solution import wizard. Dynamics detects that the solution package contains an update for a solution that is already installed. Select Maintain customizations (recommended).
Uninstalling Woodford
To uninstall Woodford from Dynamics:
- Optionally, back up your projects using the Export function in Woodford.
- Optionally, back up data in your custom Resco entities.
- If you are using Plugins (N:N Relationship, Delete, Owner), deactivate them for each entity.
- Remove the Woodford solution file.
If you encounter a problem while removing the solution, the log file can often explain what went wrong. Check also Microsoft documentation about removing dependencies.
| Note | All projects and records in resco_ entities are removed. You lose app projects, mobile reports, questionnaires, mobile audit data.
|
Roles and permissions
Here's an overview of the different Dynamics roles that can access Woodford.
- A system administrator role is necessary to install Woodford.
- Users with the system customizer role have almost the same privileges as admins. One notable exception is that they cannot create new app projects.
- Users with the Resco MobileCRM Administrator (resco system admin) role can also work with Woodford, however, the role comes with no entity permissions. Usually, these users should have also different role(s) with access to project entities (resco_mobileproject, resco_mobileprojectitem, ...) and business entities (account, contact, ...).
Resco Cloud
If you are using Resco Cloud, Woodford does not require any installation.
- Log in to your organization on Resco Cloud.
- From the landing page, Select Tools & Settings > Woodford from the menu.
Salesforce
If you are using Salesforce, Woodford does not require any installation. Use the production or sandbox links below to access the latest version.
- Go to Woodford download page: www.resco.net/woodford-overview.
- Select the appropriate Salesforce version:
- For production use, click Woodford for Salesforce - Production (direct link).
- For sandbox environment, click Woodford for Salesforce - Sandbox (direct link).
- Log in to Salesforce to open the Resco for Salesforce landing page.
- Select Woodford.
By default, Woodford works only with standard Salesforce objects and fields after its first connection with Resco. All you need to do is to sync the solution with all the custom objects and settings you have in your existing organization. Click Update and wait while your custom settings are downloaded to Woodford.
Some Salesforce objects are not available in Woodford by default. See Salesforce object blacklist for more information. Requires Resco managed package.
Upgrading from Silverlight version of Woodford
The former standalone version of Woodford based on Microsoft Silverlight technology is no longer supported or updated. Instead, use Woodford HTML, a web-based tool. From the user's perspective, the main benefits of the new version are:
- Speed: You no longer need to load the entire project to work with its parts (views, forms).
- Collaboration: HTML Woodford supports collaboration directly. More users can work on different parts of the same project.
- Access: Woodford is now accessible from any modern browser. We recommend Google Chrome, but you can now even try from Apple computers (or even on mobile devices, despite the user experience is not great yet).
- Projects are no longer stored as note attachments, so bulk delete of attachments, or using Azure Blob Store plugins are no longer an issue.
The transition between Woodford Silverlight and HTML should be smooth, there are no known issues with HTML Woodford.
- Upgrade the Woodford solution as described above.
- Just like for any regular upgrades, we recommend exporting all projects for backup.
- When you open a project in Woodford HTML for the first time, the project is upgraded to use a new format. Remember to save all changes and publish the project.
User interface

The main screen of the application has the following three sections:
- Administration menu in on the left side of the screen. Use Administration menu to access different functions of the application.
- Main menu or toolbar is in top section of the application. The buttons and settings in the toolbar depend on the function selected in the Administration menu.
- The main, central pane of Woodford displays content depending on what's selected in the Administration menu.
This menu allows you to access the following functions. Depending on your CRM server and configuration, some functions might be unavailable.
- App projects – manage and design app projects
- Device control – manage devices using your projects
- Mobile users – manage users and licenses
- Localizations – manage languages available in the mobile app, create a new translation or tweak existing
- Plugins (Dynamics only) – manage entities controlled by Delete plugin
- Maintenance (Dynamics only) – manage mobile audit and tracking data
- Geocoding – add latitude and longitude to records
- Location tracking / Location-based services – configure when and how to track the location of mobile users
- Mobile apps – set up your own branded applications and ask Resco to build them
- Settings – configure licensing options and user options
- Profile – update your user profile
- About – display information about Woodford
- Resco CRM sync – create a copy of your Microsoft Dynamics data in Resco Cloud
| Note | While the Woodford is in the evaluation period, Mobile Users menu is not available, as the number of mobile users during the trial period is not limited. |
When you use Woodford, the Administration menu can be replaced by submenus or other panes. To return to the Administration menu, use the left arrow (back) button in the top left corner of the app.
AI assistant
Click the help button in the top-right corner to access a help chatbot that can answer your questions about Resco technology using information from the Resco wiki and Resco Academy.

Command-line interface
In addition to the graphical user interface, Woodford offers a command-line interface. See Woodford CLI for more information.
Quick start
- Click New to create a new app project. You are designing what should be included in your new mobile app customization.
- Set up the properties of your new project. Most notably, select one of the predefined project templates, enter a name, and select one or more roles.
- Set up various options in the Project menu:
- Manage your mobile data model: decide which entities and fields should be available in the app.
- Design views for your entities. Views are used to display the list of records, for example, your contacts.
- Design forms for your entities. Forms are used to display the details of a particular record, for example, a single contact.
- Design Home screen to customize the start menu of your app.
- Click Save to save all changes.
- Click Publish to upload your project to a custom entity on the backend server.
- Users of Resco mobile apps can now connect to the server to download the new app project along with organization data.
{{#CI form: title = Was this information helpful? How can we improve?
| type = inputs
| [textarea]
}}