Button Click: Difference between revisions
| (10 intermediate revisions by 2 users not shown) | |||
| Line 1: | Line 1: | ||
{{Rules TOC}} | {{Rules TOC}} | ||
<span style="float:left; padding-right:10px">[[File:Button Click.PNG|100 px]]</span> | <span style="float:left; padding-right:10px">[[File:Button Click.PNG|alt=button icon|100 px]]</span> | ||
Rules are client-side scripts (no-code [[business logic]]) that are executed when a user of the mobile app interacts with the app. The '''Button Click rules''' are executed when a row button is clicked. Rules are managed using the [[rules editor]], usually in [[Woodford]]. | Rules are client-side scripts (no-code [[business logic]]) that are executed when a user of the mobile app interacts with the app. The '''Button Click rules''' are executed when a row button is clicked. Rules are managed using the [[rules editor]], usually in [[Woodford]]. | ||
{{clear|left}} | {{clear|left}} | ||
| Line 24: | Line 24: | ||
These two examples, showcase custom buttons on the account form. | These two examples, showcase custom buttons on the account form. | ||
[[File:New order appointment onform.PNG|400px]] | [[File:New order appointment onform.PNG|alt=button in the app showcase|400px]] | ||
First, we click Add button and fill in the name of the button (Click text, Label): | First, we click Add button and fill in the name of the button (Click text, Label): | ||
[[File:AddButton icon.PNG]] [[File:Button description.PNG]]. | [[File:AddButton icon.PNG|alt=AddButton icon]] [[File:Button description.PNG|alt=button properties]]. | ||
Then, set up a '''Button Click''' rule. | Then, set up a '''Button Click''' rule. | ||
Changeditem is the button's item binding (set in properties). We create a variable that will be a new instance of order or appointment and assign the customer id from the account. In the end, we open a new appointment/order record. | Changeditem is the button's item binding (set in properties). We create a variable that will be a new instance of order or appointment and assign the customer id from the account. In the end, we open a new appointment/order record. | ||
[[File:New order appointment.PNG|600px]] | [[File:New order appointment.PNG|alt=Create a new order button and create a new appointment button examples|600px]] | ||
You can fill out the new forms further. In the new order, we set the account's address as the shipping address. | You can fill out the new forms further. In the new order, we set the account's address as the shipping address. | ||
[[File:Buttonclick orderupdated.PNG|600px]] | [[File:Buttonclick orderupdated.PNG|alt=create a new order button example where we fill more fields|600px]] | ||
In the new appointment, we add the date of creation and name of the appointment by concatenating "Meeting with:" and the account's primary contact. | In the new appointment, we add the date of creation and name of the appointment by concatenating "Meeting with:" and the account's primary contact. | ||
[[File:Buttonclick appointmentupdated.PNG|600px]] | [[File:Buttonclick appointmentupdated.PNG|alt=create a new appointment button example where we fill more fields|600px]] | ||
=== OpenForm with JSON options === | |||
Note that the [[Rules_editor#openForm|OpenForm operation]] allows specifying options in JSON format. For example, you can use the following syntax: | |||
<code>{ "@initialize": { "name": "MyOrder", "discountamount": "100" } }</code> | |||
The opened form is not marked as "dirty". You can use the @dirty parameter to override this behavior. | |||
[[File:Specify-dirty-in-openform.png|600px|alt=mark form dirty when using openform]] | |||
== Example: start questionnaire by clicking the button== | == Example: start questionnaire by clicking the button== | ||
| Line 49: | Line 59: | ||
If the button is clicked, we fetch questionnaire template which is published and its name equals "Equipment checkup". If this fetch contains data, the questionnaire is opened. | If the button is clicked, we fetch questionnaire template which is published and its name equals "Equipment checkup". If this fetch contains data, the questionnaire is opened. | ||
[[File:ButtonClick inspection.PNG|600px]] | [[File:ButtonClick inspection.PNG|alt=start inspection button example|600px]] | ||
Used Fetch: | Used Fetch: | ||
[[File:ButtonClick inspection fetch.PNG|600px]] | [[File:ButtonClick inspection fetch.PNG|alt=start inspection button example: fetching the questionnaire|600px]] | ||
To see the rule execution in the app, click [https://www.youtube.com/watch?v=o7lOC-qD1xw here]. | To see the rule execution in the app, click [https://www.youtube.com/watch?v=o7lOC-qD1xw here]. | ||
| Line 59: | Line 69: | ||
== Example: Save and close form == | == Example: Save and close form == | ||
In this example, we execute a simple JavaScript function from rules that saves and closes the current form. | In this example, we [[Execute JavaScript from rules|execute a simple JavaScript function from rules]] that saves and closes the current form. | ||
# Add an offline HTML file to your form with the following script (taken straight from our [https://github.com/Resconet/JSBridge/wiki/MobileCRM.UI.EntityForm.saveAndClose GitHub wiki]).<br><syntaxhighlight lang="js"> | # Add an offline HTML file to your form with the following script (taken straight from our [https://github.com/Resconet/JSBridge/wiki/MobileCRM.UI.EntityForm.saveAndClose GitHub wiki]).<br><syntaxhighlight lang="js"> | ||
function saveAndCloseForm() { | function saveAndCloseForm() { | ||
| Line 70: | Line 80: | ||
}, null); | }, null); | ||
}</syntaxhighlight> | }</syntaxhighlight> | ||
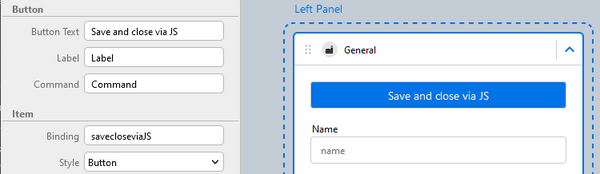
# Add a button to your form.<br>[[File:Save and close via JS.png|600px]] | # Add a button to your form.<br>[[File:Save and close via JS.png|alt=save and close form via js button example|600px]] | ||
# Add a button click rule. In the example below, "funwithforms" refers to the name of the script file.<br>[[File:Save and close via JS - rule.png|600px]] | # Add a button click rule. In the example below, "funwithforms" refers to the name of the script file.<br>[[File:Save and close via JS - rule.png|alt=alt=save and close form via js button example 2|600px]] | ||
{{Feedback}} | |||
Latest revision as of 11:16, 7 February 2025
| Rules and examples |
|---|
|
 Rules are client-side scripts (no-code business logic) that are executed when a user of the mobile app interacts with the app. The Button Click rules are executed when a row button is clicked. Rules are managed using the rules editor, usually in Woodford.
Button Click rules are available on the:
- Views
- Forms (requires release 12.2)
- Questionnaires (requires release 14.1)
Button Click variables
- Handled
- If false (default) the standard behavior is executed after the rule. If True, it is skipped.
Handled Assign False
- DirectEdit
- Controls how the changes to the entity are handled (if there are any).
- True and the entity is dirty after the rule executes, the entity is saved to storage (OnSave rule is run).
- False, if a property is changed the ChangeRule is run and the entity is added to the list of dirty entities to be saved on user command.
- Null (not-set, default), changes are ignored.
Example: create a new order or appointment
These two examples, showcase custom buttons on the account form.
![]()
First, we click Add button and fill in the name of the button (Click text, Label):
![]()
 .
.
Then, set up a Button Click rule. Changeditem is the button's item binding (set in properties). We create a variable that will be a new instance of order or appointment and assign the customer id from the account. In the end, we open a new appointment/order record.

You can fill out the new forms further. In the new order, we set the account's address as the shipping address.

In the new appointment, we add the date of creation and name of the appointment by concatenating "Meeting with:" and the account's primary contact.

OpenForm with JSON options
Note that the OpenForm operation allows specifying options in JSON format. For example, you can use the following syntax:
{ "@initialize": { "name": "MyOrder", "discountamount": "100" } }
The opened form is not marked as "dirty". You can use the @dirty parameter to override this behavior.

Example: start questionnaire by clicking the button
Clicking the Inspections button opens up a new questionnaire.
If the button is clicked, we fetch questionnaire template which is published and its name equals "Equipment checkup". If this fetch contains data, the questionnaire is opened.

Used Fetch:

To see the rule execution in the app, click here.
Example: Save and close form
In this example, we execute a simple JavaScript function from rules that saves and closes the current form.
- Add an offline HTML file to your form with the following script (taken straight from our GitHub wiki).
function saveAndCloseForm() {
	MobileCRM.UI.EntityForm.requestObject(function (entityForm) {
		/// <param name="entityForm" type="MobileCRM.UI.EntityForm"/>
		if (entityForm)
			MobileCRM.UI.EntityForm.saveAndClose();
	}, function (err) {
		MobileCRM.bridge.alert("An error occurred: " + err);
	}, null);
}
- Add a button to your form.
- Add a button click rule. In the example below, "funwithforms" refers to the name of the script file.


{{#CI form: title = Was this information helpful? How can we improve?
| type = inputs
| [textarea]
}}