Integrations: Difference between revisions
| (5 intermediate revisions by 2 users not shown) | |||
| Line 16: | Line 16: | ||
# Click '''New'''. | # Click '''New'''. | ||
# Name your integration and select which connector to use. | # Name your integration and select which connector to use. | ||
# Depending on the selected connector, enter the necessary connection details.<br>[[File:Create a new integration.png]] | # Depending on the selected connector, enter the necessary connection details.<br>[[File:Create a new integration.png|alt=Edit integration connection window]] | ||
# Click '''Save'''. | # Click '''Save'''. | ||
| Line 32: | Line 32: | ||
# In the table below, select the fields that you want to import or export (enable the checkbox in the first column) and then select the matching '''Local Field'''. | # In the table below, select the fields that you want to import or export (enable the checkbox in the first column) and then select the matching '''Local Field'''. | ||
# Additional configuration might be necessary for fields with the local type "Lookup": | # Additional configuration might be necessary for fields with the local type "Lookup": | ||
#* For Business Central integration, [[Business_Central#How_to_define_relations_between_entities|follow the instructions]] how to define relations. | #* For Business Central integration, [[Business_Central#How_to_define_relations_between_entities.3F|follow the instructions]] how to define relations. | ||
#* For Resco Cloud integration, in general, no additional configuration is necessary. | #* For Resco Cloud integration, in general, no additional configuration is necessary. | ||
# If you plan to set up regular synchronization, select '''Sync Direction''': Download Only, Upload Only, or Bidirectional. | # If you plan to set up regular synchronization, select '''Sync Direction''': Download Only, Upload Only, or Bidirectional. | ||
| Line 39: | Line 39: | ||
You can repeat these steps for additional external entities as needed. | You can repeat these steps for additional external entities as needed. | ||
[[File:Mapping of entity fields.png|600px]] | [[File:Mapping of entity fields.png|alt=Map metadata: Mapping of entity fields|600px]] | ||
=== Clean up metadata === | === Clean up metadata === | ||
| Line 54: | Line 54: | ||
Optionally, you might want to restrict what data to sync. For each entity, you can define a separate set of conditions for upload and download. Only records that match the condition are synchronized. Click '''Download Filter''' or '''Upload Filter''' and enter a suitable condition, then click '''Save & Close'''. | Optionally, you might want to restrict what data to sync. For each entity, you can define a separate set of conditions for upload and download. Only records that match the condition are synchronized. Click '''Download Filter''' or '''Upload Filter''' and enter a suitable condition, then click '''Save & Close'''. | ||
[[File:Sync filter in integrations.png|600px]] | [[File:Sync filter in integrations.png|alt=Sync filter in integrations|600px]] | ||
== Import/export data == | == Import/export data == | ||
| Line 67: | Line 67: | ||
{{Note|Preview does not respect the selected primary key.}} | {{Note|Preview does not respect the selected primary key.}} | ||
[[File:Import data preview.png|600px]] | [[File:Import data preview.png|alt=Import/export data: Import data preview|600px]] | ||
Sample migration result: <code>RESULTS: ALL (15) : IMPORTED (13); UPDATED (2); FAILED (0).</code> In this case, 13 records were imported (created), 2 records were updated, no records failed. | Sample migration result: <code>RESULTS: ALL (15) : IMPORTED (13); UPDATED (2); FAILED (0).</code> In this case, 13 records were imported (created), 2 records were updated, no records failed. | ||
| Line 83: | Line 83: | ||
* Start the [[Admin Console]]. | * Start the [[Admin Console]]. | ||
* Select '''Processes Center > Processes''' from the menu. | * Select '''Processes Center > Processes''' from the menu. | ||
* Click '''New''' to create a new process.<br>[[File:Nightly sync job.png|350px]] | * Click '''New''' to create a new process.<br>[[File:Nightly sync job.png|alt=Synchronize data: Nightly sync job|350px]] | ||
* Save all changes and activate the process. | * Save all changes and activate the process. | ||
| Line 91: | Line 91: | ||
;Export Entity / Import Entity: Alternatively, you can export/import mapping for a single entity. | ;Export Entity / Import Entity: Alternatively, you can export/import mapping for a single entity. | ||
== Update schema == | |||
The metadata or schema of connected third-party systems can change over time. Select a connection and click '''Update Schema''' (toolbar button) to update metadata. | |||
== Use cases == | == Use cases == | ||
| Line 98: | Line 102: | ||
=== Business Central === | === Business Central === | ||
The integration with Microsoft Dynamics 365 Business Central is described in a [[ | The integration with Microsoft Dynamics 365 Business Central is described in a [[Connect Resco Cloud to Business Central|separate article]]. | ||
=== Dynamics === | === Dynamics === | ||
| Line 104: | Line 108: | ||
The following applies when using Integrations for connecting to [[Dynamics|Microsoft Dynamics 365]]: | The following applies when using Integrations for connecting to [[Dynamics|Microsoft Dynamics 365]]: | ||
* Use the OData connector. | * Use the OData connector. | ||
* As the URL, use <code><nowiki>https://{organization name} | * As the URL, use <code><nowiki>https://{organization name}.crm4.dynamics.com/api/data/v9.2/</nowiki></code>.<br>You can verify this on your Dynamics server: go to '''Settings > Customizations > Developer Resources''' and look for '''Service Root URL'''. | ||
* If you're using multi-factor authentication, follow the instructions in the connection log: Go to <code><nowiki>https://microsoft.com/devicelogin</nowiki></code> and enter the provided code. | * If you're using multi-factor authentication, follow the instructions in the connection log: Go to <code><nowiki>https://microsoft.com/devicelogin</nowiki></code> and enter the provided code. | ||
* Field mapping - a general guideline: Pay special attention when mapping fields. The system will attempt to suggest a matching field (based on name), however, it's not foolproof. Consider this example of the Primary Contact ID field on the Account entity: rather than the string field use the unique identifier field. | * Field mapping - a general guideline: Pay special attention when mapping fields. The system will attempt to suggest a matching field (based on name), however, it's not foolproof. Consider this example of the Primary Contact ID field on the Account entity: rather than the string field use the unique identifier field. | ||
: [[File:Primary contact mapping.png|600px]] | : [[File:Primary contact mapping.png|alt=Dynamics: Primary contact mapping|600px]] | ||
== Technical information == | == Technical information == | ||
Latest revision as of 08:40, 14 November 2024
| Integration with third-party systems |
|---|
|
Resco CRM Connector (web APIs):
|
The Integrations function of Woodford allows you to connect your Resco Cloud organization to various systems using connectors (Resco Cloud, Dynamics, OData). Match entities and fields between the two servers and exchange data. Configured connections can be used in Resco Cloud jobs and workflows to automate sync process.
| Note | Integrations are available since release 14.1 as a preview. Contact us if you want to help us shape this function to better match your needs. |
Available connectors
The following connectors are available:
- OData: Connect to any server that supports the Open Data Protocol (OData v4), including Microsoft Dynamics 365 Business Central.
- Resco Cloud: Connect to another organization residing on one of the various cloud servers of Resco (including Resco Inspections, Resco Routes, etc.).
Create integration
You can manage your connections to other servers from the Administration menu of Woodford: Start Woodford and select Integrations (Preview) from the menu.
- Click New.
- Name your integration and select which connector to use.
- Depending on the selected connector, enter the necessary connection details.
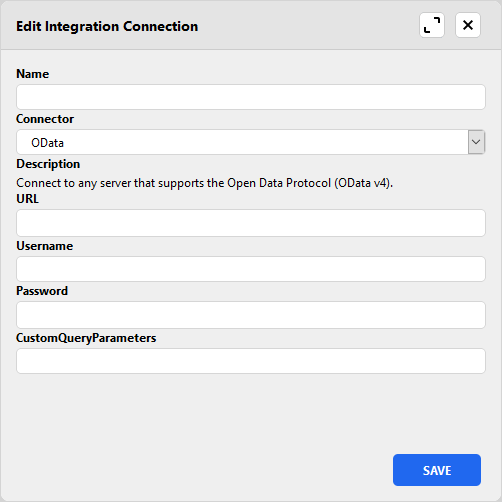
- Click Save.

If you are connecting to Business Central, some settings are configured by default:
- Default mapping will be added. In the preview, only three entities are officially supported: account, contact, and work order.
- Based on default mapping, External Primary Key fields will be added to the schema.
Map metadata
As the next step, you need to map external entities to local entities and external fields to local fields.
- Double-click a connection (created in the previous section).
- Select an entity from the External Entities pane and click Enable.
- In the Entity Mapping pane, select the matching Local Entity and optionally the Primary Key.
- In the table below, select the fields that you want to import or export (enable the checkbox in the first column) and then select the matching Local Field.
- Additional configuration might be necessary for fields with the local type "Lookup":
- For Business Central integration, follow the instructions how to define relations.
- For Resco Cloud integration, in general, no additional configuration is necessary.
- If you plan to set up regular synchronization, select Sync Direction: Download Only, Upload Only, or Bidirectional.
- Save all changes.
You can repeat these steps for additional external entities as needed.

Clean up metadata
Administrators of the backend servers can occasionally modify the metadata, either on the local or on the external server. New entities or fields are not a problem. What can affect the integration is when a certain entity or field used in integration is removed.
When you open a connection, Woodford checks whether the configured mapping is still valid. If this validation finds some missing entities or fields, a warning message is displayed with the recommended actions.
- If an external entity or field goes missing, click Clean Up to remove it from the mapping.
- If a local entity or field goes missing, select a new local entity/field.
- If the Primary Key field goes missing, consider setting up a new primary key.
Set up data filters
Optionally, you might want to restrict what data to sync. For each entity, you can define a separate set of conditions for upload and download. Only records that match the condition are synchronized. Click Download Filter or Upload Filter and enter a suitable condition, then click Save & Close.

Import/export data
Once the mapping is done, you can start using the integration for migrating data.
- Click Download or Upload.
- Optionally, click Import Preview to verify that you are migrating the right data. Previews do not make any changes on either server.
- Click Import or Export to conclude the migration.
- Wait for the migration result.
| Note | Preview does not respect the selected primary key. |

Sample migration result: RESULTS: ALL (15) : IMPORTED (13); UPDATED (2); FAILED (0). In this case, 13 records were imported (created), 2 records were updated, no records failed.
Synchronize data
While importing or exporting data is basically one-and-done, synchronization is used in scenarios where you need to keep up the two environments in sync continuously.
| Warning | When you run sync for the first time, local data for the affected entities are deleted. |
The first sync is full sync (all data downloaded); later synchronizations are incremental (only changes are transferred). See Synchronization for more information about this process in general. The article is written mostly from the perspective of syncing client (mobile app) and server, but many concepts also apply to the integration sync.
Click Sync in the toolbar to start the sync manually. Or, more likely, you might wish to schedule the sync to run regularly as a server process:
- Start the Admin Console.
- Select Processes Center > Processes from the menu.
- Click New to create a new process.
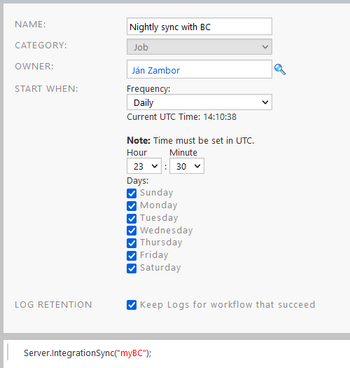
- Save all changes and activate the process.

Import/export mapping
- Export / Import
- If you have multiple similar organizations where you want to reuse an integration, you can export the entire mapping configuration to a file and then import it to a different organization.
- Export Entity / Import Entity
- Alternatively, you can export/import mapping for a single entity.
Update schema
The metadata or schema of connected third-party systems can change over time. Select a connection and click Update Schema (toolbar button) to update metadata.
Use cases
Some integrations have certain prerequisites and require additional configuration to work.
Business Central
The integration with Microsoft Dynamics 365 Business Central is described in a separate article.
Dynamics
The following applies when using Integrations for connecting to Microsoft Dynamics 365:
- Use the OData connector.
- As the URL, use
https://{organization name}.crm4.dynamics.com/api/data/v9.2/.
You can verify this on your Dynamics server: go to Settings > Customizations > Developer Resources and look for Service Root URL. - If you're using multi-factor authentication, follow the instructions in the connection log: Go to
https://microsoft.com/deviceloginand enter the provided code. - Field mapping - a general guideline: Pay special attention when mapping fields. The system will attempt to suggest a matching field (based on name), however, it's not foolproof. Consider this example of the Primary Contact ID field on the Account entity: rather than the string field use the unique identifier field.

Technical information
When you first create an Integrations connector, these following entities are added to the organization's metadata:
- integration_log: stores sync logs
- integration_syncanchor: stores the last version number of the record that was downloaded
- integration_transaction: stores information about upload transactions