Working hours: Difference between revisions
No edit summary |
|||
| (6 intermediate revisions by the same user not shown) | |||
| Line 1: | Line 1: | ||
'''Working hours''' is a feature that allows you to configure the working hours of your resources. On the [[Schedule Board]], this restricts the time interval for scheduling tasks to this resource. | '''Working hours''' is a feature that allows you to configure the working hours of your resources. On the [[Schedule Board]], this restricts the time interval for scheduling tasks to this resource. | ||
== Prepare the necessary tables and columns == | == Prepare the necessary tables and columns == | ||
| Line 14: | Line 12: | ||
: This table has a lookup column to the Working Hours table. Create only one record in this table. The lookup defines your company's default working hours. | : This table has a lookup column to the Working Hours table. Create only one record in this table. The lookup defines your company's default working hours. | ||
: <small>On Resco Cloud, the entity is called Company settings (fs_settings).</small> | : <small>On Resco Cloud, the entity is called Company settings (fs_settings).</small> | ||
[[File:Working-hours-on-dataverse.png|600px|alt=tables needed for the working hours feature on dataverse]] | |||
;Resource table with a lookup to Working Hours | ;Resource table with a lookup to Working Hours | ||
| Line 35: | Line 35: | ||
: Add the column to your form. | : Add the column to your form. | ||
== Define working hours == | Finally, add these tables to your [[home screen]] so that you can enter the data. | ||
[[File:Working-hours-home-screen.png|alt=Add tables necessary for working hours configuration to your app project]] | |||
== Define working hours in the app == | |||
First, use the mobile app to define the working hours. Create a new working hours record and add the hours. | |||
: [[File:How-to-define-working-hours-in-the-app.png|600px|alt=Define working hours in the app]] | |||
: Add multiple sets of working hours for different users. | |||
Next, select one of the working hour records as the company default. | |||
:[[File:How-to-define-company-default-working-hours.png|600px|alt=Define company-default working hours in thee app]] | |||
:Even if you keep the lookup field empty, you can use other fields like "Start Of Day" (specify the number of minutes since midnight) and "Working Day Duration" (again, in minutes) to define the hours. | |||
Finally, you can assign working hours to your resources. | |||
:[[File:How-to-define-assign-working-hours-to-resources.png|600px|alt=Assign working hours to resource records]] | |||
:Resources without specific working hours assigned fall back to company default. | |||
=== Working hours editor === | |||
When you create a form for the Working hours table in Woodford, the form automatically includes an editor. | When you create a form for the Working hours table in Woodford, the form automatically includes an editor. | ||
[[File:Working hours editor.png|400px|alt= | : [[File:Working-hours-editor-features.png|400px|alt=how to use the working hours editor in the app]] | ||
: Use the plus button to add a new range of working hours. Use the x button to delete it. Use the clone button to copy working hours from a different day. | |||
: Set a day to "Unavailable" if you don't want to work on that day. Set it to "Inherited" to fall back to company default / hardcoded values for that day. | |||
The hours are stored in the "Data" field in JSON format. The numbers are in minutes. Don't edit the "Data" field directly; when you save the record, values from the custom editor overwrite the "Data" field. | |||
You can also create a standard form for this table in Dataverse. In this case, no special editor appears. You can work with the Data column directly. We recommend using the editor in Resco mobile apps. | |||
<syntaxhighlight lang="JSON"> | <syntaxhighlight lang="JSON"> | ||
| Line 72: | Line 97: | ||
</syntaxhighlight> | </syntaxhighlight> | ||
== | == Working hours in action == | ||
If everything is properly configured, you can see the working hours highlighted in the Schedule Board timetable. Note that Luke's working hours are different from other team members. | |||
[[File:Schedule board timetable.png|600px|alt=Schedule board timetable with working hours]] | |||
{{Feedback}} | |||
[[Category:Resco Field Service]] | [[Category:Resco Field Service]] | ||
Latest revision as of 06:49, 4 December 2023
Working hours is a feature that allows you to configure the working hours of your resources. On the Schedule Board, this restricts the time interval for scheduling tasks to this resource.
Prepare the necessary tables and columns
The following two tables are necessary for this feature. On Dataverse, install a recent version of Woodford to make them available in your organization.
- SB Working Hours (resco_fs_workinghours)
- Each record corresponds to a different set of weekly working hours. You can define multiple working hours, each with a different name.
- On Resco Cloud, the entity is called Working hours (fs_workinghours).
- SB Settings (resco_fs_settings)
- This table has a lookup column to the Working Hours table. Create only one record in this table. The lookup defines your company's default working hours.
- On Resco Cloud, the entity is called Company settings (fs_settings).

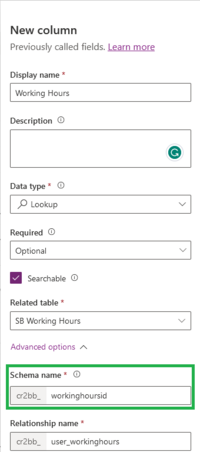
- Resource table with a lookup to Working Hours
- Additionally, designate a table that corresponds to your Schedule Board resources (i.e., the people responsible for a particular activity). This can be a standard table, for example, System User, or a custom table. In either case, this table must include a lookup column to the Working Hours table, called "workinghoursid". This allows you to select working hours for each resource.

Enable the tables in Woodford
Start Woodford and enable the necessary tables and columns. Also, create Woodford views and forms for these tables.
- SB Settings
- Enable the columns First Day Of Week, Start Of Day, Working Day Duration, Working Hours, Working Weekends.
- Create a view and a form for this table. The only necessary column is "Name". The form will automatically include the working hours editor.
- SB Working Hours
- Enable the column Data.
- Create a view and a form for this table. Include the SB Working Hours lookup column on the form.
- Resource table
- Enable the new column (SB Working Hours lookup).
- Add the column to your form.
Finally, add these tables to your home screen so that you can enter the data.

Define working hours in the app
First, use the mobile app to define the working hours. Create a new working hours record and add the hours.
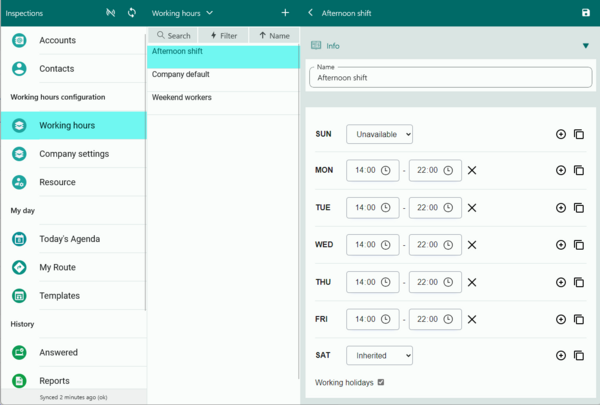
- Add multiple sets of working hours for different users.

Next, select one of the working hour records as the company default.
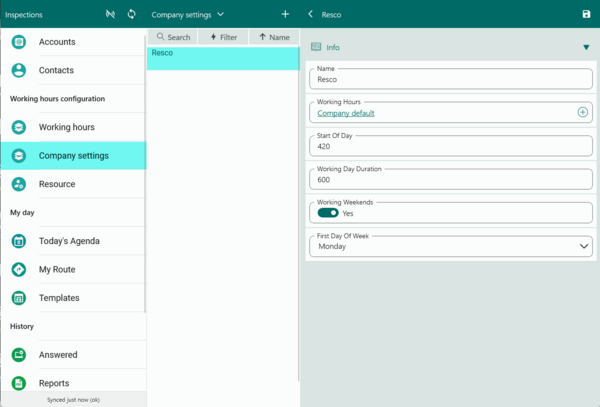
- Even if you keep the lookup field empty, you can use other fields like "Start Of Day" (specify the number of minutes since midnight) and "Working Day Duration" (again, in minutes) to define the hours.

Finally, you can assign working hours to your resources.

- Resources without specific working hours assigned fall back to company default.

Working hours editor
When you create a form for the Working hours table in Woodford, the form automatically includes an editor.
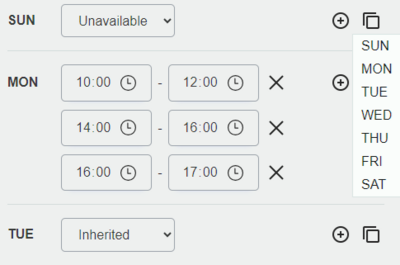
- Use the plus button to add a new range of working hours. Use the x button to delete it. Use the clone button to copy working hours from a different day.
- Set a day to "Unavailable" if you don't want to work on that day. Set it to "Inherited" to fall back to company default / hardcoded values for that day.

The hours are stored in the "Data" field in JSON format. The numbers are in minutes. Don't edit the "Data" field directly; when you save the record, values from the custom editor overwrite the "Data" field.
You can also create a standard form for this table in Dataverse. In this case, no special editor appears. You can work with the Data column directly. We recommend using the editor in Resco mobile apps.
{
  "workingHours": [
    [],
    [
      {
        "start": 480,
        "end": 780
      },
      {
        "start": 840,
        "end": 1140
      }
    ],
    [
      {
        "start": 480,
        "end": 960
      }
    ],
    [],
    [],
    [],
    null
  ],
  "workingHolidays": false
}
Working hours in action
If everything is properly configured, you can see the working hours highlighted in the Schedule Board timetable. Note that Luke's working hours are different from other team members.

{{#CI form: title = Was this information helpful? How can we improve? | type = inputs | [textarea] }}