Select Form: Difference between revisions
No edit summary |
|||
| (One intermediate revision by one other user not shown) | |||
| Line 6: | Line 6: | ||
{{clear|left}} | {{clear|left}} | ||
[[File:Select form rule.png]] | [[File:Select form rule.png|alt=Select Form rule in Woodford list of views, forms and charts]] | ||
Unlike most rules, Select Form rules are listed directly on the '''Mobile Views, Forms and Charts''' screen. To delete a Select Form rule, select FormSelectRule and click '''Delete'''. | Unlike most rules, Select Form rules are listed directly on the '''Mobile Views, Forms and Charts''' screen. To delete a Select Form rule, select FormSelectRule and click '''Delete'''. | ||
| Line 24: | Line 24: | ||
== Example: Select a different form for customer and potential customer account== | == Example: Select a different form for customer and potential customer account== | ||
In this example, we prepare two forms—one for the Customer account and the second for the Potential customer account. | In this example, we prepare two forms—one for the Customer account and the second for the Potential customer account. | ||
| Line 30: | Line 29: | ||
Go to Admin control, Entities, and click on the Account entity. Create a new Option set field called Account level. Add two options: Customer and Potential customer. | Go to Admin control, Entities, and click on the Account entity. Create a new Option set field called Account level. Add two options: Customer and Potential customer. | ||
[[File:AccountlevelAdminConsole.PNG|600px]] | [[File:AccountlevelAdminConsole.PNG|600px|alt=select form example: create field for differentiating account types in admin console]] | ||
Now, we can prepare a specific form for each account type. | Now, we can prepare a specific form for each account type. | ||
<gallery mode= nolines widths=300px heights=400px> | <gallery mode= nolines widths=300px heights=400px> | ||
File:CustomerSelectFoem.PNG|Customer | File:CustomerSelectFoem.PNG|Customer|alt=select form example: sample form for "customer" | ||
File:PotentionalCustomerSelectFoem.PNG|Potential customer | File:PotentionalCustomerSelectFoem.PNG|Potential customer|alt=select form example: sample form for "potential customer" | ||
</gallery> | </gallery> | ||
Finally, set up the Select Form rule. If the Account level contains data, start the value-checking branch. If the account level equals Customer, assign Customer form. If the account level contains a Potential customer, assign a Potentialcustomer form. | Finally, set up the Select Form rule. If the Account level contains data, start the value-checking branch. If the account level equals Customer, assign Customer form. If the account level contains a Potential customer, assign a Potentialcustomer form. | ||
[[File:SelectForm.PNG|600px]] | [[File:SelectForm.PNG|600px|alt=select form example: rule that applies the correct form]] | ||
== Error: no form displayed == | == Error: no form displayed == | ||
Latest revision as of 09:59, 14 November 2023
| Rules and examples |
|---|
|
 The Select Form rules are triggered when a form is about to be displayed. They let you set up which form is used for a particular record. For example, the form when creating a new record can display only a subset of fields. Once the record is saved, the full form is displayed instead.
Select Form rules are managed in Woodford, on the list of Mobile Views, Forms and Charts of an entity.

Unlike most rules, Select Form rules are listed directly on the Mobile Views, Forms and Charts screen. To delete a Select Form rule, select FormSelectRule and click Delete.
| Note | Due to architectural constraints, Select Form rules are not supported for Sales detail entities (such as OpportunityLineItem, OrderItem, QuoteLineItem, DealItem). This applies to all platforms (Salesforce, Dynamics, Resco Cloud). As a workaround, you can use multiple form tabs and show/hide them using On Load rules. In older versions of Woodford, it used to be possible to configure Select Form rules for these entities, but the rules did not work. |
Example of a simple select form rule
| If Condition | Entity.statecode | Equals | Active |
| Then Step | FormName | Assign | MyActiveForm |
| Else Then Step | FormName | Assign | MyInactiveForm |
Example: Select a different form for customer and potential customer account
In this example, we prepare two forms—one for the Customer account and the second for the Potential customer account.
First, we have to create a custom field to differentiate between Customer and Potential customer accounts. Go to Admin control, Entities, and click on the Account entity. Create a new Option set field called Account level. Add two options: Customer and Potential customer.

Now, we can prepare a specific form for each account type.
-
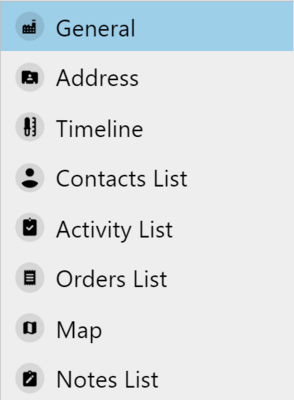 Customer
 -
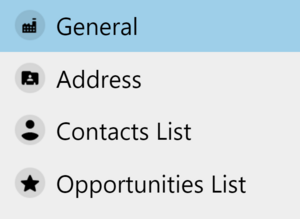 Potential customer


Finally, set up the Select Form rule. If the Account level contains data, start the value-checking branch. If the account level equals Customer, assign Customer form. If the account level contains a Potential customer, assign a Potentialcustomer form.

Error: no form displayed
If your select form rule is malformed and no form is specified, the app does not display any form. Instead, the app displays an error message that the configured 'FormSelectRule' does not set any FormName.
See also
{{#CI form: title = Was this information helpful? How can we improve?
| type = inputs
| [textarea]
}}