Deep dive: Combined entity form

Traditionally, entity forms display details about a single entity record. One notable exception is common in field service scenarios, where the work order form and the bookable resource booking form are often combined into a single form. Resco Mobile CRM offers support for combined entity form in field service out of the box. Would it be possible to create custom combined forms?
Possible solutions
Resco Mobile CRM does not directly support designing a form for two entities or embedding a portion of one form into another one. However, there are several ways to accomplish similar behavior, with varying degrees of complexity. In these examples, we assume that one of the two entities is primary, where most of the action happens, while the other is mostly here for convenience, often read-only, providing extra information so that users don't have to navigate away from the main form.
- Use shared variables to display fields from the related entity.
- Usually, this approach would be read-only; modifying the shared variables and saving changes to the related entity would bring extra complexity.
- Create a custom view of the related entity and add it to the form
- Add an unrelated list to the form, displaying only a single record.
- Use Resco JavaScript Bridge to add a custom iframe to the main form.
- Here, the degree of control over the related entity depends on the skill of the JavaScript developer. Custom development is very powerful but can be expensive.
In the examples below, we are working with the standard entities Account and Contact. We want to enhance the Contact form with information about the parent account record.
Combined form using editable view
A list of associated or unrelated records is a standard component that you can add to forms. In this approach, we create a custom view for the parent account that displays exactly one record. We make it larger and editable to fit all the necessary fields. Finally, we add it to the form.
Create a new view for the parent entity
- Edit an app project in Woodford and go to the Account entity.
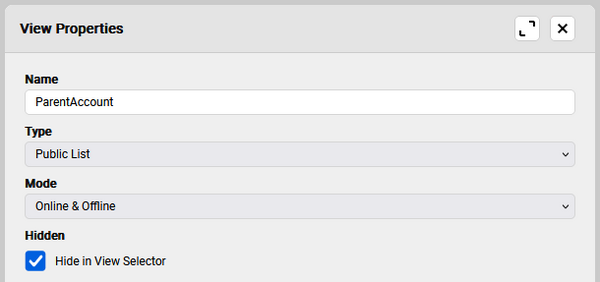
- Create a new view. Let’s hide it in the view selector. Users cannot select such views manually; they are only used when explicitly selected in Woodford.
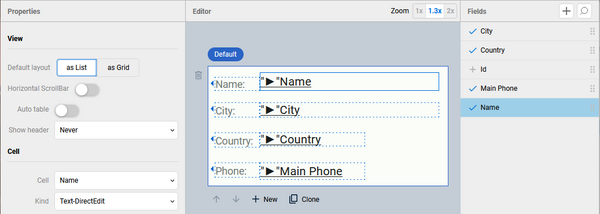
- Add some extra height to the row to display all the fields that you need.
- Add additional cells for labels (set Type to "Constant" and enter the label).
- If you want to make the cells editable, change the Kind to "Text-DirectEdit".
- Click Multi Select and disable it. This is just to prevent unexpected behavior in the view when users tap and hold.
- The standard behavior for views is that when you tap any row, the record's form is displayed. If you want to disable the behavior, click Button Click and use the following rule:

- Save and close the view.


Add view to form
- Go to the Contact entity and edit its form.
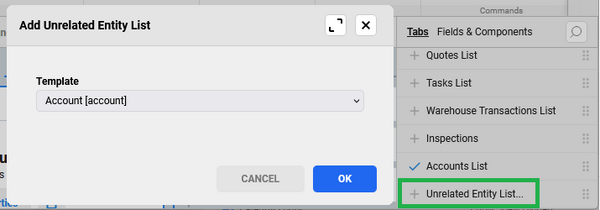
- Add an unrelated entity list to the form and select the Account entity.
- Select the new list and on the Properties pane, enter a suitable Name, e.g. "Parent account". Set the Height to "1" - just tall enough to display one record.
- Expand the new list and click Properties. In the Unrelated Tab Properties, select the view you created in the previous step. Click Edit Filter and select the right record to display.
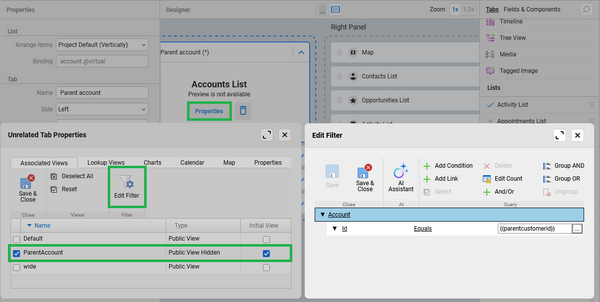
- To ensure that the list shows the correct Account record when you change the Contact's parent on the form, add an On Change rule.
- Save all changes and publish the project.


Behavior in the app
In this approach, users can edit the parent account details directly from the contact form. Changes to the account are saved immediately (thanks to Kind set to "Text-DirectEdit"). The Save button saves changes to the contact details. If you want edits to the parent account trigger On Change events for the contact form, enable Trigger OnChange event for the list.
We have dealt with some of the possible pitfalls that you can encounter, e.g. multi-selection of view records or the tap behavior. Additional things you might want to disable are flipping the list into a map/calendar or creating new account records from the list. See Associated tab properties > Properties tab.
Extra work can be done to make sure the rules are ready for all possible scenarios. (Hint: They are not.) Update the rules to handle cases where the lookup to the parent is empty. This can happen when you first open the form, or when the user clears the lookup.
A different approach to enriching your form with details from another entity is to use shared variables. On the Contact form, initialize a shared variable of the type "Entity", fill it with data of the parent Account, and you can add the Account fields to your form. One important thing to remember is that changes to the shared variable are not saved.
Displaying fields of the parent Account
- Edit an app project in Woodford and go to the Contact entity.
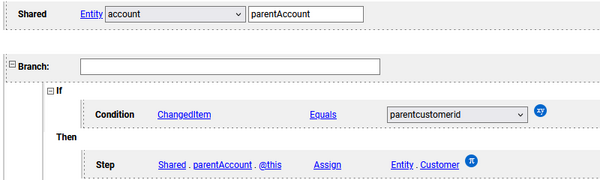
- Click On Change.
- Define a new shared variable of the type "Entity". Have it point to the Account entity.
- Fill the variable with the target of the parent customer lookup. Remember, On Change rules are executed after the form first loads, and also when the appropriate trigger changes.
- Note that the Fields & Components pane now includes fields of the shared variable. Add the necessary fields to your form.
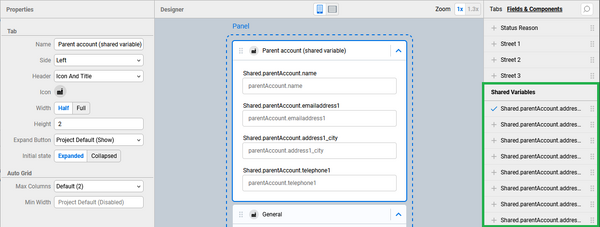


This variant of combined forms is easy to set up. The style of the parent fields automatically matches standard form fields: app users might not even realize the difference. This looks good, but it's actually bad, particularly because the behavior is different. Shared variable fields are not saved along with the Contact fields.

Making the fields read-only
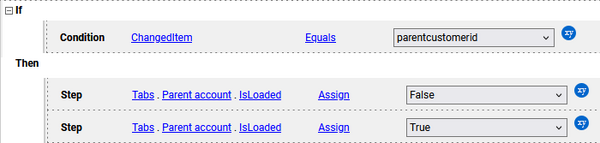
One way to solve the problem is to make the fields or the card with the shared variable fields read-only. For example, the following rule prevents users from changing the values in the tab.
![]()
This is a valid approach and a recommended way to display fields from a different entity on a form.
But wait: what if...?
You can write an On Save rule that saves the Account fields along with the Contact.

Why is this a bad idea?
- Changes in the Account fields do not trigger On Change rules.
- Save action only triggers when any of the contact fields are changed. If you only change the account fields, the contact form does not register as dirty, and the save action merely closes the form without saving.
How can it be salvaged?
- When loading the Contact form, make the Account fields read-only.
- Add a custom "Edit" button to the Account fields. On click, this button would enable the Account fields, then disappear, and mark the form as dirty.
- Save action can now consistently save Account fields.
- The problem with On Change not triggering for Account fields is not solved.